A sample text widget
Etiam pulvinar consectetur dolor sed malesuada. Ut convallis
euismod dolor nec pretium. Nunc ut tristique massa.
Nam sodales mi vitae dolor ullamcorper et vulputate enim accumsan.
Morbi orci magna, tincidunt vitae molestie nec, molestie at mi. Nulla nulla lorem,
suscipit in posuere in, interdum non magna.
|
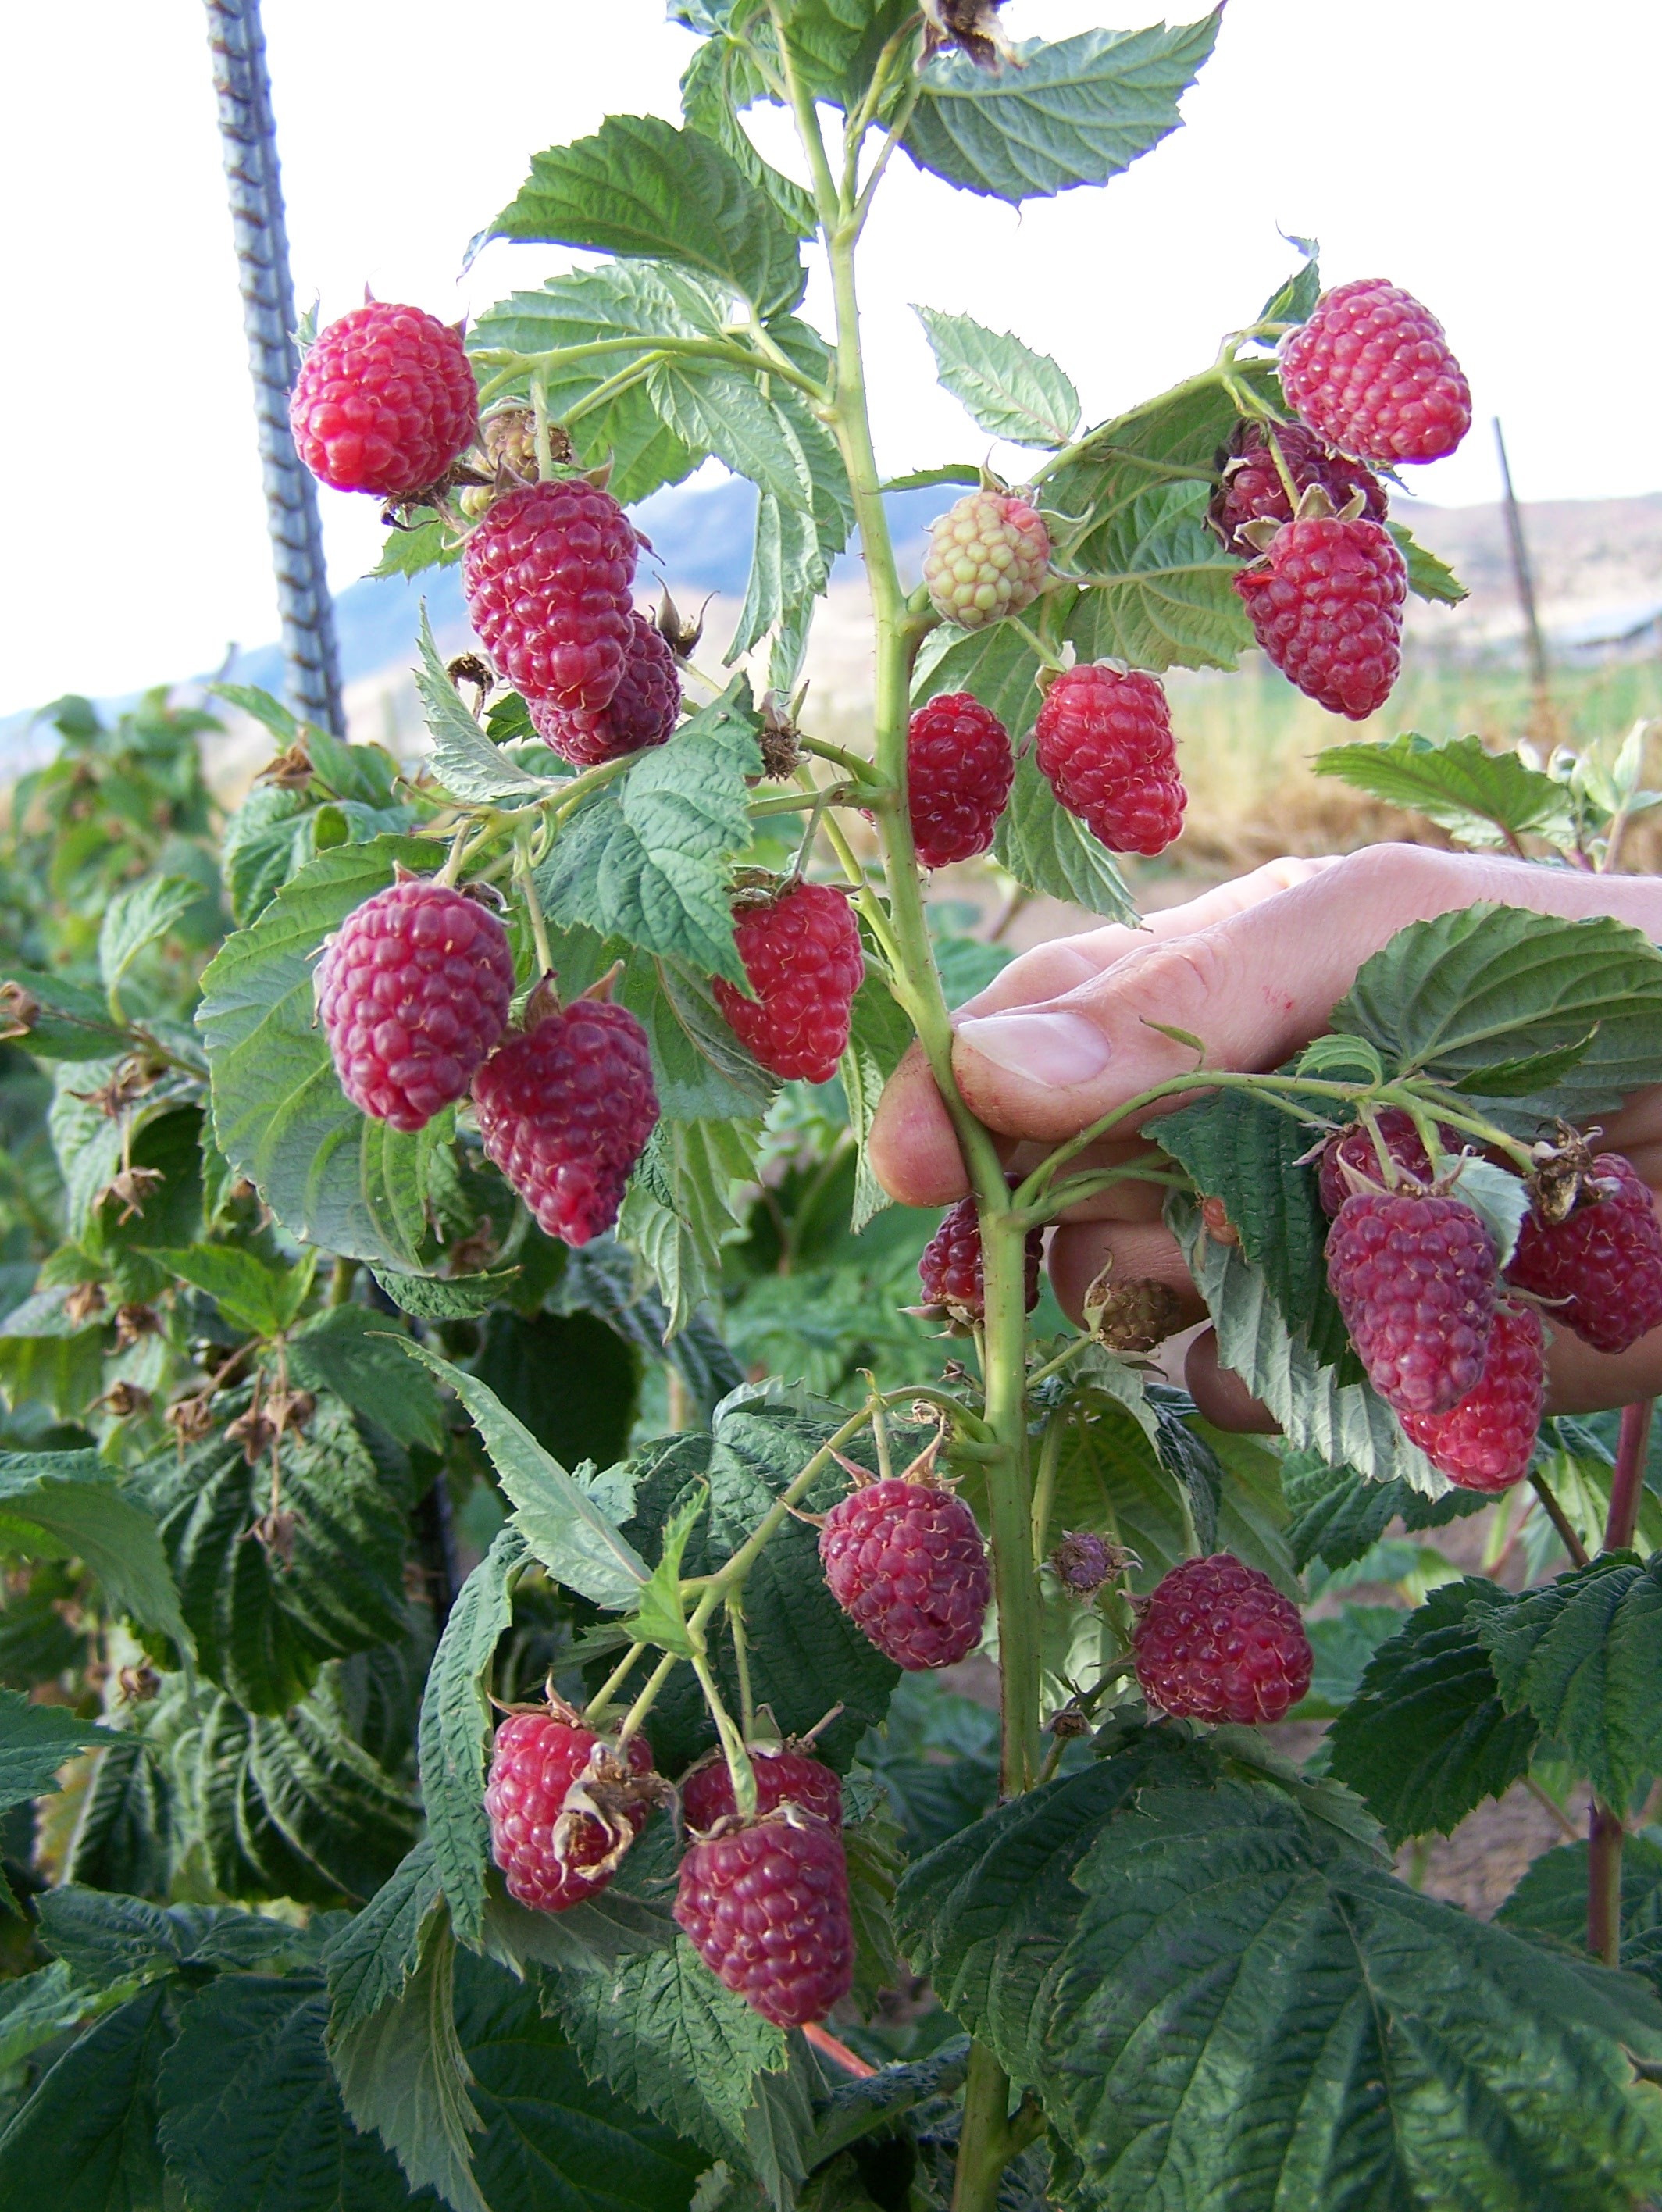
Why a Greenhouse to grow Raspberries?
There are some specific advantages to growing raspberries in a greenhouse over field grown berry’s. First, raspberries have a relatively low chilling requirement for over-wintering, about 45 days below 45°F. Then the plants can be brought into the greenhouse from the cold to bring them out of dormancy early. They also prefer cool growing temperatures (55°F to 70°F), so the cost of heating the greenhouse is less than it would be for other crops. Growers in areas that winter begins early, have the added advantage of satisfying the chilling requirements (over-wintering) earlier. Those in warmer claimants may find it beneficial to use a separate chilling room to speed up the process.
Also in most locations they don’t need supplemental lighting to produce high yields. One study did a test using both supplemental light and without. The plants with supplemental lighting began to flower 2 weeks earlier, but the total yield over the season (about 4 months) was just about even for both tests. Another advantage to growing raspberries in a greenhouse is that greenhouse plants are not subject to the foliage and berries getting wet by rain or dew. Wet raspberries are very susceptible to rotting, and damaged berries are useless and won’t sell. So just by using a greenhouse to grow them in, you will significantly increase the profitable/usable yield of your plants.
Greenhouse raspberry plants are typically watered via-drip system whether they are grown hydoponically or not. But growing them hydroponically significantly reduces the possibility of soil born diseases being introduced to the root systems, provided they were certified virus indexed plants to start with, resulting in healthier plants. Because  the fruit has been kept dry (out of the rain and morning dew), the storage and shelf life of ripe raspberries (under refrigeration) is greatly increased, thus stays fresher longer for the consumer. In addition, many of the insects/pests that can be a problem during the summer months are not active during the off season in the cold winter months. the fruit has been kept dry (out of the rain and morning dew), the storage and shelf life of ripe raspberries (under refrigeration) is greatly increased, thus stays fresher longer for the consumer. In addition, many of the insects/pests that can be a problem during the summer months are not active during the off season in the cold winter months.
Growing your hydroponic Raspberries
Even with all the requirements that raspberry plants have (size, trellising, chilling etc.), they have been grown in practically all types of hydroponic growing systems, even NFT, DWC and Aeroponic. Some growers may even use grow bags full of growing medium, and simply cut a slit in the bag to insert the plants in and use a non recovery drip irrigation system. A well fed raspberry plant doesn’t necessarily have a large root system for it’s size, it can be even smaller than that of a mature tomato plant, but still last for years. As always hydroponic growing medium is mostly a personal choice, however it’s important to make sure the growing medium drains well and doesn’t remain to wet. Typical growing mediums used for raspberries by most growers include: sand, vermiculite, peat and perlite, either by themselves, in equal parts, or in just about any combination of them.
Probably the most common type of hydroponic system to grow raspberries in is a drip system. Either as a recovery ,or non-recovery system (also called run to waste). Non-recovery simply means that the nutrient solution is not  returned back to a central reservoir, but is allowed to run off. Depending on the size and age of the plant, growers use buckets starting from 3 gallons and transplanting into larger buckets up to 7 gallons as they get bigger. All the plants energy is stored in the roots, so make sure to take care to do as little damage as possible to them when transplanting if doing so. Also make sure not to let the roots dry out before, during, or after transplanting. returned back to a central reservoir, but is allowed to run off. Depending on the size and age of the plant, growers use buckets starting from 3 gallons and transplanting into larger buckets up to 7 gallons as they get bigger. All the plants energy is stored in the roots, so make sure to take care to do as little damage as possible to them when transplanting if doing so. Also make sure not to let the roots dry out before, during, or after transplanting.
To determine how many raspberry plants can fit in your greenhouse, just calculate how many plants you can fit in a row, spacing them two feet apart. For floricane-fruiting plants, determine how many rows you can have with about 5 1/2 to 6 feet between rows, remembering to leave at least 3 feet between the end rows and the greenhouse walls (for harvesting etc.). Rows for primocane-fruiting varieties can be spaced closer, at about four feet apart. Closer spacing can result in pour air circulation that can lead to disease.
 Optimum Growing Conditions Optimum Growing Conditions
Growing Raspberry plants using hydroponics gives the grower maximum control of the plants nutrition, and naturally quality. According to one study raspberries grow better with a higher proportion of N relative to P and K. Another study used the same nutrient formula they used for strawberries with very good results. Raspberry’s are a crop that can tolerate low light levels, and even lots of cloudy days. So even though supplemental lighting may increase a yield somewhat, the cost of running the lights may out-way any increase in yield from of using them. Not to mention, considering the add expense of installing them if they were specifically installed for the raspberry crops only.
Raspberries thrive in cool climates, with the optimal daytime temperatures around 72°F, and nighttime temps around 55°F to 60°F. But like any plant, they can tolerate and adapt to higher or lower temps, as well as fluctuations.  The optimum humidity range is between 65% -75%. Humidity levels above 90% will encourage fruit molding and pour pollination. Humidity levels below 65% will encourage mite infestations as well as pour pollination also. The optimum humidity range is between 65% -75%. Humidity levels above 90% will encourage fruit molding and pour pollination. Humidity levels below 65% will encourage mite infestations as well as pour pollination also.
 A supporting trellis system is an important part of good raspberry production. As the fruiting laterals become heavily weighted down with berry’s and foliage, they will tend to bend over and break from the weight. Once the growing season is over all the leaves can be trimmed off, and the old canes can be pruned off as well. Pruning and trellising will affect plant growth, fruit quality and quantity, as well as size. So you should get to know your canes. A supporting trellis system is an important part of good raspberry production. As the fruiting laterals become heavily weighted down with berry’s and foliage, they will tend to bend over and break from the weight. Once the growing season is over all the leaves can be trimmed off, and the old canes can be pruned off as well. Pruning and trellising will affect plant growth, fruit quality and quantity, as well as size. So you should get to know your canes.
Pollinating Raspberry’s
Unfortunately pollination is probably the biggest drawback to greenhouse and off season production of raspberries for most growers. Unlike some crops that can be pollinated by shaking the plants, air currents and a just a good breeze, raspberries need to be pollinated by insects. More than 30 flowers can be produced by one single fruiting lateral, and most buds that reach 2mm continue to develop, set fruit and mature. Insect pollination is essential for good fruit set. Hand pollination is to labor intensive, not to mention to hard to keep track of which flowers were pollinated to be cost effective.
For summertime crops, some greenhouses may be built with openings that allows outside bees to come inside to pollinate. But depending on the size of operation that may still be inadequate to pollinate all the flowers, although a beehive can be brought into the greenhouse for adequate pollination. For the home grower, planting flowering plants around openings in the greenhouse will attract bees inside to pollinate the raspberries. For off-season (wintertime) crops, most bee hives are inactive, especially in northern areas. Even inside a greenhouse it may not be warm enough for bees to be active enough, even above the optimal temp for raspberries of 72°F.
Bumblebees are very good pollinators, and remain active in much cooler temperatures than bees. They are also quite docile and wont sting unless provoked. But bumblebee hives don’t have a long life-span like bees do. Bumblebee hives will last about 10 to 12 weeks or so. Depending on the variety of raspberry and if your staggering  the production cycle or not, you may need more than one bumblebee hive to pollinate your crops. The stigmas of the flowers may only remain receptive to pollination for about 6 days or so, so it’s important to have your pollinators ready when the flowers begin to open. For growers serious about raspberry production, it may be well worth their while to learn to raise bumblebees themselves, especially for year round production. the production cycle or not, you may need more than one bumblebee hive to pollinate your crops. The stigmas of the flowers may only remain receptive to pollination for about 6 days or so, so it’s important to have your pollinators ready when the flowers begin to open. For growers serious about raspberry production, it may be well worth their while to learn to raise bumblebees themselves, especially for year round production.
Along with bees and bumblebees as pollinators, Blue Bottle Fly’s are a recent option for pollination. Like bumblebees the blue bottle fly’s will remain active in cooler temperatures than bees will. Blue  bottle fly’s are also suited for use in greenhouses. They don’t like to stay in one place, and tend to fly off. But work well in confined spaces like a greenhouse environments. It’s important to remember bees, bumblebees and fly’s are all insects also, the use of pesticides will have a negative effect on them as well. Most growers are learning that the use of beneficial insects for pest control will still allow them to be able to control the pest populations, as well as not effect the other beneficial insects like the important pollinating insects. bottle fly’s are also suited for use in greenhouses. They don’t like to stay in one place, and tend to fly off. But work well in confined spaces like a greenhouse environments. It’s important to remember bees, bumblebees and fly’s are all insects also, the use of pesticides will have a negative effect on them as well. Most growers are learning that the use of beneficial insects for pest control will still allow them to be able to control the pest populations, as well as not effect the other beneficial insects like the important pollinating insects.
Growing Hydroponic Raspberries, part 1
Useful links
Greenhouse Raspberry production guide (Cornell University, pdf)
High Tunnel Raspberries and Blackberries (Cornell University, pdf)
Greenhouse Raspberry Production for Winter Sales
Pruning Raspberries, Blackberries and Gooseberries
OFF-SEASON PRODUCTION OF STRAWBERRIES AND RASPBERRIES (Department of Horticulture Cornell University)
High Tunnel Raspberry Production
Growing Raspberries and Blackberries
Pruning Raspberries and Blackberries in Home Gardens (pdf)
Typically raspberries are not considered good plants to grow hydroponically by growers because they are long term plants that depending on type of raspberry plant, may not produce any fruit in the first year. Because there are no real large producers of out of season raspberry’s in the USA, most of them are imported from Mexico and Chile during the off season. That results in pour quality as well as higher prices because of the long distance they have to travel get to market. Even with the high prices and low quality of off season raspberry’s, people are still apparently willing to spend their money on them. And for those people who like fresh raspberries, growing their own can be very rewarding.
Raspberry’s are a high value crop that can sell for between $3 and $6 for a 1/2 pint during the off season, and typically sell for around $3 or more when they are in season. Each plant can produce 8 to 11 1/2 pints of berry’s in one season (about 4 months) for second year plants, and 3 or 4 year old plants can produce as much as 20 1’/2 pints or more in a season. Let say they sell at $3.50 for a 1/2 pint, and each plant yields 11, 1/2 pints, that’s a total of $38.50 (11, 1/2 pints at $4.50= $49.50) of product from each plant. So there’s a lot of potential for profit, especially when rotating plants to provide for both in and out of season berry’s. Even so very little information exists on hydroponically grow off season raspberry’s. Yet because they are a highly perishable product, there is always a demand for fresh locally grown high-quality raspberry’s.
Types of Raspberries
There are two basic types of raspberries plants (called canes). Primocane-fruiting (Fall-Bearing, and/or everbearing) and Floricane-fruiting (Summer-bearing). Primocane-fruiting, produces fruits at the top of the first year canes. If allowed to over-winter, these same canes will produce fruit again on the lower portions of the canes in early summer of the second year. However the second year fruit of the primocanes is said to be less quality than the first year fruit. Some growers will sacrifice the second-year crop in favor of the smaller but higher quality  late fall primocane crops by pruning the canes to the ground, at either the end of the first years harvest or in early spring of the next year before they begin to grow again. Then new canes will continue to grow and fruit each year in late summer. late fall primocane crops by pruning the canes to the ground, at either the end of the first years harvest or in early spring of the next year before they begin to grow again. Then new canes will continue to grow and fruit each year in late summer.
Floricane-fruiting (only produce fruit from buds on second-year canes), and unlike primocane-fruiting raspberries, these canes must stay intact through the winter and into the following growing season to fruit. Also, during second-year of floricane-fruiting raspberry plants, while the canes are flowering and fruiting new first-year canes are growing (also called primocanes because these are the first year canes). These will produce fruit in the fallowing second year. At the end of the harvest year the second year canes (floricanes) should be cut to make room for the new primocanes that will fruit the fallowing year. If not they will just die and not produce fruit anyway, taking energy away from the fruiting canes.
Advantages and Disadvantages
Primocane-fruiting Advantages
 long harvest season from the same plant long harvest season from the same plant- less labor moving plants in and out of the greenhouse because of the long season
- higher density of plants can be placed in the same space
- only a simple trellis is required for support
Primocane-fruiting Disadvantages
- mites and other pests can build up during the longer harvest season
- bees must be active thought the long season for pollination
- Primocane plant yields are lower than floricane
Floricane-fruiting Advantages
- superior flavor and fruit size than primocane
- shorter harvest season, but with higher yields
- easy to schedule plant rotations for production cycles
- bees have a shorter season they need to be active
- pests easier to control because of shorter growing season
Floricane-fruiting Disadvantages
- larger plants so they take up more space
- plants require more trellising support than primocane
- plant requires more labor in manipulation of the canes
- it may be two years before the full potential yields are realized
- accumulation from the chilling is required to come out of dormancy
Raspberry cultivars
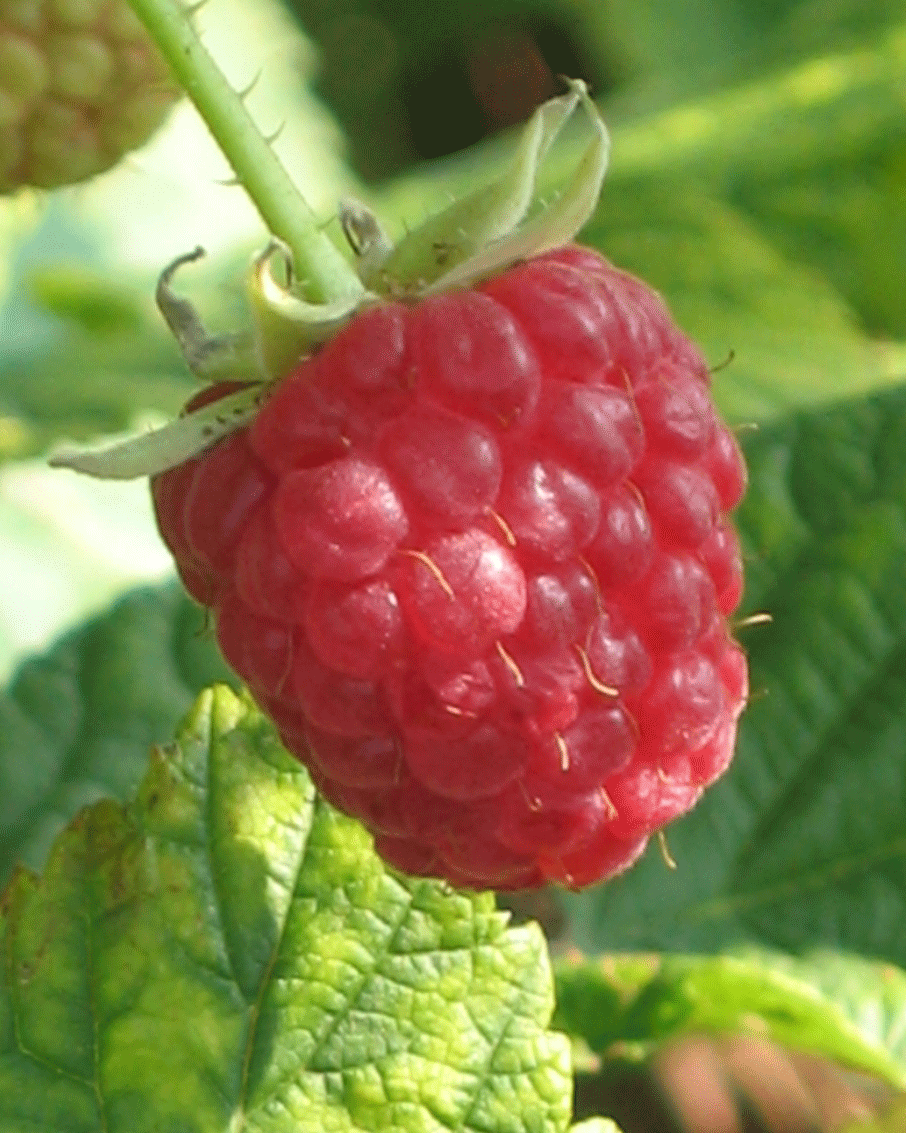
For some reason not all raspberry cultivars (variety of a plant) produce well in the greenhouse environment. Some of the varieties that have shown to do well in the greenhouse include: (primocane varieties) Caroline, Josephine,  Autumn Bliss, Autumn Britten, (Floricane varieties) Tulameen, Chilliwack, Cascade Delight and Encore. The Tulameen variety seems to be a particular favorite for it’s large size as well as it’s flavor, and also seems to be particularly resistant to insects and disease. Autumn Bliss, Autumn Britten, (Floricane varieties) Tulameen, Chilliwack, Cascade Delight and Encore. The Tulameen variety seems to be a particular favorite for it’s large size as well as it’s flavor, and also seems to be particularly resistant to insects and disease.
Growers that want to grow raspberries for profit will want to obtain high quality virus indexed plants from a reputable source. Preferably from a nursery that sells certified virus indexed stock. Certified virus indexed raspberry stock is propagated from plants that have never been exposed to the outdoor environment. They are grown under very strict conditions in order to be free of pests and viruses, including soil born pests and pathogens. Field grown plants can be used, but are much more likely to introduce pests and disease into the greenhouse that can affect the entire crop. Also virus indexed raspberry plants generally grow more vigorously, as well as be more productive and even tend to live longer.
Growing Hydroponic Raspberries, part 2
Useful Links
How to Grow Raspberries (video)
Different Varieties of Raspberries, Part 1 (video)
Different Varieties of Raspberries, Part 2 (video)
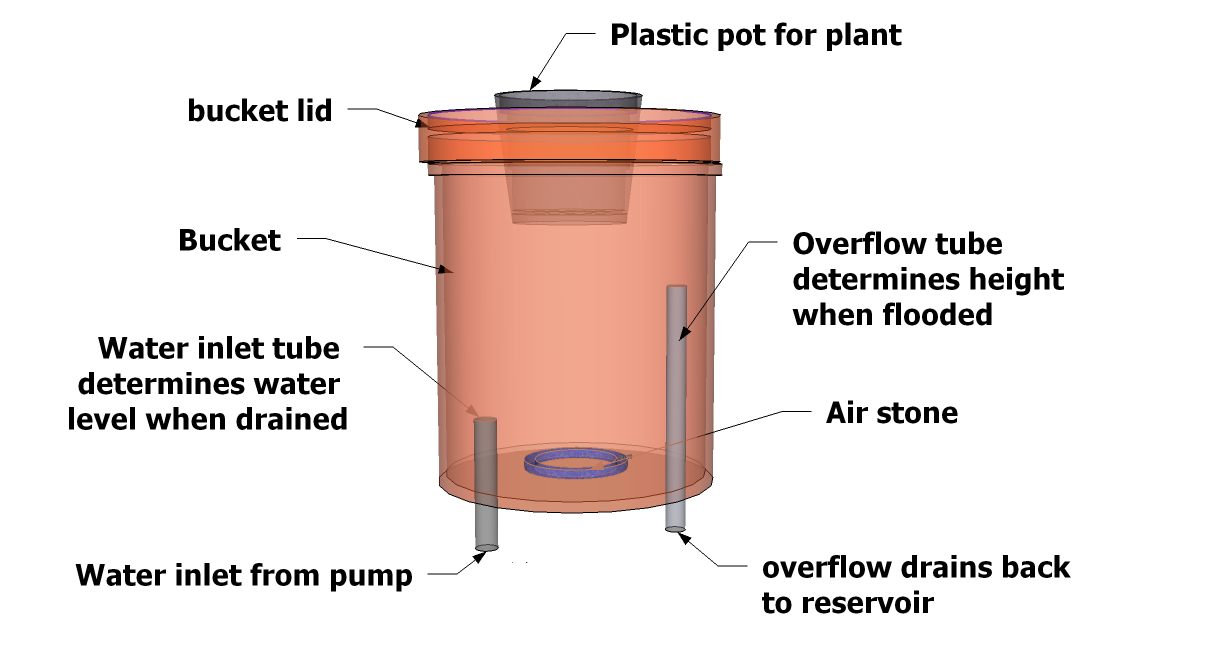
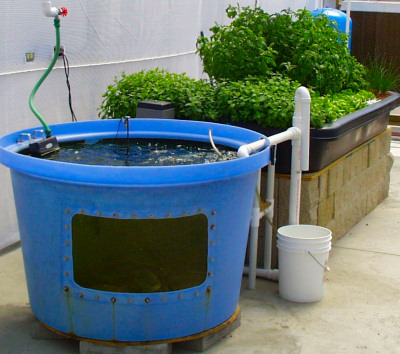
One of the easiest hydroponic systems to build is commonly called a DWC (deep water culture) system. Although typically called a DWC system, it’s usually really a combination of hydroponic systems. A true DWC system is nothing more than a water culture system, with a deeper reservoir instead of a shallow one. Depending on how it’s built, most DWC systems combine a water culture system with one or more of these, drip, aeroponics and/or flood and drain systems. The easiest way to construct one is using a five gallon bucket with a lid, and a regular plastic pot. Cutting a hole in the bucket lid for the plastic pot to sit in without falling through.
The nutrient solution is placed inside the bucket where there is usually an air stone (connected to a air pump) is also placed. The air stone provides oxygen to the roots, and helps them to keep from suffocating in the water. Then the lid (with the pot) is set on top of the five gallon bucket. From there you have the basic DWC hydroponics system design. The key to the DWC system working is that the plants root system (either part or all of them) be submerged in the nutrient solution. From there you can make many variations, like if you wanted to recirculate the nutrient solution, and weather you wanted to recirculate it using a drip system, misters (aeroponic), or flood and drain. There are just to many variations to cover them all, but I will try to cover the most common ones.
Basic system
With no recirculating nutrient solution this would be the most basic, inexpensive and easiest. Without using a recirculating system the water level is very important, because the roots that are hanging in air (inside the bucket) are likely to dry out. Also the roots that are in the growing medium (in the pot) wont get any moisture and dry out.  So you will want the water level to be just above the bottom of the pot with the plants in it, that will allow the growing medium to wick up the nutrient solution, and keep the hanging roots wet. So you will want the water level to be just above the bottom of the pot with the plants in it, that will allow the growing medium to wick up the nutrient solution, and keep the hanging roots wet.
Even though it’s a basic system, there are a couple of things that will make it easier to use, and grow your plants. First is, you will want a way to drain the nutrient solution in order to make nutrient changes easier. The easiest way to do this is by simply just securely placing an end cap (or plug) on the drain tube that can be removed to drain the bucket/s. Another easy way is by installing a plastic or PVC “ball cock valve” at the bottom of the buckets.
Simply opening the valve will drain the buckets, then the new solution can be poured in from the top, right on the growing medium without even opening the lid. The next thing is you’ll want to be able to check the water level easily. A simple elbow connector installed in the side of the buckets with clear vinyl tubing running all the way up to the top of the bucket will make it easy to see the water level inside the bucket. Just make sure it’s covered when your not checking it to prevent algae growth in the clear tube.
The most common DWC/drip system
 The most common DWC setup is probably the combination drip system, especially when using 2 or more buckets at the same time. Again there many variations on this type of setup you can do. But you wont need the clear tubing on the outside of the bucket for viewing the water level. You can set the water level by the placement of a overflow tube. The height of the overflow tube will keep the water level constant. Each time the drip system waters the plants, it drips down into the bucket filling it to the point of the overflow tube. The overflow tube then drains back to the nutrient reservoir, to be pumped back through the drip system again. The most common DWC setup is probably the combination drip system, especially when using 2 or more buckets at the same time. Again there many variations on this type of setup you can do. But you wont need the clear tubing on the outside of the bucket for viewing the water level. You can set the water level by the placement of a overflow tube. The height of the overflow tube will keep the water level constant. Each time the drip system waters the plants, it drips down into the bucket filling it to the point of the overflow tube. The overflow tube then drains back to the nutrient reservoir, to be pumped back through the drip system again.
Because the water is recirculating between the buckets and a reservoir, the drain tube with the ball cock valve to drain the bucket with may not be needed. You will be able to just change the nutrient solution that’s in the reservoir. There will still be the nutrient solution in the buckets, but as the new nutrient solution circulates through the system, it will mix with the old nutrient solution. So whether you want a drain on each bucket depends on weather you want to be able to get as much of the old nutrient solution out as you can when doing a nutrient change.
DWC/flood and drain system
The DWC/flood and drain system is fairly simple also, and as always can have many variations as well. The only real difference is how the water is pumped to the buckets. Instead of dripping down from above, the nutrient solution is pumped into the buckets from below the plants, through the water inlet tube. Then when the pump shuts off, the water begins to drain back down through the pump, and through the same inlet tube it was pumped up in.
DWC/aeroponic system
The DWC/aeroponic system is very similar to the DWC/drip system setup. Again the only real difference is the nutrient delivery system. Where the drip system drips down through the growing medium into the buckets, the aeroponic variation sprays the roots from inside the buckets with misters. The overflow tube would need to be low enough to allow the misters to spray the roots. But the water level in the buckets doesn’t need to be real high anyway, because the misters will keep the hanging roots moist and from drying out. But you do want it high enough to keep a good amount of water at the bottom of the buckets.
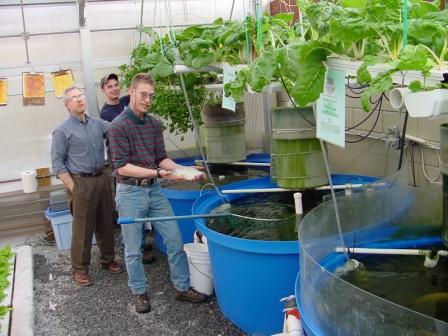
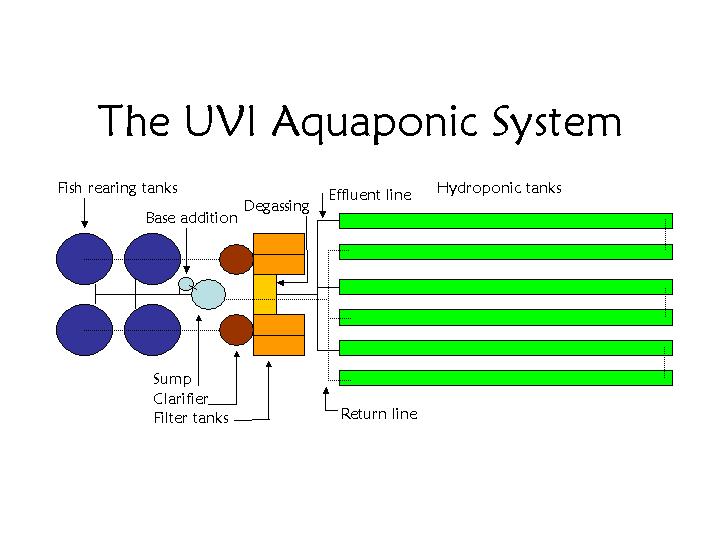
Aquaponics, also known as the integration of hydroponics with aqua culture, is gaining increased attention as a bio-integrated food production system. Hydroponics and aquaponics are close and often considered the same, but there are some distinct differences. With aquaponics, fish and plants are grown together in one integrated living soil-less ecosystem. The biggest difference is the nutrient source for the plants. With Hydroponics the nutrients are provided by refined chemical salts. With aquaponics, fish waste from living fish provides the food source for the plants, and the plants and plant beds can provide a natural filter for the water the fish live in.
Aquaponic systems are a bit more complex than a regular hydroponic system because the nutrients are derived from the living ecosystem itself. Also with aquaponics there’s usually a series of filtration tanks needed to remove the accumulating solids as well as the degassing of accumulating gasses like hydrogen sulfide, methane and nitrogen from the system. There is also the plant to fish ratio to consider, not enough fish equals not enough nutrients to support the plants.
Aquaponic Systems
Typically aquaponic systems consist of several parts. A rearing tank (fish tank), solids removal tank (to keep solids from building up in the system), bio-filter (to remove the accumulating chemicals and gasses, as well as promote the growth of the beneficial bacteria and microorganisms), hydroponic system (where the plants are grown without  soil), and lastly a sump pump (that circulates the water supply). soil), and lastly a sump pump (that circulates the water supply).
Depending on the setup type of a aquaponic system, it may or may not be using planter beds to grow the plants. Planter beds are like raised flower-beds that are usually filled with gravel (also called “gravel beds”). These gravel beds not only act as a bio-filter that strips out ammonia, phosphorus as well 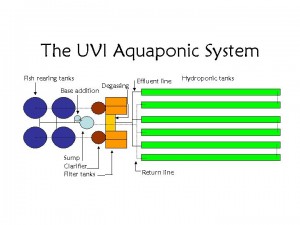 as other accumulating chemicals, so that freshly cleansed water can be recycled back to the fish tanks. But they are also the breeding ground for beneficial bacteria and microorganisms that break down the fish waste into the raw elements (nutrients) the plants can then absorb. These beneficial bacteria and microorganisms are essential to an aquaponic system working, because without them to turn fish waste into nutrients, the plants would not get the nourishment they need to grow. as other accumulating chemicals, so that freshly cleansed water can be recycled back to the fish tanks. But they are also the breeding ground for beneficial bacteria and microorganisms that break down the fish waste into the raw elements (nutrients) the plants can then absorb. These beneficial bacteria and microorganisms are essential to an aquaponic system working, because without them to turn fish waste into nutrients, the plants would not get the nourishment they need to grow.
Aquaponic systems that are not growing the plants in gravel beds, but rather using a more traditional hydroponic system like a water culture or flood and drain systems, still require the beneficial bacteria and microorganisms to work. These traditional hydroponic systems don’t have the large surface area (like within the gravel beds) for the beneficial bacteria and microorganisms to largely grow and multiply. But they can be added directly to the water as a bacterial starter culture and grow in a separate in line bio-filter.
Growing the Fish
 The fish of course are an important part of the aquaponic system. The most common fish that’s raised in commercial aquaponic systems is tilapia. Some other fish that have been used include catfish, bass, crappies, trout, carp, pacu, goldfish and cod. Tilapia is a warm water fish so they can also tolerate higher water temperatures, though most fresh water fish that can tolerate crowding should do well in aquaponic systems. The fish of course are an important part of the aquaponic system. The most common fish that’s raised in commercial aquaponic systems is tilapia. Some other fish that have been used include catfish, bass, crappies, trout, carp, pacu, goldfish and cod. Tilapia is a warm water fish so they can also tolerate higher water temperatures, though most fresh water fish that can tolerate crowding should do well in aquaponic systems.
There are typically three ways of fish rotation in commercial aquaponic setups, Sequential rearing, Stock splitting and Multiple rearing units. Sequential rearing is where multiple age fish are raised in the same tank, then when the oldest ones are ready to harvest they are selectively caught and removed. Then new baby fish are added to replace them. Stock splitting involves stocking very high densities of baby fish, then periodically splitting the population in half as they get bigger until there ready to harvest. Multiple rearing units involves using a series of sequentially larger tanks. As the fish get larger they are either herded through a hatch between adjoining tanks, or into “swim-ways” connecting distant tanks moving them all as a group into the next size tank. All the multiple rearing units are usually connected to one filtration system that feeds the plants.
An important factor is the water to plant ratio. That also has many variables, but can range anywhere from a 1:1 ratio to a 1:4 ratio. The variation in range depends on type of hydroponic system used (gravel vs. raft etc.), fish species, fish density, feeding rate, plant species, as well as the depth of the growing beds etc.. You need enough fish waste to provide a constant amount of nutrients, but you don’t want waste to accumulate in the system or growing beds. The solids removal tank will take care of most of that, although if using the gravel beds solely as the bio-filter without a solids removal tank, solids can build up in the gravel beds.
Conclusion
 Aquaponic systems are complex carefully choreographed living ecosystems that can provide both fish and produce. But most commercial aquaponic farms need to run at full production for both fish and produce in order to be profitable. On the other hand, even though more complex than a regular hydroponic system, it can be quite rewarding to grow both plants and fish together. But be patient because it will likely take some time, as well as trial and error to get quite good at it (as with most things). Aquaponic systems are complex carefully choreographed living ecosystems that can provide both fish and produce. But most commercial aquaponic farms need to run at full production for both fish and produce in order to be profitable. On the other hand, even though more complex than a regular hydroponic system, it can be quite rewarding to grow both plants and fish together. But be patient because it will likely take some time, as well as trial and error to get quite good at it (as with most things).
Useful Links
Recirculating Aquaculture Tank Production
Aquaponics—Integration of Hydroponics with Aquaculture
Aquaponic System – Design Manual
Classroom Aquaponics: Exploring Nitrogen Cycling in a Closed System
Barrel-ponics
On-Farm Food Safety: Aquaponics
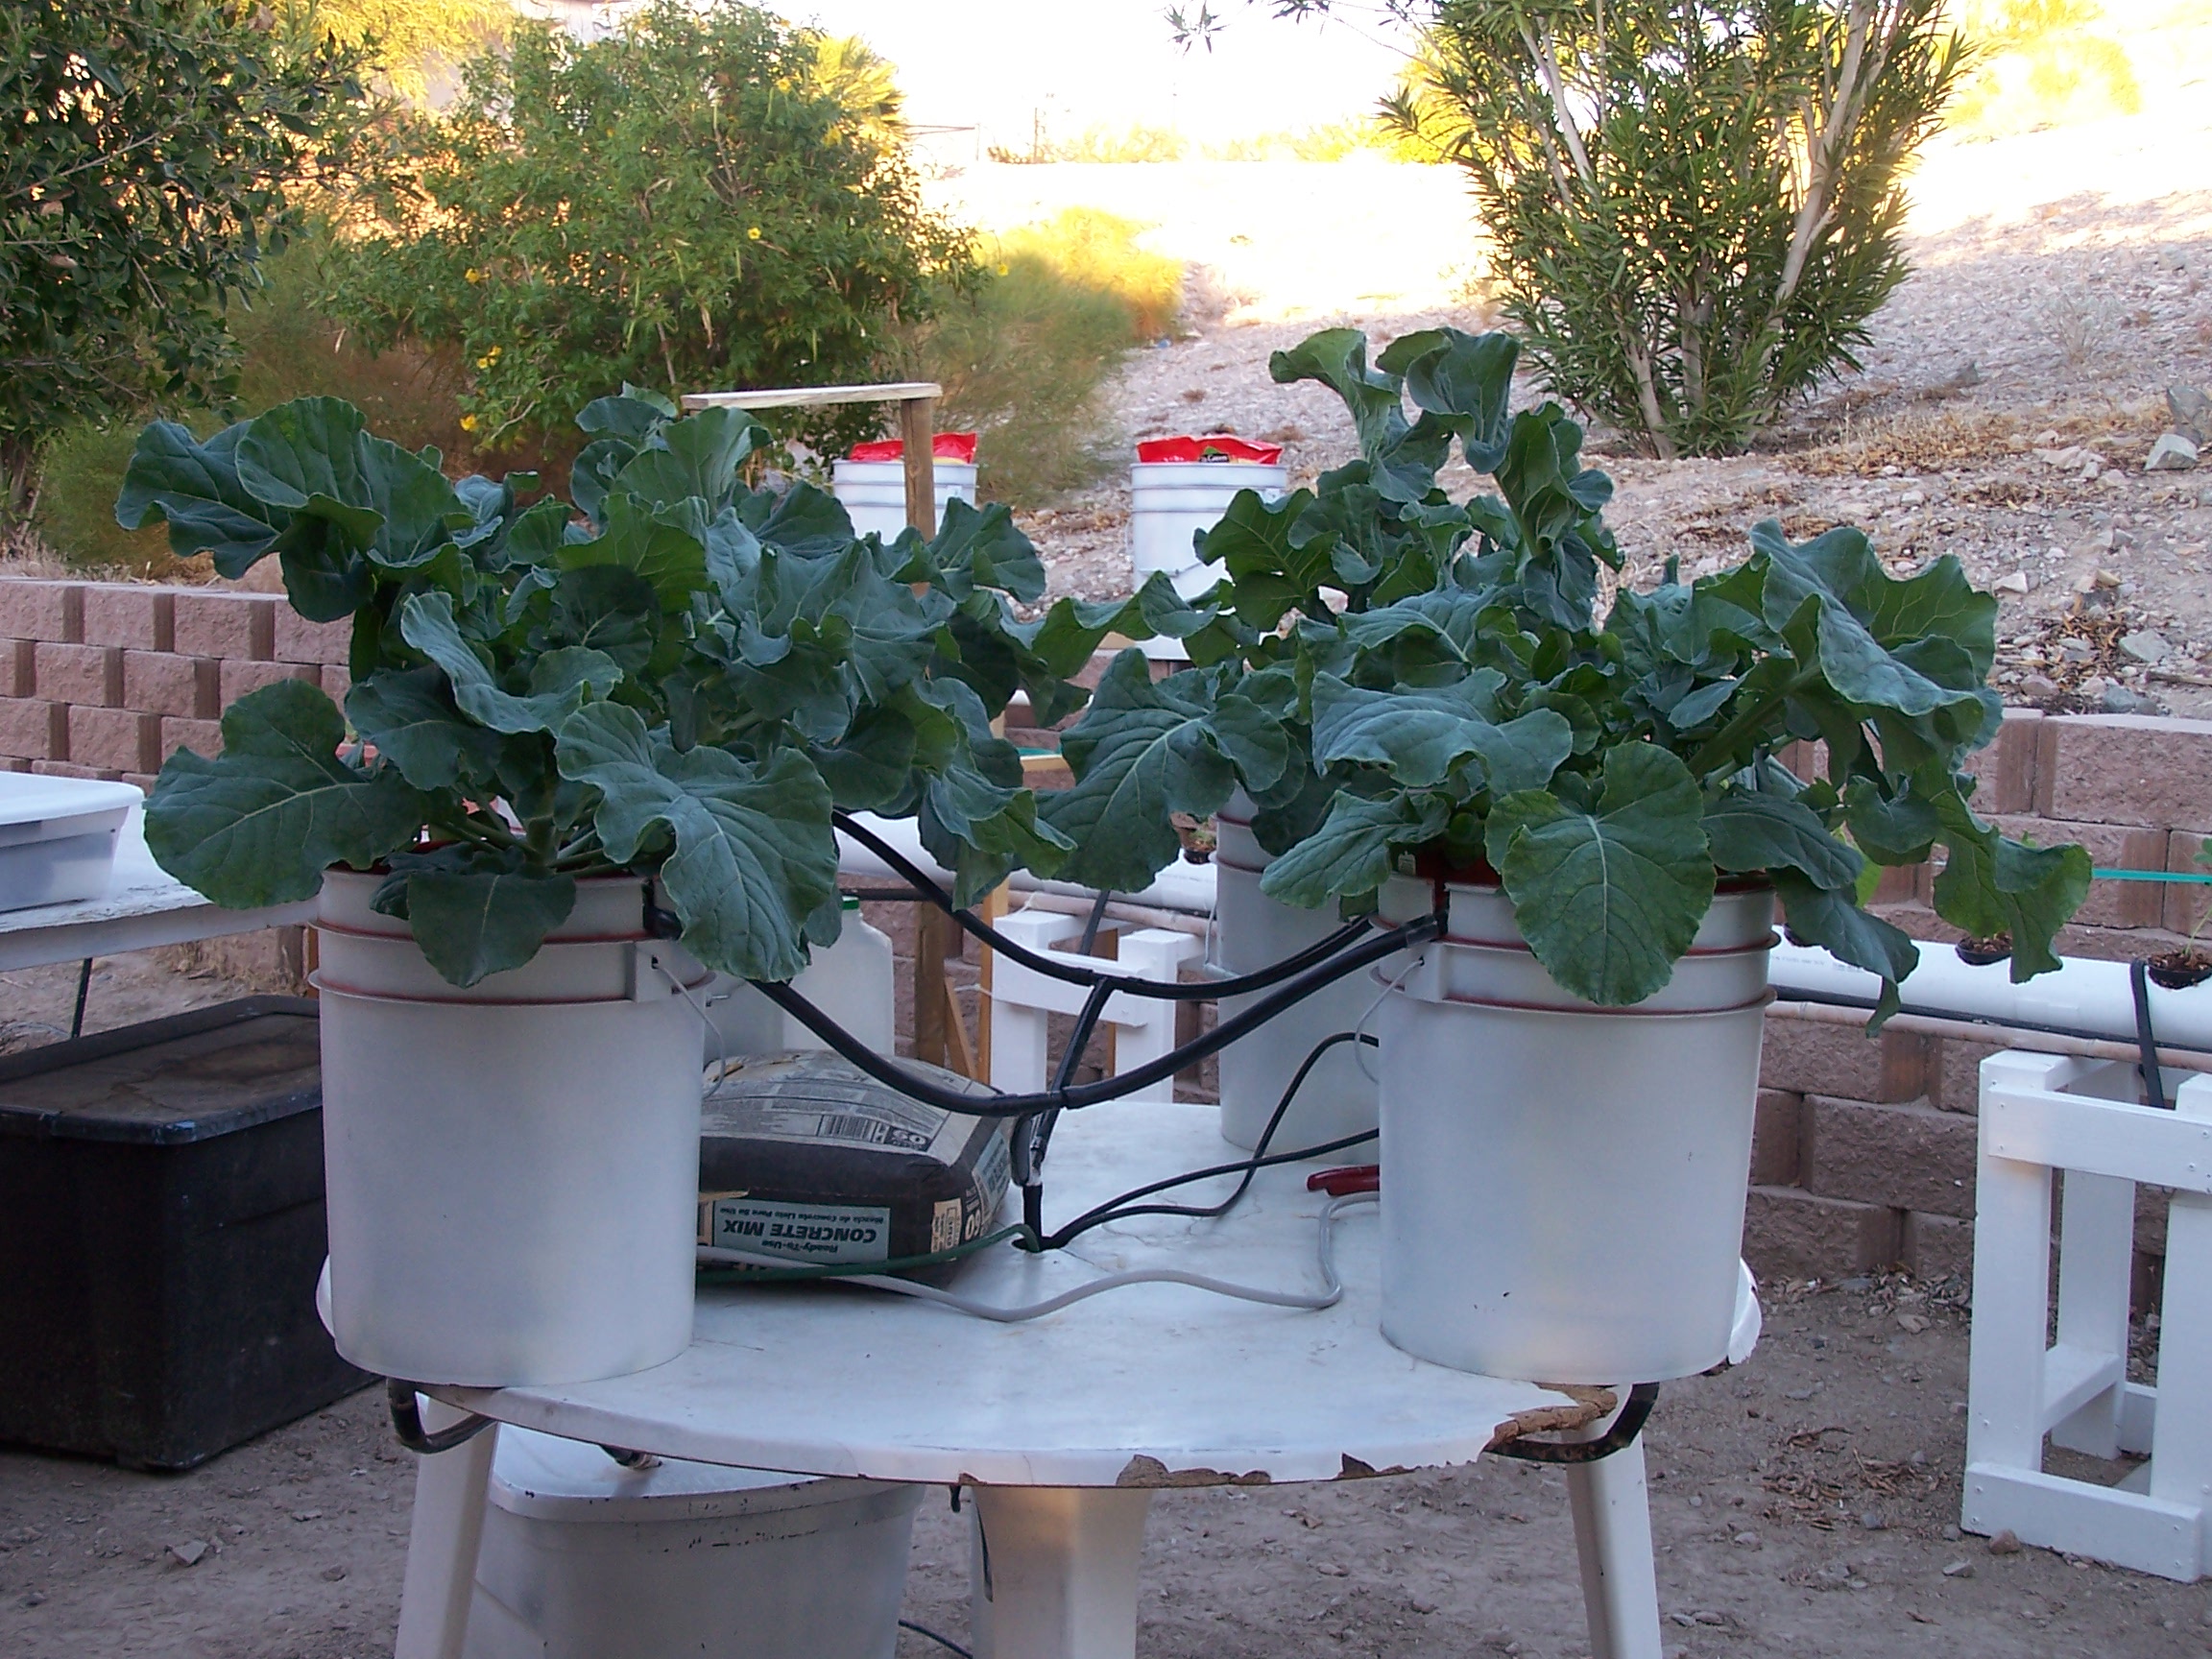
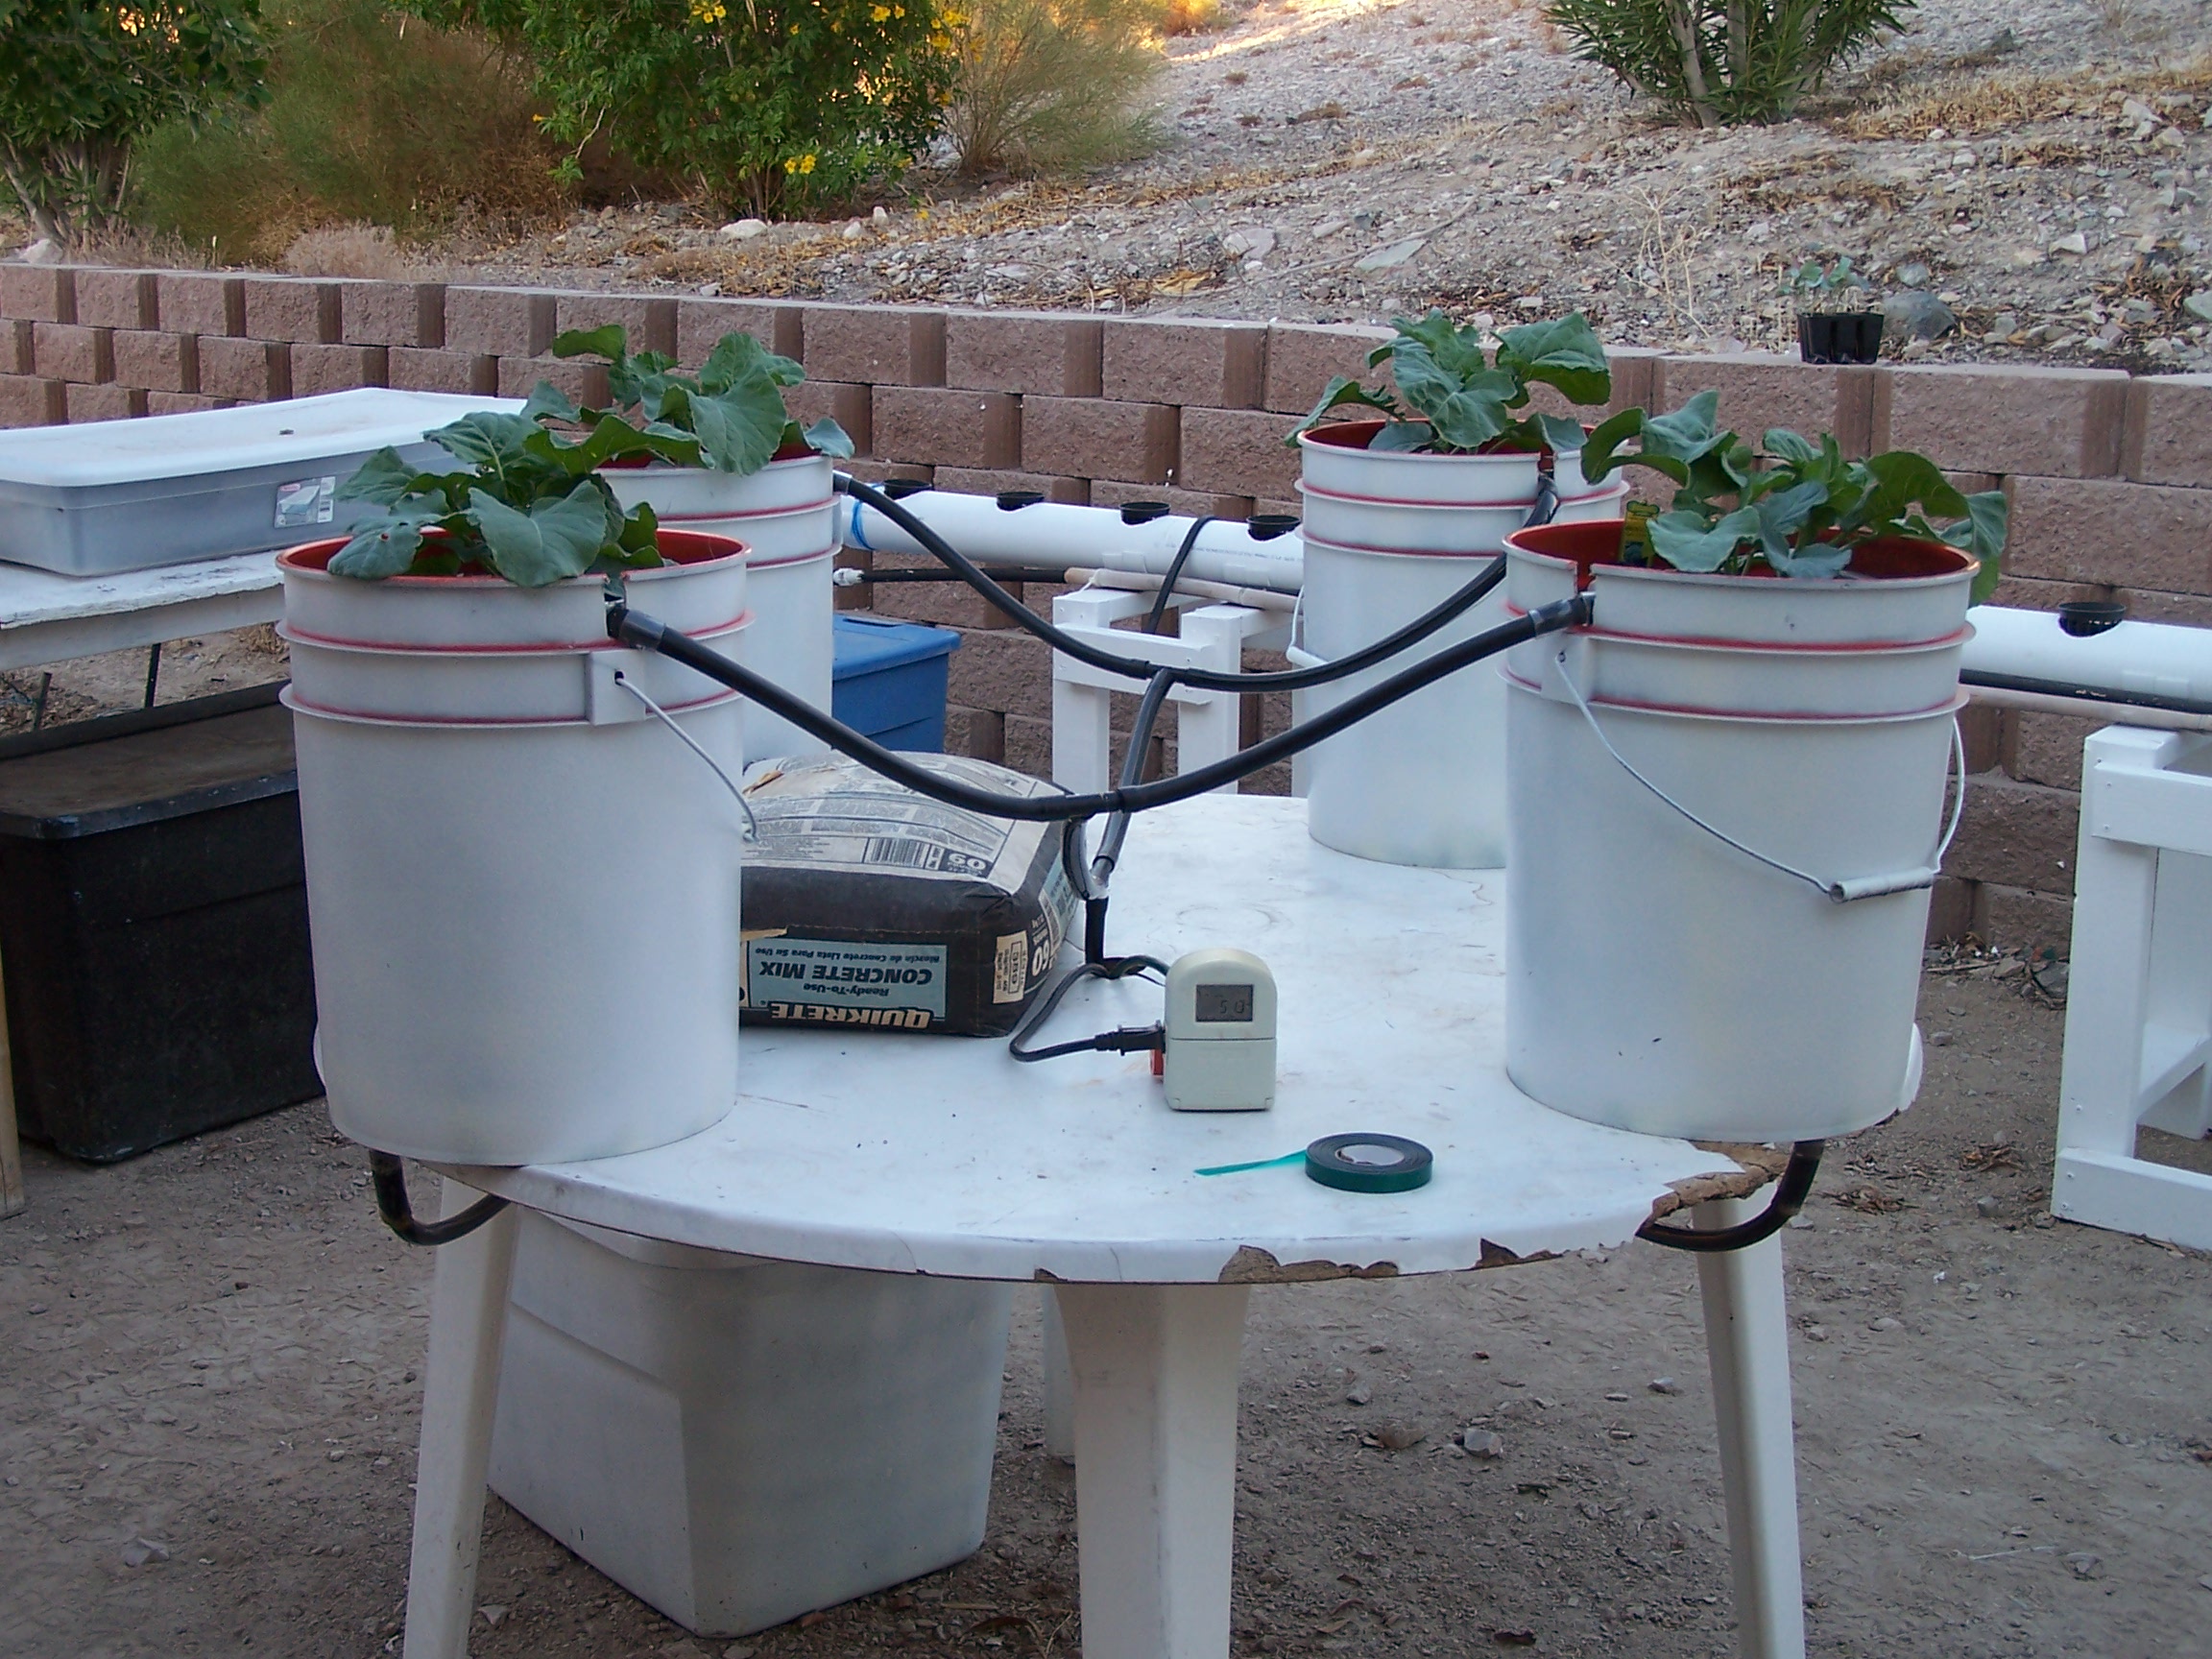
Even though this system is designed to grow 4 plants in 5 gallon buckets, you can easily adapt it to grow more or less plants as you wish, as well as in larger or smaller containers/buckets. You should be able to get all the materials needed at local stores like Home Depot, Lowe’s, Wal-Mart, Target, Big lots, Kmart etc. I got the five gallon buckets at Home Depot for about $2.50 each, and the 18 gallon storage tote at Wal-Mart for $3.50. The black vinyl tubing and “T” connectors, I got at Lowe’s. I also got the fountain pump from Lowe’s (in the gardening section). That was the most expensive part of the whole system. The pump was about $40, but for this system you don’t need a pump as large to do the job, but it does allow you to expand on the system in the future.
Just make sure any pump you use has a removable filter, If not you will want to create one to keep debris out of it. The Through holes/Bulkhead fittings come in all sizes and shapes. They are used in all sorts of industry’s, but most home improvement stores carry them somewhere in the store, and very likely have them in more than one place. The Through holes/Bulkhead fittings come in all sizes and shapes. The ones that I used for this system I found at Home Depot for $1.97, right next to the electrical conduit.
System Parts List
- 4 Five Gallon Buckets (for plants)

- 4 Through Holes (also called bulkhead fittings)
- Black Vinyl Tubing (for both fill and drain lines), also blue Vinyl tubing from a
hydroponic supply shop will work fine.
- 1 Submersible Fountain Pump
- 18 to 30 Gallon Storage Tote (for reservoir)
- Inexpensive Lamp Timer (with lots of on/off cycles to turn pump on and off with)
- Hydroponic Growing Medium (to support plants and hold moisture for the roots)
- One Inexpensive furnace Filter (to keep growing medium from getting in the tubing)
- A Few “T” Connectors that Fit the Vinyl tubing your using (how many depends on your
final configuration)
- Two Cans of Inexpensive Black Spray Paint, and Two Cans of Inexpensive White Spray
Paint (in order to light proof the buckets and reservoir)
- (Optional) A small amount of PVC tubing and connectors (for return line ends)
You will need to make sure the end of the through hole that the vinyl tubing will go on (end without the threads and nut), will fit the size tubing you are using. The ones I used will fit 5/8 inch inside diameter tubing. If not you can use two sizes of tubing and/or using a hose clamp to tighten it up. Also you may find that a old garden hose will fit just fine, and can be substituted for the vinyl tubing for the return (drain) lines.
Getting Started
First step is to trace the side of the through hole with the thread and nut, on the bottom of all 4, five gallon buckets. You’ll want it to be close to the edge of the bucket, but not so close you wont be able the thread the nut on in order to install it (about an inch). That’s so you will be able to set it upright on a table or bench, and most of the buckets weight  will still be supported and it wont tip over. will still be supported and it wont tip over.
I use a rotary tool to make the holes, but if You don’t have one you can make the holes any way you want. Even a hot metal coat hanger will be able to melt the plastic nicely, then just scrape any burs off with a razor blade to make the edge soothe. It’s important that you don’t make the holes too big, or it may leak. It should be just big enough to stick the threaded side of the through hole in, without noticeable gaps. Now insert the through hole and tighten it up. Just make sure you have the rubber gasket on the right side. In most cases (depending on the particular through holes your using) it will most likely be on the outside of the bucket, and only the nut on the inside.
Now you’ll need to light proof the buckets. Turn the buckets upside down, and put tape all around the through hole (so you don’t get paint on or in it). Give the buckets a couple of coats of black spray paint, or as many as needed to block all the light. Then because the color black absorbs heat, give the buckets a couple of coats of white spray paint. This will reflect light and help keep the root zone temperatures from getting hot. Make sure you only paint the outside, you don’t want paint to come in contact with the roots or nutrient solution.
The reservoir is quite simple, just paint the base and lid (outside) of the 18 to 30 gallon storage tote the same way you did the buckets. Painting it black to block light, and then white to reflect light. Once painted, cut a notch in the lid for the electrical cord and hose from the pump to go through. Then another hole or two for the return line/s where you plan it to be.
Setting the system up
There are so many different configurations to setting up the system, there’s no way to explain them all. The buckets can be setup on a table, bench, wall etc.. But the one thing that you need to be sure of is that the reservoir is at least 6 inches below the buckets. Otherwise the nutrient solution wont be able to flow back into the reservoir. The design is simple, the pump pumps the nutrient solution up to the top of the buckets, where it drips down through the bucket, and out the through hole at the bottom. Then the return tubing drains it back into the reservoir.
 You can run the return lines different ways, but it should be a gentle slope all the way back to the reservoir. You can see that I connected the return lines from two buckets together with a “T” connecter, then back to the reservoir. The PVC at the end of the line’s going back into the reservoir is not necessary, although it does help keep the flow draining back more even. The tube coming out the side of the reservoir and looping back up through the center of the table, is the line that pumps up the nutrient solution from the pump to water the plants. You can run the return lines different ways, but it should be a gentle slope all the way back to the reservoir. You can see that I connected the return lines from two buckets together with a “T” connecter, then back to the reservoir. The PVC at the end of the line’s going back into the reservoir is not necessary, although it does help keep the flow draining back more even. The tube coming out the side of the reservoir and looping back up through the center of the table, is the line that pumps up the nutrient solution from the pump to water the plants.

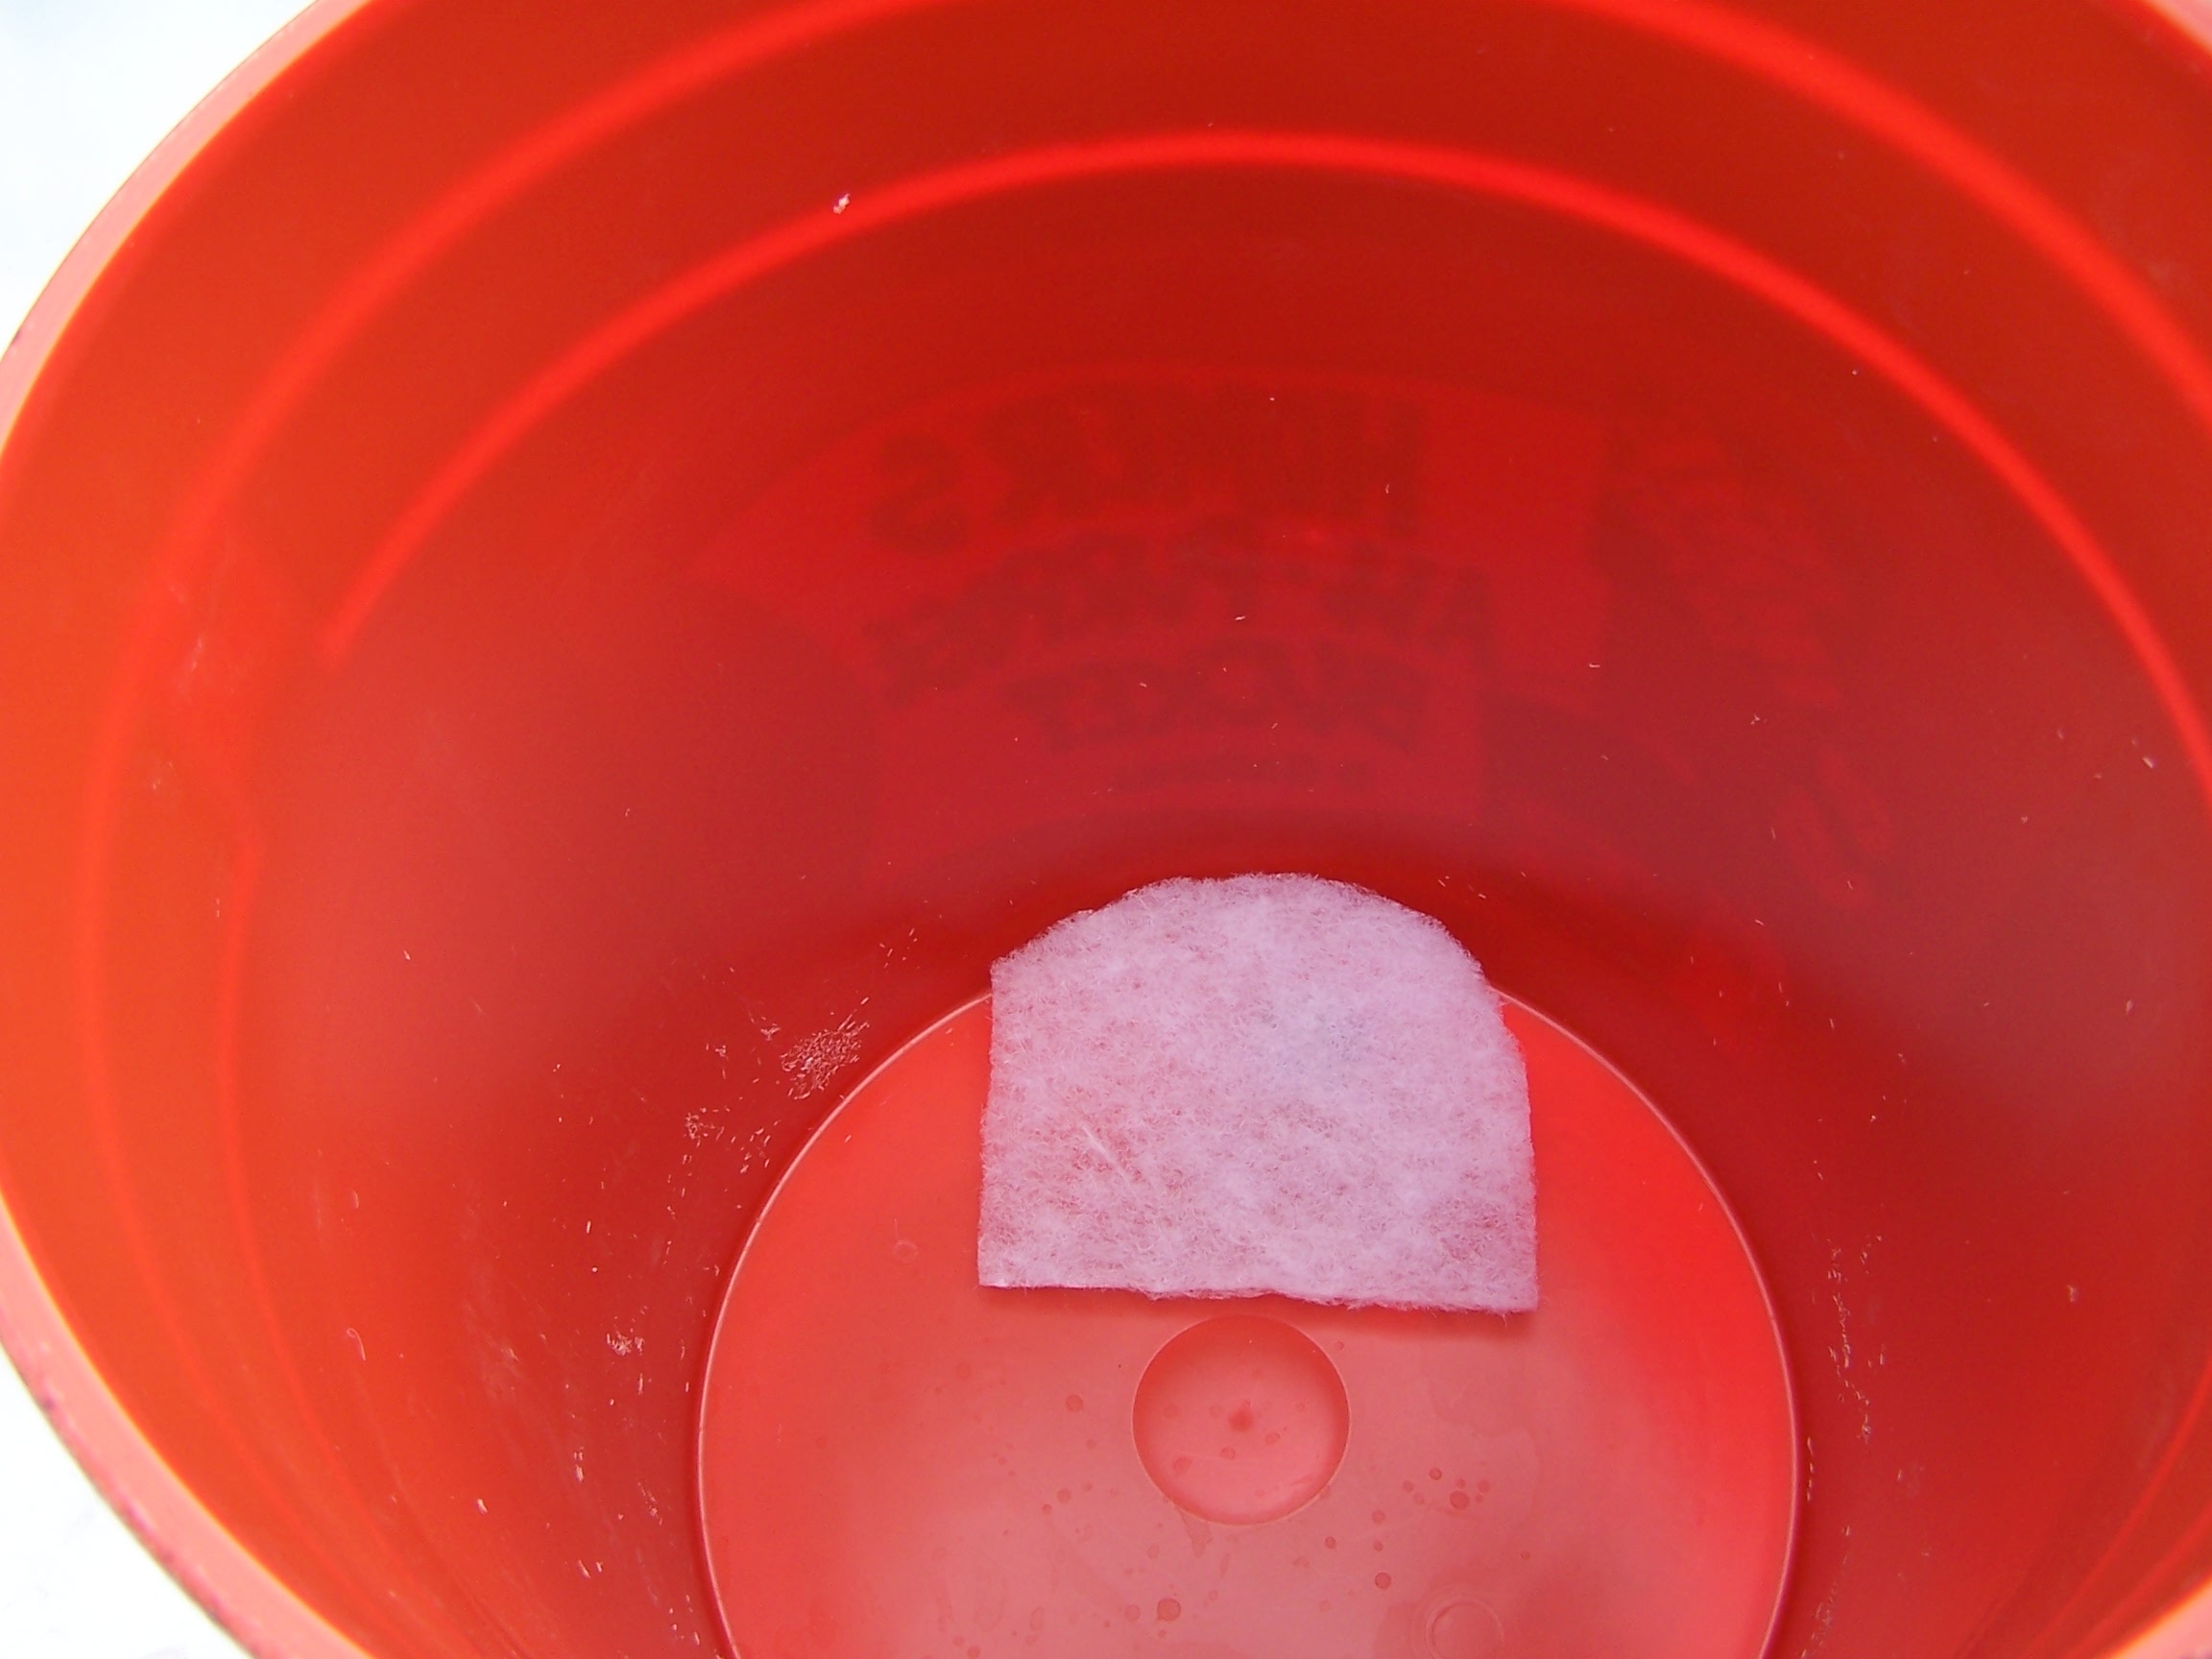
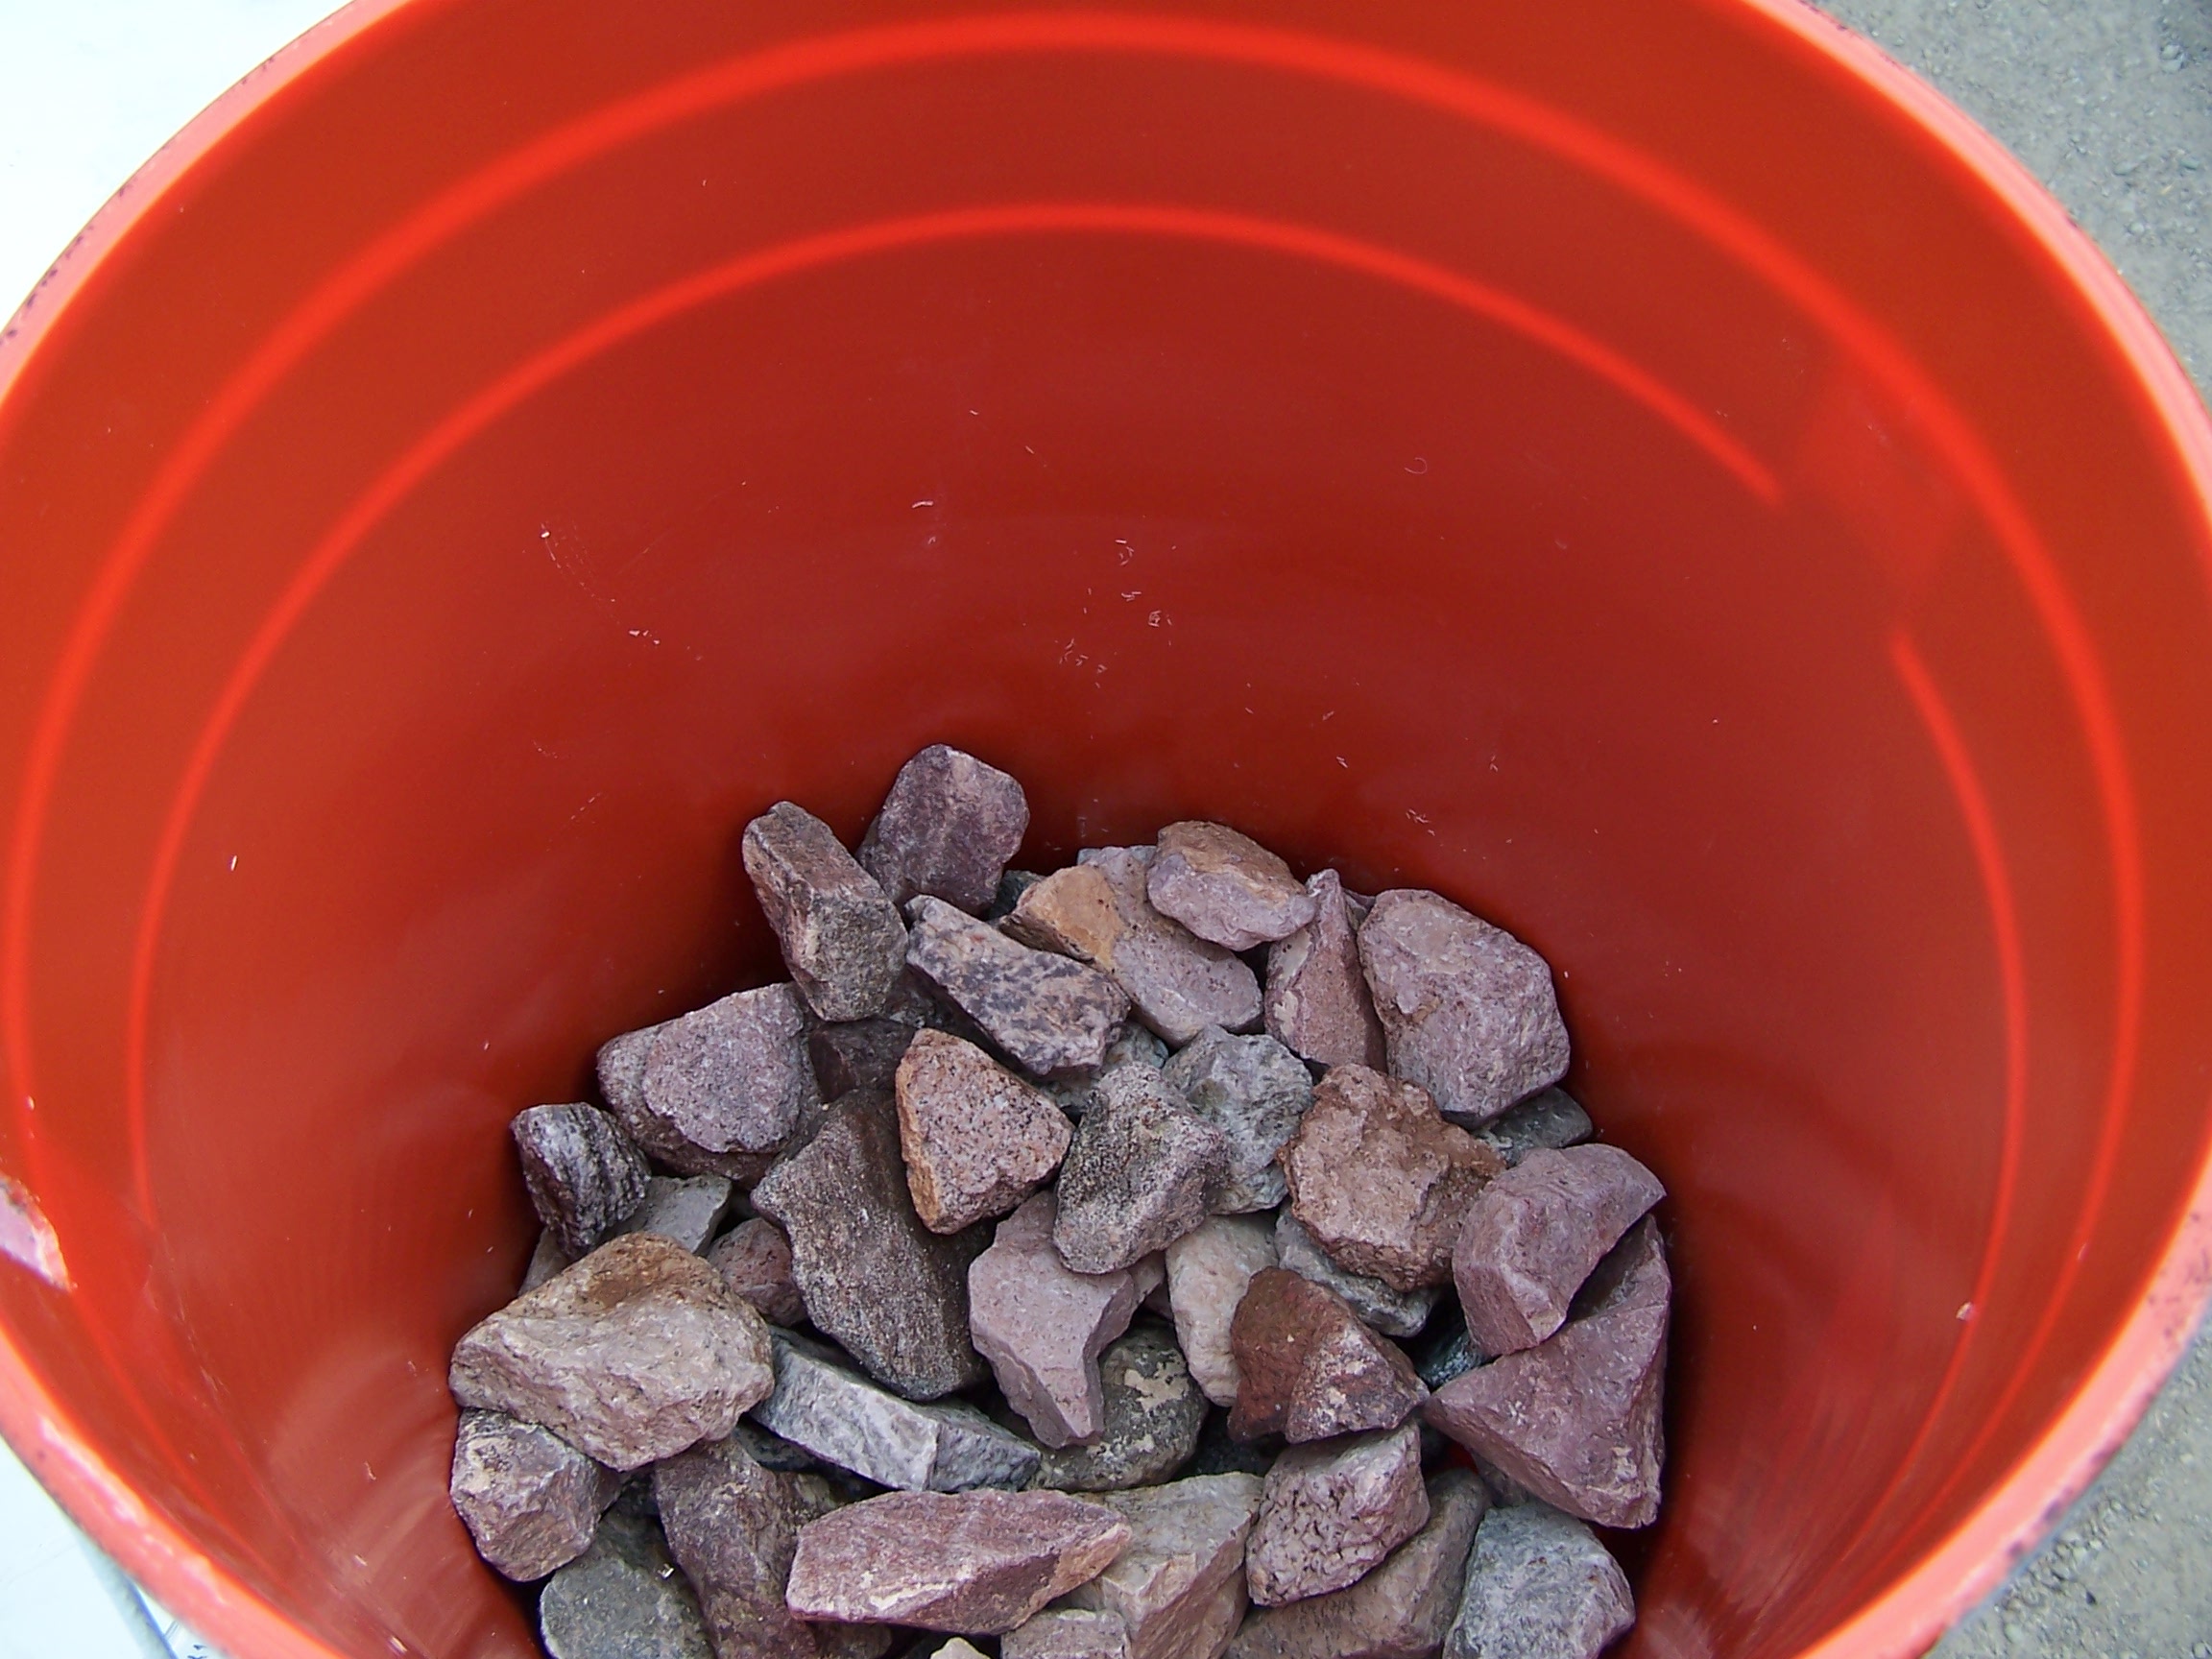
Getting the buckets ready to put the plants in is also quite simple, but just a few steeps. First cut the filter part out of the furnace Filter, then cut a piece off to place over the through holes. This will keep the growing medium out of the tubing, but still allow the water to flow easily out the bottom. Now that you have the filter in place, place some rocks on top of that. I would fill about the bottom third with rocks. This holds the filter in place, and adds weight to the bucket keeping them firmly in place. (Note:) Be sure to clean and sanitize the rocks first by soaking them in bleach water for about an hour, then rinsing again. This reduces the chances of any root diseases.

On top of the rocks place the growing medium. I like coco chips myself, and that’s what I used when building this system. Coco chips and coco fiber are Basically the same thing, but the chips just larger partial sizes. Now make a loop using the vinyl tubing and a connecting “T” for all 4 buckets. These will be the dripper’s that will water the buckets. Once you have  made them, take a paperclip and heat one end up with the flame of a candle, then poke some holes in the tubing ring with it. Notice that I cut a notch in the side of the buckets just large enough to hold the watering line in place snugly. made them, take a paperclip and heat one end up with the flame of a candle, then poke some holes in the tubing ring with it. Notice that I cut a notch in the side of the buckets just large enough to hold the watering line in place snugly.
As with the drain lines, the feed (watering) line setup will depend on the configuration and positing of where you place your buckets. In this picture you can see how I have run the lines to my buckets. The feed line comes up through a hole in the center of the table. Then is split into 2 lines using a “T”  connector, then each of those lines is split into two lines again using the same “T” connectors. Essentially splitting one feed line into 4 separate lines (one to each bucket). connector, then each of those lines is split into two lines again using the same “T” connectors. Essentially splitting one feed line into 4 separate lines (one to each bucket).
I used a digital timer with this system (I already had it), but I later got another one for a different system for $5.95 at Kmart. It had plenty of settings and even a cover over the dial. For best results with the timer, make sure it ‘s rated for 15 amps (usually called heavy duty). You will also want a timer that has pins for the on/off cycles all around the dial, not just a few (for analog timers). That’s because it will need to be turned on and off many times during the day. Digital timers usually have many on/off cycles that can be set.
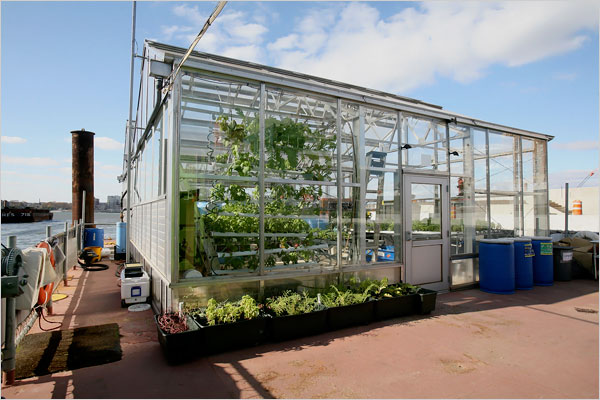
With all the environmental issues facing the planet these days, it’s not often you hear about real viable solutions to any of the problems that can be fully taken advantage of right now. But the Science Barge project (started in 2006) is one of those viable solutions. By taking common technology, and combining them together, the Science Barge project is showing that there’s at least one answer to the planets problems that can be implemented today. Without waiting decades for the technology to be developed and perfected first.
The Science Barge is a floating, sustainable urban farm project, that’s owned by Groundwork Hudson Valley in NY. There funded by federal, corporate, and foundation support as well as receiving individual donations. The Barge may be a small scale project, but the goal is to help educate and show future farmers that a self sustaining farm can be done on a large scale. By not only serving as a model for future farms, but it’s also serving as an ongoing educational tool to students, collages and the general public. Another goal is to get people to think outside the box, by simply showing them that growing food can be done in lots more places then were conventionally thought to be unusable for crops, and food production. Can you imagine crops growing on rooftops, buildings, floating on lakes or oceans, suspended above parking lots and highways, on top of sports stadiums and Schools.
What makes the Science Barge different
The Science Barge program is a 135 foot long flat bottom boat based in Yonkers NY. that takes hydroponics and aquaponics, as well as being green to the next level. By using solar, wind, and bio-fuels (with no carbon emissions) to 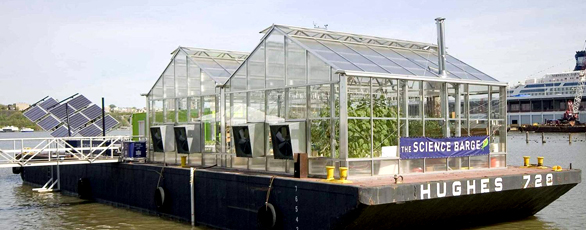 fully power the project. Water storage tanks hold rainwater from a rainwater catchment system, as well as a RO system (Reverse Osmosis) that purifies river water to irrigate the crops. The used water is also recycled so there is no waste-water run-off going back into the environment. The water demand for irrigating all the plants on the barge is about 75 to 150 gallons per day. that’s less than 1/4 the demand for the same amount of field grown plants. The fruits and vegetables grown on the Science Barge also require seven times less space to grow than traditional field grown crops. fully power the project. Water storage tanks hold rainwater from a rainwater catchment system, as well as a RO system (Reverse Osmosis) that purifies river water to irrigate the crops. The used water is also recycled so there is no waste-water run-off going back into the environment. The water demand for irrigating all the plants on the barge is about 75 to 150 gallons per day. that’s less than 1/4 the demand for the same amount of field grown plants. The fruits and vegetables grown on the Science Barge also require seven times less space to grow than traditional field grown crops.
They get all of the electricity they need from wind, solar and bio-fuels. They have five internally regulated wind turbines (with a total 2.0 kW of power), two passive solar trackers, including solar charge controller and auto-transformer. These solar panels track the suns path for maximum efficiency (with a total 2.45 kW of power). All of  this electricity is stored in a bank of battery’s on-board the barge. The battery bank is capable of storing a two day reserve of needed electricity. But well you just never know, so they also have a generator that has been converted to run on used vegetables oil (bio-fuel), just in case. The barges daily power demand is about 25 kWh. Large farming operations that don’t use all the electricity generated from the solar and wind generators, can also sell the excess electricity to the electricity company’s for an added source of income. this electricity is stored in a bank of battery’s on-board the barge. The battery bank is capable of storing a two day reserve of needed electricity. But well you just never know, so they also have a generator that has been converted to run on used vegetables oil (bio-fuel), just in case. The barges daily power demand is about 25 kWh. Large farming operations that don’t use all the electricity generated from the solar and wind generators, can also sell the excess electricity to the electricity company’s for an added source of income.
Along with regular hydroponics, they are also utilizing the technology of aquaponics on the Science Barge. Aquaponics is a little bit different than traditional hydroponics, it’s a process where the nutrients solution is created in a controlled living environment of living fish, water-plants, and microorganisms that break down the organic material (fish waste etc.), into the raw elements the plants can then absorb from the roots. Among other things, the aquaponic system on the science barge is home to crayfish, goldfish, catfish, and is able to grow editable food. The Science Barge also contains a small man made wetland area, that’s located underneath the solar panels that is used to recycle the used water from the hydroponic, and aquaponic systems.
But is it really all that efficient?
The Science Barge is able to grow 2000 pounds of fruits and vegetables in an area about the size of a single bedroom apartment, all in a single growing season. Unlike field grown plants where there’s only one growing season a year, because you control the plants environment when growing hydroponically, you can have anywhere from 4 to 8 growing seasons in a single year (depending on crop/plant). There’s no off season in hydroponics, plants are grown and  when their done their immediately replaced with new plants, all year long. So along with being able to grow 7 times more produce in the same amount of space, and using less than 1/4 of the water to do it, then multiplied by many more seasons per year in the same space. Well I’ll let you do the math. And on top of all that, it’s completely environmentally sustainable too. when their done their immediately replaced with new plants, all year long. So along with being able to grow 7 times more produce in the same amount of space, and using less than 1/4 of the water to do it, then multiplied by many more seasons per year in the same space. Well I’ll let you do the math. And on top of all that, it’s completely environmentally sustainable too.
The only downside would be the higher start-up costs, mainly from building the greenhouses, wind turbines, solar panels, and battery bank to store the energy. That’s the main stumbling block, but due to the much higher yields will quickly more than pay for itself. Especially when you factor in all the savings from not needing all the very expensive heavy equipment needed to plow and condition the soil, spray pesticides, as well as harvest traditionally grown field crops. From my point of view, I don’t see how we can afford to continue to grow crops the traditional way anymore.
Useful Links
Sunburst Solar Panels
Science Barge
Events & Workshops
Science Barge FAQs
Science Barge technical description pdf.
Is the Science Barge Sustainable?
Futuristic Farm pdf.
There are so many different manufactures of hydroponic nutrients on the market, and you always here the question which nutrients work best. While the answer to that is really based on what plants your growing, simply because some nutrients are formulated for specific types of plants, and some nutrients are formulated for general use. But just about all commercially manufactured nutrients are formulated to provide a well balanced nutrient solution that will generally supply your plants with all the nutrients they need, and in the right ratios. But that doesn’t mean your plants wont ever become deficient of some essential nutrient/s (element/s), and will never show any signs or symptoms of a deficiency. Even if there in abundant supply in the nutrient solution. This can be a calcium problem.
It’s normal to think that if there’s a deficiency in the plant, it must be deficient in the nutrient solution. But that’s not always the case. Plant chemistry is a very complex process where each element affects others, as well as environmental conditions. Calcium is a major building block for plants, and like any other element, can become deficient in plants even when in plentiful supply in the nutrient solution. But a calcium deficiency is very difficult to diagnose because it has such a wide range of symptoms, and can simply look like other deficiencies and/or diseases.
Why Plants Need Calcium
Calcium is used in the plants cell walls during their formation, It’s basically required for the stability and function of the cell membrane, and it acts like a kind of glue or cement, binding the cell walls together. So if adequate calcium is not in the cell tissue during the formation of the cell walls, the plant tissues will simply be less stable and prone to breaking down. It then can look like a wide verity of symptoms of disease and/or deficiencies, that also makes the plant tissue more prone to getting disease and viruses from other environmental conditions and/or insects.
Once the cells are formed, the calcium is glued/cemented in place and becomes immobile. Because calcium has then become immobile within the plant, a constant supply of calcium is needed for healthy growth as the plant continues to grow. If there’s a lack of calcium supply within the plant, once the cells are already formed, they can’t be repaired by an increase of calcium supply to the cells that have already been formed. But the new plant growth can grow healthy and normal. When other elements are in excesses, calcium also helps act as a buffer for the root system. Calcium even plays a part in activating enzymes that regulate the flow of water movement within the plant cells, and is therefore vital for new cell growth and division.
Factors that Influence Calcium Availability
 Plants have two basic types of tissues to transport the minerals and sugars they need for growth though the plant, the xylem and phloem. These act as the circulation system for the plant, like vain’s and blood vessels in a human. The xylem vessels carry water along with the dissolved nutrients from the roots up stems to the leaves and fruit. Water is lost from the foliage by transpiration (like exhaling in humans), through small pours in the stems and leaves called stoma. This creates a suction which draws up water from the roots through the xylem vessels, and distributed all around the plant. Plants have two basic types of tissues to transport the minerals and sugars they need for growth though the plant, the xylem and phloem. These act as the circulation system for the plant, like vain’s and blood vessels in a human. The xylem vessels carry water along with the dissolved nutrients from the roots up stems to the leaves and fruit. Water is lost from the foliage by transpiration (like exhaling in humans), through small pours in the stems and leaves called stoma. This creates a suction which draws up water from the roots through the xylem vessels, and distributed all around the plant.
Any condition that affects plant transpiration will affect the water flow/uptake through the xylem. Since the calcium is transported primarily through the xylem, this will affect the calcium nutrition of the plant. Slow uptake of water into the plant can lead to calcium deficiencies, even if there’s plenty of calcium in the nutrient solution. Therefor encouraging transpiration is one of the best ways to ensure the plant is getting the calcium it needs all the time. Environmental conditions like high humidity and little or no air flow, slow down  transpiration of the plant. Adding ventilation is the simplest way to encourage plant transpiration. High temperatures and water stress also affect calcium intake. Keeping the plants stress free, with good ventilation, will go a long way to good calcium nutrition. transpiration of the plant. Adding ventilation is the simplest way to encourage plant transpiration. High temperatures and water stress also affect calcium intake. Keeping the plants stress free, with good ventilation, will go a long way to good calcium nutrition.
Also not all parts of the plant will transpire at the same rates. The tips and edges of new and/or fast growing foliage, as well as fruits tend to transpire at slower rates than the already established older foliage. Because of this, a calcium deficiency in the plant tissue can appear in the form of “Tip Burn” and/or “Blossom End Rot” (BER). But both Tip Burn, and Blossom End Rot can be caused by other things, making a calcium deficiency quite difficult to diagnose.
It’s also important to maintain a well balanced nutrient solution. Most all commercially made hydroponic nutrients are well balanced. Although as the plants take up nutrients from the nutrient solution, the balance tends to be thrown off. Another important factor to consider is the strength of the nutrient solution, nutrient solutions that are too strong can inhibit calcium uptake from the plants roots.
With any hydroponic nutrient solution, there can sometimes be unwanted pathogens, bacteria and/or fungi that can grow out of control in it. It’s not uncommon for these disease and viruses causing microbes to be in the nutrient solution. In fact, it’s very common for many different pathogens, bacteria, and fungi to be in the nutrient solution. it’s just when the unwanted microbes grow into numbers that largely out weigh the beneficial microbes, that they can cause a problem. Much like the human immune system, the nutrient solution is a living environment, the beneficial microbes in the nutrient solution act as the plants immune system, keeping the damaging microbes at bay.
Once the pathogenic microbes get a strong foothold, they are very difficult to get back under control without doing damage to the plants. Simply changing the nutrient solution is not usually good enough, by then they have already imbedded themselves on the plants roots causing diseases and viruses. Once that happens, aside from constant care of fungicides and/or H2O2 treatments (that can also do damage to the plants). The only other option is the direct addition of beneficial microbes into the new nutrient solution once it has been changed, in hopes of keeping the pathogenic microbes from out numbering the beneficial ones again. But that wont fix any disease problems that may already exist, just helps keep it from getting too much worse. After that, the plants need to be discarded and the whole system needs to be sanitized to prevent recurrence.
How Ultraviolet Light (UV) Works
 UV light has been used as a water purification system for well over 50 years, so it’s not new technology. Although for hydroponic systems, it can be safely used to kill microorganisms without adding harmful chemicals like chlorine to the nutrient solution. Because the UV light only penetrates the water so far down depending on how strong the light source is. The nutrient solution is run UV light has been used as a water purification system for well over 50 years, so it’s not new technology. Although for hydroponic systems, it can be safely used to kill microorganisms without adding harmful chemicals like chlorine to the nutrient solution. Because the UV light only penetrates the water so far down depending on how strong the light source is. The nutrient solution is run 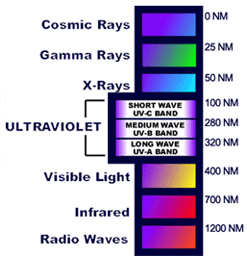 through a tube where the water level is sufficient for the light to be able to penetrate all the way through the water. The water then runs through the tube at a flow rate that allows the light to have sufficient time for the UV radiation to kill the organisms. The UV radiation will kill most of the microorganisms directly, or it will sterilizes them. Once a microorganism is sterilized, it cant reproduce and simply dies. through a tube where the water level is sufficient for the light to be able to penetrate all the way through the water. The water then runs through the tube at a flow rate that allows the light to have sufficient time for the UV radiation to kill the organisms. The UV radiation will kill most of the microorganisms directly, or it will sterilizes them. Once a microorganism is sterilized, it cant reproduce and simply dies.
The UV radiation treatment is safe for people and animals, so don’t worry about glowing nutrient solutions, or glowing plants from radiation. In fact, many people subject themselves to direct UV radiation every day to get a tan at the tanning salon. Once out of the direct UV light (that’s inside the tube) there is no more UV radiation, in which case new microorganism that haven’t been subjected to the light source yet will be able continue to multiply. That’s why the nutrient solution is generally run through the UV light (in the tube) on a continuously flowing basis, keeping new microorganism from being able to multiply.
How Ozone Treatments work
Ozone Treatment is similar to using an air pump to oxygenate the nutrient solution, although Ozone has an extra Oxygen molecule that is highly unstable. That doesn’t mean that it’s dangerous, just that the third molecule dissipates quite quickly (it has a very short half life). The added oxygen molecule makes Ozone a very powerful oxidizing agent, and can result in the elimination of the unwanted pathogens, bacteria and fungi that can cause the diseases and viruses to the plants. With Ozone Treatments, it’s not easy to achieve good reliability due to the short half life, and difficulty in getting good concentrations of Ozone into the nutrient solution. For this reason Ozone Treatments are generally just used in commercial operations.
Ozone treatment systems require an ozone generator, and some of the oxygen from the air that flowers through the generator is converted into Ozone. Then just like an air pump and air stones are used to help oxygenate the nutrient solution, the ozone enriched air (O3) is pumped into the nutrient solution as a stream of bubbles. Contact time between the solution and Ozone bubbles is critical to it’s efficiency, especially due to the very short half life of the (O3) molecules. The Ozone bubbles need to pass through a very deep solution tank usually called an “absorption tower,” this allows the Ozone bubbles to stay in contact with the solution as long as possible for maximum efficiency.
Downsides to using Ultraviolet and Ozone treatments
Both ultraviolet , and Ozone treatments can breakdown some of the iron chelate in the nutrient solution, and that may cause some precipitation of manganese compounds. They also may reduce the “beneficial” micro-flora, which can play a role in suppressing plant disease and viruses. Also if you use any insecticides and/or fungicides in your nutrient solution, UV and Ozone treatments can also breakdown many of the organic compounds in them, once these organic compounds are broken down, some can become toxic to plants. Lastly Ozone can sometimes be damaging to certain plastic parts, mostly for commercially made NFT systems.
Useful Links
Ultraviolet Light Disinfection
Clean Water Supplies for Hydroponics
Hydroponic H2O: Water Quality and Treatment
Ultraviolet Disinfection Technology
The main idea behind grafting is to simply take a variety of plant with a desirable above ground characteristics, and connect it to the roots of a variety with desirable under ground characteristics. Grafting is a propagation technique where the living tissue of two different plants are joined, and fused together into one plant. The top part of a contributing plant can be stems, leaves, flowers, and/or fruits, this part is called the scion. The bottom part of the plant contributes the roots and support, this part is called the rootstock (or understock).
Although grafting usually refers to joining only two plants together, you can join as many as needed. Multiple grafts are commonly done with fruit trees. For instance in order to get multiple varieties of apples from one tree, or to get multiple varieties of citrus like lemons, limes, oranges, tangerines and grapefruit from just one tree. Grafting is not limited to trees, grafting vegetables and/or any other plant follows the same principle as grafting fruit trees.
Why Graft Your Plants
Besides just for the obvious fun of it, there a other reasons that grafting your plants may be useful. Some of these benefits include;
- To Take advantage of a particular rootstocks, Some rootstocks varieties may have superior growth habits, disease and insect resistance, drought tolerance, or may even be better adapted to a particular climate than that produced naturally by an ungrafted plant. Where the scion (top) of another variety may have a desired fruit size, flavor, or even plant size etc..
- To Optimize cross-pollination, Not all plants are self pollinating, some require pollination from another variety for good fruit set, and some plants have either male or female flowers but not both. To ensure good fruit set on the female flowers, a male plant must be growing nearby. Grafting a section of a male plant to a female plant can increase good cross pollination.
- To Increase the growth rate of seedlings, Grafting seedling onto a more mature plant can increase the growth rate of the seedlings because the root system is already established.
- To Perpetuate clones, Clones of some species of plants can’t be reproduced from vegetative cuttings easily, because the percentage of cuttings that successfully root is quite low. But many of them can however be grafted onto seedling rootstocks.
- Creating new Varieties Some varieties of plants don’t actually come from seeds. Some are difficult and/or just about impossible to reproduce strictly from cuttings or other techniques.
Grafting limitations
All kinds of plants can be grafted including fruits, vegetables, trees, bushes, flowers, but not all plants can be grafted together. The only real way to tell if it can be grafted is simply to try. But generally speaking plants that are closely related graft together best, and form a good graft union. A poor graft union usually results in plants that either grow poorly, break off or just eventually die.
Types of Grafts
Although there are many different so called types of grafts (Cleft Graft, Bark Graft, Side-Veneer Graft, Splice Graft, Whip and Tongue Graft, Saddle Graft, Bridge Graft and Inarch Graft) they all basically really come down to two types of grafting techniques, top grafting and side grafting. With top grafting the scion is matched to the new stem (plant) by placing it directly on top of the rootstock stem. In most cases the scion and understock are of exact or nearly equal size. Another type of top grafting consists of splicing the scion to the side of the stem of the new rootstock (even of different sizes). In which case several scions may be attached to a single rootstock, or stem of a rootstock. The different names (types) are just given to explain the different types of cuts used to match the two stems together.
With side grafting, a partial cut is made into the stem of the scion plant (leaving the rootstock attached), then placing it onto the cut-off stem of the rootstock. At that point both the top (scion), and the bottom (rootstock) still have their root systems attached. Once the graft has successfully formed a good union, the root system of the scion (top) is severed from it’s original root system, leaving the scion to now live solely on the new rootstock.
Taking Care of the Graft
Both preparation, and post-graft care should be taken to insure success. It’s usually better to do the grafting in the morning or late afternoon when it’s cooler so they don’t wilt, and to avoid water stress. Also if you can, it’s best to do your grafting on cloudy days, in the shade, and/or in a cool greenhouse. You should keep the grafting area and cutting utensils as clean as you can (like cleaning off the cutting blade in-between cuts) to help prevent plant diseases from getting in the graft.
All graft cuts must be smooth and straight so they will fit and line up correctly. It’s a good idea to practice by cutting some extra twigs of the same size as the ones you intend to graft. Once you have made the matching cuts, it’s important not to let the cuts dry out. You shouldn’t try to cut more plants than you can graft together in a few minutes in order to keep the cuts from drying out, and the plants from wilting. Although, you can wrap the cut ends in a wet towel, or place them in a cup of cool water temporary if necessary. When attaching the graft, you want to make sure the stems are lined up correctly in order to form a good union, also you’ll want to wax over the cuts to help prevent diseases. Once complete you’ll need to secure the graft, this can be done a number of ways (like wrapping, tying, clamps etc.) depending on the size, and what type of graft your doing.
After grafting, it’s best to keep the plants in a warm but shaded place, about 80-85 degrees F. Also you should try to keep them in a place with high humidity (hopefully 95% relative humidity if possible) until the grafts heal. Regular misting is helpful as well to keep humidity high (just not real wet). It will likely take about a week for the graft to heal. Once the grafts heal, set them out in direct sunlight again a little longer each day in order to slowly acclimate them to the direct sunlight again. Continue to mist them if needed to prevent wilting. Once the grafts have healed and formed a good union, and shortly after growth starts (usually about 2 to 6 weeks depending on the plants), you’ll want to remove the binding material such as string, cord or even some types of nursery tape to prevent Girdling (basically choking the plant) because they wont easily expand with the plant growth.
Useful Links
Grafting Techniques For Greenhouse Tomatoes
Grafting and Budding Nursery Crop Plants
Grafting
Grafting, University of Missouri
GRAFTING GREENHOUSE TOMATOES
Grafting, University of Kentucky
Who says you cant grow hydroponic crops anywhere? How about in the Antarctic, the coldest harshest continent on the planet. The only continent that has such harsh conditions there are no permanent human residents on the entire continent. The only residents are 1,000 to 5,000 people that reside throughout the year at research stations scattered across Antarctica. Out of all the dozens of research stations, only three are permanently manned year round, and they rotate the personal during the summer season. Well if you can grow hydroponic crops in that type of environment, you can grow hydroponically anywhere.
The National Science Foundation’s Office of Polar Programs (NSF/OPP) oversees all of the research stations in Antarctica. Many of the research stations have built greenhouses to grow fresh produce to feed the crews manning the stations. This is especially important for the few research stations that are in operation year round. Supply’s cant be flown in because like the north pole, most of Antarctica is in total darkness for about 4 months of the year. That combined with bad weather conditions like record lows of -117 F (without the wind chill), and unpredictable blizzard like winds, makes it extremely risky for planes to land and take off to bring in supply’s most of the year. So these stations simply can’t be re-supplied over winter months. All material and personnel must be flown in and stockpiled during the Summer season.
 Once the supply planes stop after the Summer season, the fresh produce quickly runs out. So if there going to have any fresh fruits and vegetables during these long cold months, they simply need to grow it all on site at the research station themselves. The availability of fresh fruits and vegetables for meals, as well as flowers in the dining and recreation areas, has a great effect and impact, to the overall morale of all the personnel during those long dark winter months. Once the supply planes stop after the Summer season, the fresh produce quickly runs out. So if there going to have any fresh fruits and vegetables during these long cold months, they simply need to grow it all on site at the research station themselves. The availability of fresh fruits and vegetables for meals, as well as flowers in the dining and recreation areas, has a great effect and impact, to the overall morale of all the personnel during those long dark winter months.
Hydroponics in Antarctica is not exactly new, they have been using hydroponic systems in Antarctica scene the 1980’s. Although it was not intended as part of the research, but just to help provide fresh perishable fruits and vegetables to the researchers, in order to make life at the research stations more bearable. Though over the years, and through trial and error from the personnel at the research stations, as well as their persistence, they have been able to make hydroponics on Antarctica quite productive. Providing as much as 250 plus pounds of food monthly with less than 700 square feet of greenhouse space.
The Antarctic Greenhouses
 The Antarctic greenhouse at the McMurdo (US) research station is not your ordinary greenhouse though. With the help of the researchers in Antarctica, the University of Arizona’s “Controlled Environment Agriculture center” has developed the most sophisticated state-of-the-art growth chamber (greenhouse) on the planet. It’s also a prototype for space stations, including those future stations planed for the Moon, and Mars. It’s called the “South Pole Food Growth Chamber” (SPFGC) Project. The Growth Chamber was first completed and delivered to the South Pole McMurdo research station in February of 2004. The Antarctic greenhouse at the McMurdo (US) research station is not your ordinary greenhouse though. With the help of the researchers in Antarctica, the University of Arizona’s “Controlled Environment Agriculture center” has developed the most sophisticated state-of-the-art growth chamber (greenhouse) on the planet. It’s also a prototype for space stations, including those future stations planed for the Moon, and Mars. It’s called the “South Pole Food Growth Chamber” (SPFGC) Project. The Growth Chamber was first completed and delivered to the South Pole McMurdo research station in February of 2004.
It’s a completely sealed, automated atmospheric, CO2 enriched, climate controlled greenhouse. This includes recalculating the waste heat given off by the water-jacketed HPS lamps to supplement the heat needed to heat the greenhouse. Also the hydroponic nutrient delivery system, and pH adjusting system, as well as all the environmental conditions are computer controlled by the ARGUS agricultural environmental control system and equipment. It records, controls and displays all key aspects of the environmental conditions for current, and later analysis. The Growth Chamber is fully operated by volunteer’s at the research station, and with each personnel change the new personnel needs to be trained to operate it all.
 Some of the typical hydroponics crops grown in the Antarctic include tomatoes, lettuces, spinach, various dark leafy greens, cucumbers, bell and hot peppers, beans, zucchini, snow peas, fennel, as well as all kinds of herbs. Growing hydroponically allows the grower to grow out of season crops as well as all year round, and with the fully climate controlled greenhouse it’s always the perfect season for the plants. By using this to their advantage, that allows the personnel in Antarctic to continually rotate the plants so they always have fresh ready to eat produce from there crops. Some of the typical hydroponics crops grown in the Antarctic include tomatoes, lettuces, spinach, various dark leafy greens, cucumbers, bell and hot peppers, beans, zucchini, snow peas, fennel, as well as all kinds of herbs. Growing hydroponically allows the grower to grow out of season crops as well as all year round, and with the fully climate controlled greenhouse it’s always the perfect season for the plants. By using this to their advantage, that allows the personnel in Antarctic to continually rotate the plants so they always have fresh ready to eat produce from there crops.
Also by germinating seedlings on a regular basis, they make sure they always have replacement plants ready to place in the hydroponic systems once they have harvested the older ones. This significantly reduces the time that’s needed to go from seeds to maturity (or before they begin to fruit), and helps to make sure they have a continuous supply of fresh produce all the time.
Conclusion
Well perhaps ordering your own “South Pole Food Growth Chamber (SPFGC)” is out of the question, but it just goes to show that just about anything can be done. Not many of us have such extreme conditions to deal with, but all it takes is some trial and error, persistence, patients, and ingenuity to find a way to solve any conditions and/or problems 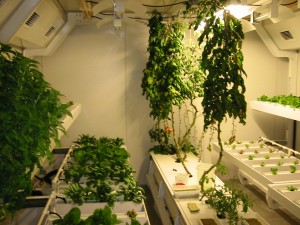 that you may be facing with your hydroponic gardens. that you may be facing with your hydroponic gardens.
Useful Links
Hydroponics at Mc Murdo Station Antarctica
South Pole Food Growth Chamber (SPFGC)
Science in Antarctica
Australian Antartica Division
Fresh Veggies at the South Pole
South Pole Greenhouse Feeds Winter Crew, Simulates Lunar Chamber
Green Antarctica: Station greenhouses produce fresh food
|
|
 the fruit has been kept dry (out of the rain and morning dew), the storage and shelf life of ripe raspberries (under refrigeration) is greatly increased, thus stays fresher longer for the consumer. In addition, many of the insects/pests that can be a problem during the summer months are not active during the off season in the cold winter months.
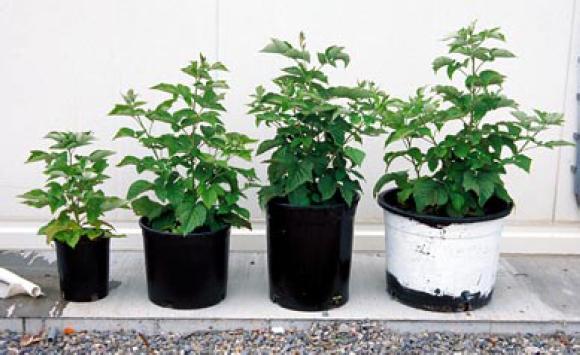 returned back to a central reservoir, but is allowed to run off. Depending on the size and age of the plant, growers use buckets starting from 3 gallons and transplanting into larger buckets up to 7 gallons as they get bigger. All the plants energy is stored in the roots, so make sure to take care to do as little damage as possible to them when transplanting if doing so. Also make sure not to let the roots dry out before, during, or after transplanting.
 Optimum Growing Conditions
 The optimum humidity range is between 65% -75%. Humidity levels above 90% will encourage fruit molding and pour pollination. Humidity levels below 65% will encourage mite infestations as well as pour pollination also.
 A supporting trellis system is an important part of good raspberry production. As the fruiting laterals become heavily weighted down with berry’s and foliage, they will tend to bend over and break from the weight. Once the growing season is over all the leaves can be trimmed off, and the old canes can be pruned off as well. Pruning and trellising will affect plant growth, fruit quality and quantity, as well as size. So you should get to know your canes.
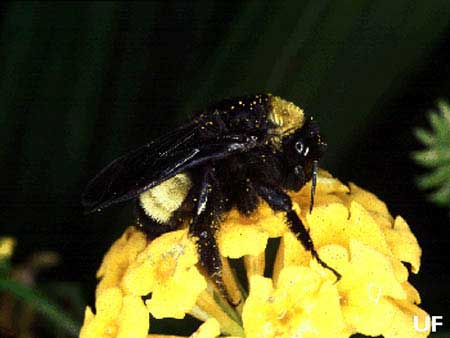 the production cycle or not, you may need more than one bumblebee hive to pollinate your crops. The stigmas of the flowers may only remain receptive to pollination for about 6 days or so, so it’s important to have your pollinators ready when the flowers begin to open. For growers serious about raspberry production, it may be well worth their while to learn to raise bumblebees themselves, especially for year round production.
 bottle fly’s are also suited for use in greenhouses. They don’t like to stay in one place, and tend to fly off. But work well in confined spaces like a greenhouse environments. It’s important to remember bees, bumblebees and fly’s are all insects also, the use of pesticides will have a negative effect on them as well. Most growers are learning that the use of beneficial insects for pest control will still allow them to be able to control the pest populations, as well as not effect the other beneficial insects like the important pollinating insects.