This Ebb & Flow hydroponic design can be custom built for as many plants as you wish, but it would be recommended to build smaller setups, and place them in line with each other, in case in the future you don’t want to grow a lot of plants in the same hydroponics system. That way they would be more versatile.
Parts List
- 6 empty two litter bottles (cleaned and sterilized)
- 1/2 inch PVC tubing (3/4 inch if desired)
- 7 PVC elbow connectors
- 8 PVC “T” connectors
- 1 Threaded and barbed connector (to connect PVC tubing to vinyl tubing)
- 1 Threaded (on one end) PVC connector to connect the PVC tubing, to the vinyl tubing connector
- PVC glue and Primer
- Six 3/4 to 3/4 inch PVC connectors
- Six 1/2 inch to 3/4 inch adapter (if using 1/2 inch tubing)
- Epoxy glue (for gluing plastics)
- 1 Water pump
- 1/2 inch black vinyl tubing (or blue tubing from a hydroponics store)
- Minim 10 gallon storage tote for reservoir (15-20 recommended)
- Air pump (optional)
- Air line (optional)
- Air stones (optional)
- Black spray paint
- White spray paint
Two litter bottles for the growing chambers
 First cut the bottoms off of 6 two litter bottles. Then either drill or use a hot poker to make a lot of holes in the bottoms of the two litter bottles that you cut off. Flip the bottoms upside down then insert them all the way down into the tops of the bottles. No need to glue them, they will stay in place and make it easier to take out and clean for reuse. This is just to keep the growing medium from going down into the PVC tubing.
Grind off just enough of the threads on the two litter bottles so they will fit into the 3/4 inch to 3/4 inch PVC connectors. Then glue the connectors to the bottles using the epoxy glue (for plastics). After the epoxy has dried wadded up a paper towel and place it into the other end of the connector so paint wont get in the throat of the bottles. Set the bottles cut side down, and paint and paint the outside of the bottles black (note: painting black will block light and keeps algae growth down). Once the black paint has dried, paint them again using white paint (note: white paint reflects light and helps to keep the temp of the nutrient solution, and root zone down).
Building the base of the system
The base of the system can be built with either 1/2 inch or 3/4 inch (or even 1 inch) PVC tubing, just make sure you have the right connectors for the size tubing you are using, and if using 3/4 inch tubing you can omit the “1/2 inch to 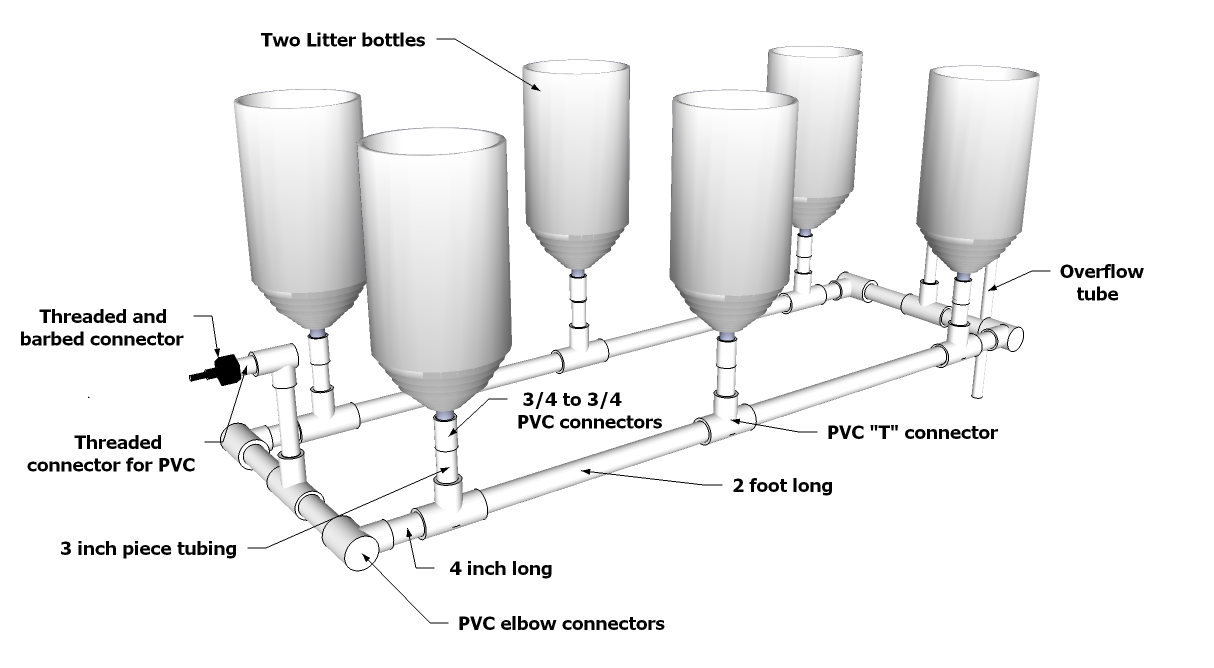 3/4 inch adaptor.” Now cut four 2 foot, four 1 foot, and four 4 inch pieces of tubing. We will cut the tubing for the fill and drain lines, and bottle connections later.
Now dry fit the tubing with the “T” and elbow connectors together (as in the image), don’t glue them yet. Now cut 8, 3 inch pieces of tubing. Place one in the “T” for each of the 6 bottle. Then one in the “T” for the water inlet, then place an elbow connector facing the direction you need the inlet to come from. Now place the last 3 inch piece in that elbow. Now place all 6 bottles in place and align all the tubing so everything is straight, and the bottles are straight up. Now take a marker and draw one line across all the connections, this way when you glue them together you can simply and quickly line up the marks before it sets.
 Now glue all the connections together, except the bottles themselves. That way you will be able to remove them for cleaning or any maintenance. Now connect and glue the threaded PVC connector for the inlet, and thread on the barbed PVC connector to connect PVC tubing to vinyl tubing. The inlet side is now complete. Now measure a piece of tubing so that it will come up to about 2 inches below the top of the upside down bottles, this will be the height of the water level in the system. Place this tubing in the overflow side, don’t glue any of the pieces in the overflow side so you can easily adjust the water height later if needed. Now place an elbow on it in the direction of the reservoir and measure and cut what you need to get the overflow the drain back into the reservoir.
The reservoir and pump
You can use almost anything for the nutrient reservoir as long as it will hold enough water and is light proof to prevent algae growth (you can paint it black, then white like the bottles if needed). I recommend at least a 10 gallon reservoir, although 15 to 20 would be better. I have used a 18 gallon storage tote that I can get at Walmart for under $4 for my reservoirs. Just place it in place then cut a hole in the lid for the overflow line, then cut a notch out of the side for the vinyl tubing and cord for the pump.
You can get a pump from any hydroponics store, or you can use a fountain and/or pond pump found at most home improvement store in the nursery department. Just make sure it has a filter. You wont need a large pump, the most important number is the head height, this is the maximum height the pump can pump up to. The pump should be able to pump at least twice as high as it will be pumping in order to get good water flow. When the pump shuts off the system will drain (syphon) back into the reservoir through the pump tubing.