| Home | Store | Blog | Forums | FAQs | Lesson Plans | Pictures |
|
#1
 04-14-2009, 01:47 PM
|
|||
|
|||
|
Cutting out the holes in the lids to accommodate the pots and grow media.
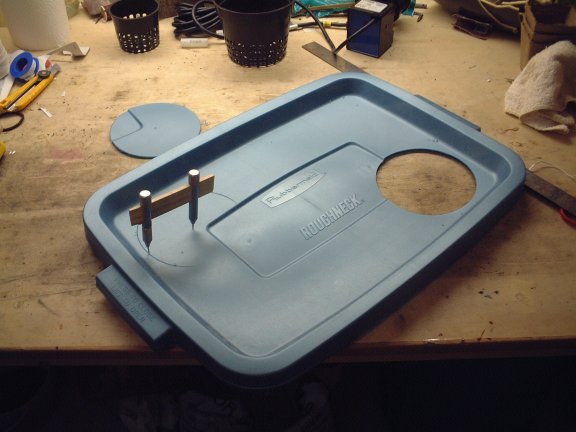 I thought about using a razor knife, but thought it was going to leave jagged edges, that may rip or tear with weight and heat. I came up with the compass cutter from a tool I purchases to draw 6 foot radius circles for a stained glass church window I made. The tool is designed to hold a center point pin and lead that is used for a Schaffer mechanical pencil. The tool fits on a yard stick I modified it by taking the lead out and replacing it with a finishing nail sharpened on the end used to score repeatedly the rubber maid lid till it cut 1/2 way through, then it was scored from the other side till it caused the cut out to separate from the lid. The rubber maid material is easy to score like this - but if you try to use a drill, spade bit or hole saw it will fail, and rip the rubber. It might be possible to hole saw it if the lid is sandwiched between plywood to this catching and ripping. Test holes after each cut. I give the holes a light sanding to remove any left over debris from the cut. ---------------------------------------- Drilling out for the drain hole. 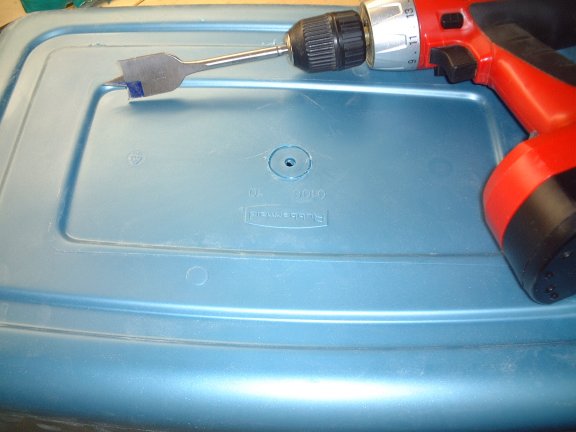 I used a spade bit the one that has tabs on the outer edge of the bit that cuts in about 1/32" almost and the thickness of the material. The thickness is about 1/8". So if you cut a little from the front, then a little from the backside it will produce a perfect hole and not rip the container and set you back a few bucks. Note there was no material removed from the center of the hole, be gentle. 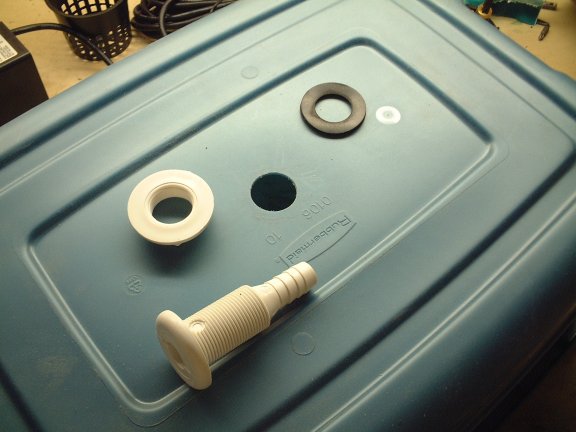 This is a very handy fitting for connecting a leak proof drainage hole. Make sure you have 2 rubber washers on the inside of a container with a curved surface - this aids the seal on the curved surface. I apply a little bead of silicon to the surfaces that will come in contact with the inside surfaces, this includes between the washers. On the barbed x thread x flange fitting the big white fitting here - for lack of a name...I will place some silicon then add the rubber washer. Use a slot screw driver to push the washer up against the silicone surface gently - then silicon the second rubber then attach the drain fitting to the storage device pail -bucket - etc. Remember the rubber fittings against the flange go on the inside of the pail...Watch it closely as you tighten the nut on this fitting - the silicon will have a lubricant affect and over tightening may cause the washer to slip out - you can tighten more if needed when the silicon is set. ---------------------------------------- Container support.  This is what the sections will look like but with more wood covering the skeleton figure and white paint. Add a canopy to protect from hail and to support the solar panels. I will even use a white sheet to protect the plant as I attempt to harden them off. ---------------------------------------- I hope this helps some newbies with this style of design. I Now have the wood painted and was going to assemble it in the yard - but guess what - it is frackin snowing. 
|
|
#2
04-14-2009, 02:57 PM
|
|||
|
|||
|
Connecting pex with out crimp rings.
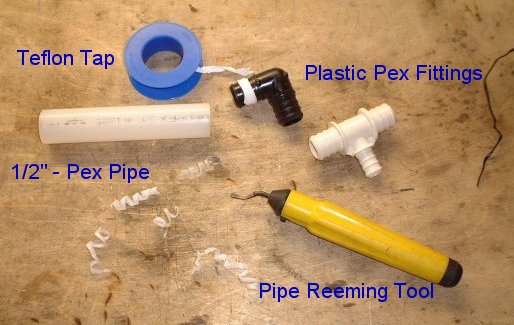 Installing the aeration system under the lids in the chamber of the roots, I did not want to use metal - In this system -- there will be no contact of metal with solution period... So I came up with a push fitting using the plastic pex fittings with pex pipe - these are very cheap for me so I use them. First if you put a pex (from now on it is assumed plastic) fitting in to the pipe it is not very snug. So if you want it more snugger...lol... you will need to wrap it with Teflon tape - BUT if you push it in to pex pipe it rips the Teflon tape and the seal is compromised. So - use a means by which to camber or bevel the inside edge of the pex pipe, I use the yellow reamer. I use the reamer to bevel the inside edge of the pipes to allow the Teflon taped fittings to insert in to the pex pipe with little damage to the seal. A little lubricant is ok like a very very very tiny amount twisted on to the tape on the fitting will encourage the seal but very very little is needed...It never hurts to expose the pipe to hot water to make it pliable. ---------------------------------------------- Piping set up Excuse the mess 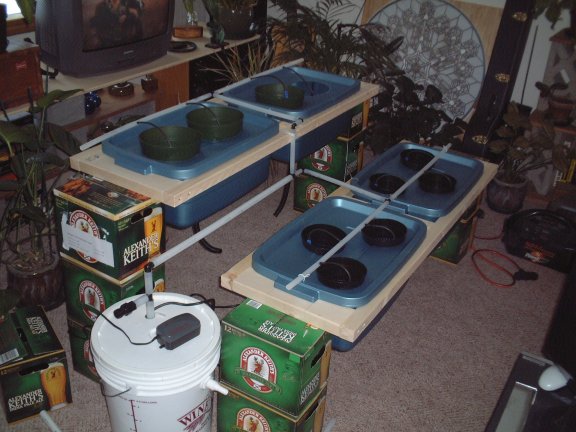 This is just a way I like to look at something I am building to get a mechanical view. It is hard to see the piping but the feed is 3/4" pex to a 3/4" x 1/2" x 1/2" tee to a 1/2" 90 degree elbow. So a 3/4" feeding 2 - 1/2" feeds, just for balance. I filled the ends of the pipes with silicon because I could not find plastic plugs. ---------------------------------------------- The heart of the system The pump in an old Wine Kitz primary fermenter, or just call it a 5 gallon bucket... After the plug and 3/4" pex and an air hose is feed through the hole in the lid there is little room for anything else. There is a shut off valve on the riser off the pump I am going to use it for discharging the reservoir. In the yard there is a drop in elevation of at least 4 feet with out setting up a level and transom so siphon action should help speed this up, I will probably put in a shut off on the feed side to assist flushing out the solution every 10 to 14 days. ---------------------------------------------- Feeding the growing media. 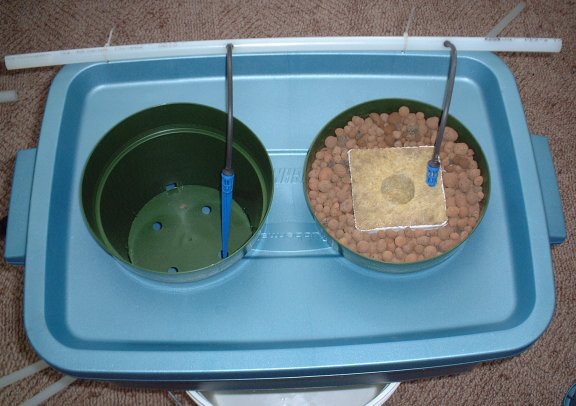 The blue steaks are drop controllers. I will be melting more holes in the green pot to encourage root development. On the right you see a 4" cube of rock wool supported by expanded clay pellets. There will be an aeration system under the lid. There will be more to come if I can get some no snow weather. The system will run 2 small submersible pumps and 2 air pumps off of 2 solar panels at 30 watts total - on 2 battery's with an inverter and charge controller. by Cliver_McGyver Last edited by Cliver_McGyver; 04-14-2009 at 03:11 PM.
|
|
#4
04-18-2009, 09:27 AM
|
|||
|
|||
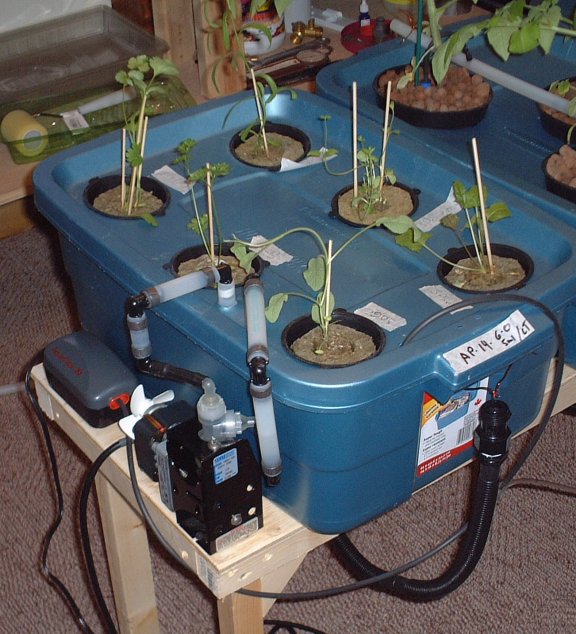 Here is a cool little pump - a bellows pump, capable of a lot of pressure, and I managed to lift water 6' vertical with the pump at the top of the 6' mark, it sucks... This is my little test run of my aeroponic's system with the aerators inside the tub. You will see a drain hose to empty the chamber of solution. It is a little hard to get all the solution out because of the thickness of the fitting for the drain as you seen above. When I add the solution I siphon it in to the tank through the media. The 2 last 90 degree elbows just before they go in to the tank do not have crimp rings - so I can remove the lid if I have to. The pump comes on every hour for 1 minute.The black net pots can be moved around very easily. Last edited by Cliver_McGyver; 04-18-2009 at 09:48 AM.
|
|
#6
04-18-2009, 01:51 PM
|
|||
|
|||
|
I tried it at six it might lift more head but did not test...
I use to install chemical filtration equipment to meet the Canadian Environmental standards. This pump moves about an once per stroke at about one stroke just under a second. I have a couple of double bellows... I also have 2 pumps that are like the kidney dialysis pumps. They are capable of incredible pressure that you cant stop by holding it... I want to put them in to an atomizing grow bed... Those pumps are very expensive and built to very demanding tolerances.
|
 |
| Bookmarks |
|
|


 Linear Mode

