A sample text widget
Etiam pulvinar consectetur dolor sed malesuada. Ut convallis
euismod dolor nec pretium. Nunc ut tristique massa.
Nam sodales mi vitae dolor ullamcorper et vulputate enim accumsan.
Morbi orci magna, tincidunt vitae molestie nec, molestie at mi. Nulla nulla lorem,
suscipit in posuere in, interdum non magna.
|
With the increasing acceptance and legalization of cannabis around the world, cultivation techniques are continuously evolving. Among them, hydroponics has become a go-to method for many cannabis cultivators. It provides plants with direct access to water and nutrients, eliminating the traditional need for soil. Let’s delve into the top ten hydroponic systems for growing cannabis.
1. Deep Water Culture (DWC)
In DWC, plants are suspended in nutrient-rich, oxygenated water. This direct access to nutrients and oxygen allows for faster growth. A single plant might use a bucket, while larger setups might use connected reservoirs.
2. Ebb and Flow (Flood and Drain)
This system works by temporarily flooding the grow tray with nutrient solution, then draining it back into the reservoir. This action provides nutrients and oxygen to the roots, enhancing plant growth.
3. Nutrient Film Technique (NFT)
With NFT, a thin film of nutrient solution is continuously circulated over the roots, which hang in the air. This approach is efficient, but requires careful monitoring to prevent issues like drying out.
4. Wick System
One of the simplest hydroponic methods, the Wick System, uses wicks to transport nutrients from the reservoir to the cannabis plants. It’s passive and doesn’t require any pumps, but it’s less efficient for larger plants.
5. Drip Systems
Drip systems use a pump to deliver nutrient solution to each plant through a series of tubes and drip emitters. It’s efficient and allows for precise nutrient management.
6. Aeroponics
An advanced method, aeroponics involves misting the roots with nutrient solution while they hang in the air. This high-oxygen method can lead to rapid growth but requires precise management to avoid issues.
7. Rotary (Rotating) Systems
In these systems, plants are placed on a rotating platform. It’s an innovative approach, typically paired with lights in the center, ensuring all plants get equal light exposure.
8. Vertical Hydroponics
For those with limited horizontal space, vertical systems allow plants to be stacked vertically, usually in towers. It’s a space-saver and can be combined with other hydroponic methods.
9. Dutch Buckets
Ideal for larger plants, Dutch buckets give each plant its own bucket of nutrient solution. They’re versatile and can be easily expanded or rearranged.
10. Kratky Method
A passive hydroponic system, the Kratky method allows plants to take what they need from a nutrient reservoir as they grow. It’s simple and doesn’t require pumps or electricity, but careful monitoring is essential.
When choosing a hydroponic system for cannabis cultivation, it’s essential to consider the scale of your grow, your budget, and how much time you can dedicate to system maintenance. While hydroponic systems can yield impressive results, they require careful monitoring and maintenance. Regardless of your choice, the future of cannabis cultivation is sure to benefit from these advanced growing methods.

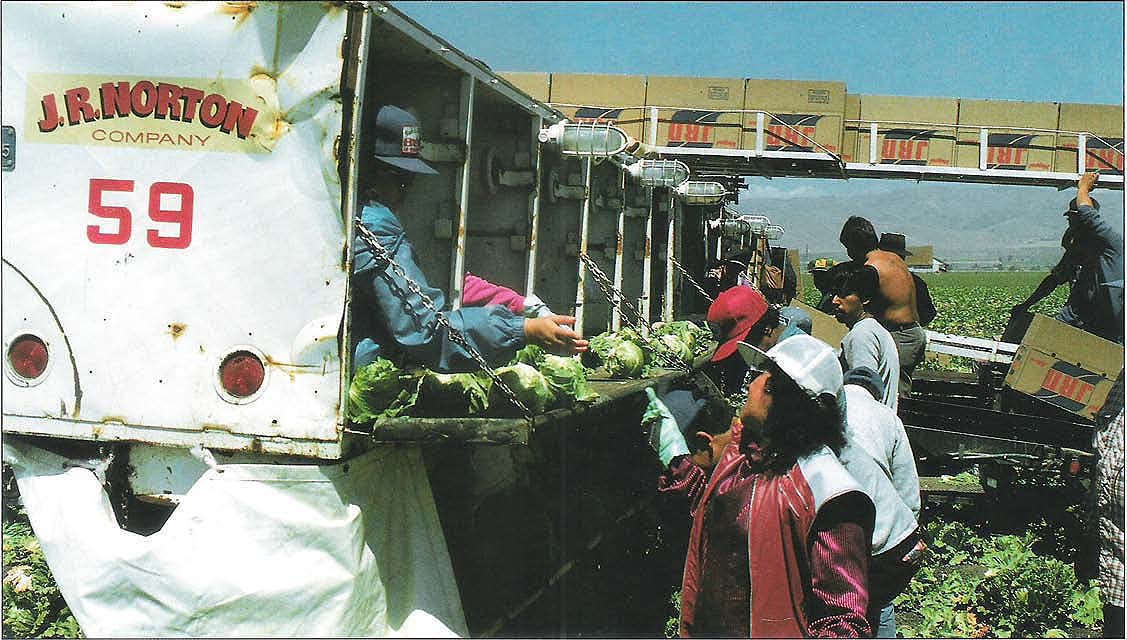
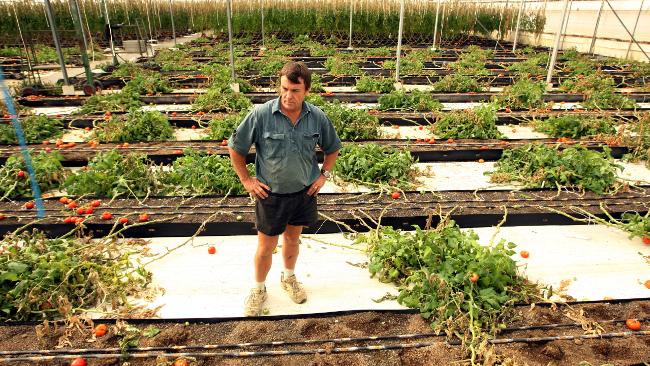
No matter what your beliefs on the new tougher immigration laws are, you will no doubt notice produce prices rise in the markets. As much as 75% of the migrant workers that work the fields harvesting crops are undocumented workers. As a now Arizona resident, and former southern California resident, I understand the need for immigration laws. But the fact still remains that undocumented workers are willing, or should I say “must” work for much less money because they don’t have any say in the matter. There is always another undocumented worker willing to take the job.
There are plenty of out of work legal American workers, but with the combination of long hours, irregular seasonal employment, as well as the strenuous physical demands of farming jobs. Not many legal workers are willing to take the jobs at such low wages. Some farmers have increased wages by up to 20%. But even with that, most legal workers aren’t attracted to the farming jobs because they still need to be able to pay their bills. My guess is that farmers will need to double the wages they pay illegal workers in order to be able to attract enough legal workers. But most farmers say their already pushing the limits between profit and losses.
For farmers that are largely dependent on migrant workers to harvest their crops, this poses a huge problem. Pay the legal workers more money, and chance loosing money on their crops if they cant get a good price for it at the market. Or using less efficient machinery to harvest their crops, and wind up loosing part of their crops in the process. Either way, it’s a no win for the  farmers, and it ends up meaning higher prices for you at the grocery store. farmers, and it ends up meaning higher prices for you at the grocery store.
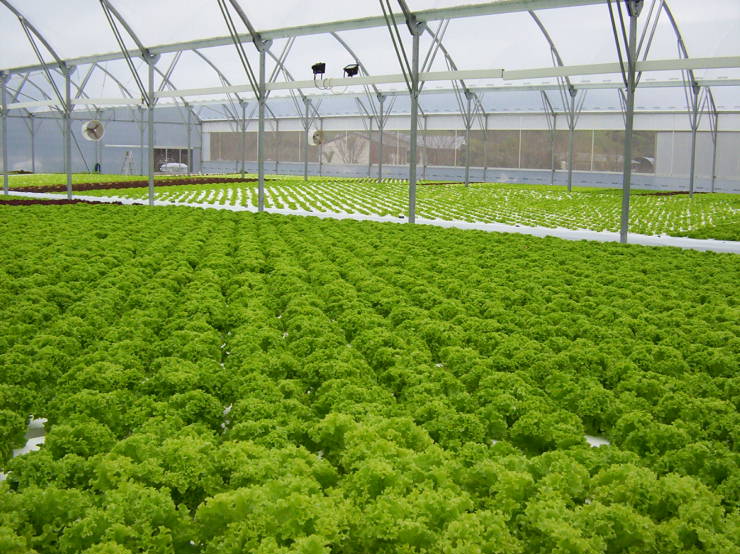
The Stage is Set for Hydroponic farms
Typically in history, major changes are driven by necessity. Now with the new tougher immigration laws in many states diminishing the low pay migrant workforce, that sets the stage for a increase in hydroponic farming. Field grown crops need hundreds of workers to harvest their crops, yet hydroponicaly grown crops only need a fraction of that. That makes it possible to raise wages enough to 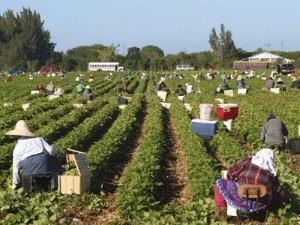 attract legal workers. And that solves both their workforces problem, as well as allows them to still be able to comply with federal laws. After all hiring illegal workers “is also illegal” itself. Although not typically enforced much until recent years. Especially in the farming industry where politicians and law enforcement agency’s tend to just look the other way. As well as when it’s so easy to just pay their workers in cash, and just deny they were illegal in the first place. attract legal workers. And that solves both their workforces problem, as well as allows them to still be able to comply with federal laws. After all hiring illegal workers “is also illegal” itself. Although not typically enforced much until recent years. Especially in the farming industry where politicians and law enforcement agency’s tend to just look the other way. As well as when it’s so easy to just pay their workers in cash, and just deny they were illegal in the first place.
Needing a much smaller workforce for harvesting crops is just one benefit, there are many benefits to growing hydroponically for farmers. Hydroponically grown crops also take up much less space to grow the same amount of product than field grown crops do. That significantly cuts down on the amount of land they need to own (buy and/or pay for), as well as the property taxes they need pay each year for that land.  Not to mention that field grown crops need expensive machines to till, prepare, and plant the land for the crops, as well as spread fertilizers etc.. These machines cost hundreds of thousands of dollars. Some farmers just rent these machines, but their not cheep rent either. Not to mention that field grown crops need expensive machines to till, prepare, and plant the land for the crops, as well as spread fertilizers etc.. These machines cost hundreds of thousands of dollars. Some farmers just rent these machines, but their not cheep rent either.
Field grown crops are also subject to weather conditions as well, and weather conditions can devastate crops from conditions like rain, wind, hail, frost and freezing, excessive heat etc.. Fortunately farmers don’t need to worry about needing workers (legal or not) to harvest their crops when their income is lost to the uncontrollable weather conditions. If soil farmers learn to grow their crops hydroponically in a climate controlled greenhouse, they wont loose their crops to weather conditions.
They will also be able to grow more than one crop a year. Growing outside they can only grow during a particular season. Where in a climate controlled greenhouse they can produce year round. That’s a significant increase in income for the farmer, even as much as triple or quadruple what they would make growing in soil one season a year. Harvesting their crops year round provides steady work for workers as well.
Immigration law is not the only crisis farmers are facing
Water use is also one of the biggest problems for farmers. Especially in the western states where states are in constant legal battles for water rights. With ever expanding city’s like Phoenix, Las Vegas, and Los Angeles, just to name a few of the hundreds of city’s that all draw water from the Colorado river system. Water levels in our river systems are at an all time low. With a big portion of  that water needing to be dedicated to irrigating farms to grow food for these expanding city’s, water supply’s are simply stretched as thin as they can be already. that water needing to be dedicated to irrigating farms to grow food for these expanding city’s, water supply’s are simply stretched as thin as they can be already.
Without a change, the current water supply’s will never be able to support the population growth. It’s not just the city’s that are growing with the problem. Growing city’s use more water, and that leaves less water to go around for everyone else (hence all the legal battles). But hydroponically grown crops use just a fraction of the water needed to irrigate field grown crops. In general cutting water usage by as much as 90% or more. In short, for farmers growing in soil 90% of the water their paying for is being wasted. Their money is just draining back down into the water table and never being used by the plants. That’s just lost money.
Conclusion
Granted hydroponic farming has made great strides in the past few decade, but hydroponics is not a new technology. Modern day hydroponic gardening has been around for over 50 years, and goes back to the days of Babylon. It’s not a mater of finding a new technology to solve the farmers problems. It’s a mater of teaching farmers to use the technology that has been around for a long, long, long time. Once farmers learn to grow their crops hydroponically, they’ll be able to solve many of the issues they face, as well as significantly be able to increase their income and profits. Bottom line, those growers that can adapt and embrace the changing conditions, will be the ones who will survive, and continue to profit from agriculture.
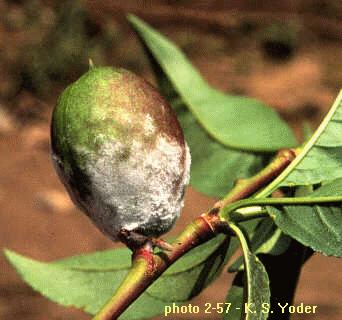
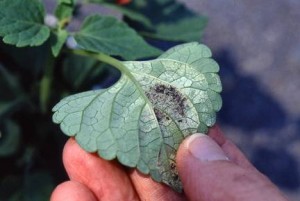
Powdery mildew, and downy mildew are very common world wide fungal diseases that affect both field grown crops, as well as hydroponic and greenhouse grown crops. They are easily recognized plant diseases, but are often confused with each other because they can often look similar (especially in the early stages). But they are different diseases that thrive in different environmental conditions, making that the easiest way to tell them apart. But like any fungus, they are easily spread through spores that travel through the air, and can affect virtually any and all types of plants. Although powdery mildew is more common than downy mildew, they both can stunt plant growth, yields, and even the quality of the yield.
Powdery mildew
Powdery mildew generally appears as a dusty white or light gray “talcum powder like” growth over the plants surface. It’s usually seen on the leaves, but can easily grow on the stems, flowers, and fruit as well. It can sometimes mistakenly be dismissed as just dust that has accumulated on the plants surfaces. Spores land on the plant through the air, and when conditions are right they germinate. They begin as tiny pinhead sized spots, either as a single spot, or in groups. These spots grow larger, and grow together into a continuous layer as the mildew grows.
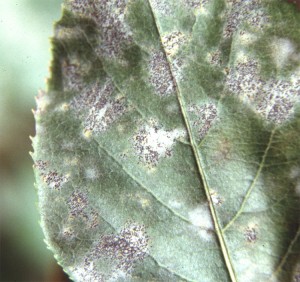 Powdery mildews can cause stunted and distorted leaves, as well as stunted and/or distorted fruits. The fungus feeds directly on the nutrients in the plant tissue. It causes yellowing/discoloration of the leaves, and causes them to die and/or drop off prematurely. In general it causes an overall decline in plant growth, as well as plant health. The severeness of the disease depends on several factors. Like type of plant, how old the plant is, how healthy the plant is to begin with, as well as the weather conditions while the fungal disease is infecting the plant. Powdery mildews can cause stunted and distorted leaves, as well as stunted and/or distorted fruits. The fungus feeds directly on the nutrients in the plant tissue. It causes yellowing/discoloration of the leaves, and causes them to die and/or drop off prematurely. In general it causes an overall decline in plant growth, as well as plant health. The severeness of the disease depends on several factors. Like type of plant, how old the plant is, how healthy the plant is to begin with, as well as the weather conditions while the fungal disease is infecting the plant.
Conditions That Favor Powdery mildew
(1) Powdery mildew usually shows up later in the growing season, but can occur at any time if the year if conditions are right, like especially in greenhouse conditions.
(2) The severity of the disease depends on many factors like variety of the host plant, age and condition of the plant, and weather conditions during the growing season, Especially if conditions are most favorable like when growing inside.
(3) Powdery mildew is more common on the tops of the leaves, but can also appear on the undersides of leaves, as well as on the 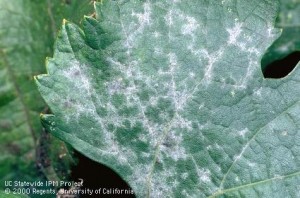 buds and fruit. buds and fruit.
(4) Powdery mildew is likely to be severe in warm dry climates, that’s because it doesn’t need water on the plant, in order to be able to infect the plant. However it does need high humidity for the spores to be able to germinate. Like areas where plants are spaced closely together, shaded damp areas, or areas that have dense foliage. Basically damp areas with poor air circulation around the plant. Once the spores are germinated, the fungus infects the plant, and can continue to easily spread in the warm dry climate.
(5) The young succulent plant growth is much more vulnerable to the fungus than the older plant growth (where downy mildew usually affects older growth first).
(6) Powdery mildew is a fungus, and like mushrooms, there are a number of strains of powdery mildew as well. Each strain can only live off of certain types of plants. So the right spores need to make their way to the right spot, on the right type of plants, in order to be able to cause infection.
 Controlling Powdery Mildew Controlling Powdery Mildew
In some cases it may be possible to find resistant varieties of the plants your growing in your area, and that can be a great start to minimizing damage in the first place. However if it becomes a significant problem, there are some things you can do.
(1) Prune off the older growth, especially for crowded plants. This helps air circulation around the plants, and helps prevent the spores from germinating, and being able to infect the plant at all.
(2) Prune off infected plant tissue. That keeps the fungus from feeding on the plant, as well as to help prevent the fungus from spreading to new areas. Do not compost infected plant debris, or the fungus will still grow, and/or spread it’s spores in your area.
(3) Avoid overhead watering and misting the plant foliage. This helps cut down on pockets of moisture/humidity in and around the plant foliage that the spores need to germinate.
(4) If the infestation continues, you may want to consider using a chemical and/or fungicide spray. Ask at your local nursery about them. Some like NEEM oil are organic. Another remedy that may be effective is baking soda mixed with a horticultural oil like NEEM oil, or a sticky foliar fertilization agent. Recommended mix is about 1 tablespoon baking soda to 1 gallon of water, plus the horticultural oil (according to manufactures instructions).
Downy mildew
 The first sign of downy mildew is often the appearance of light green or yellow spots on the tops of the leaf surface on the older leaves. A closer look shows the spore growing fungus/mildew on the underneath the same leaves. Downy mildew will causes plant health to quickly decline, and with stunted plant and fruit growth, as well as poor flavor. You may even see leaf curling, and infected leaved die and fall off quickly. Downy mildew may even be confused with nutrient deficiencies, or look similar to damage done from foliar nematodes. But it’s a soft fluffy light gray to brown, or even purplish mold that grows on the undersides of the leaves. The first sign of downy mildew is often the appearance of light green or yellow spots on the tops of the leaf surface on the older leaves. A closer look shows the spore growing fungus/mildew on the underneath the same leaves. Downy mildew will causes plant health to quickly decline, and with stunted plant and fruit growth, as well as poor flavor. You may even see leaf curling, and infected leaved die and fall off quickly. Downy mildew may even be confused with nutrient deficiencies, or look similar to damage done from foliar nematodes. But it’s a soft fluffy light gray to brown, or even purplish mold that grows on the undersides of the leaves.
Downy mildew is closely related to the Pythium, a water mold that causes root rot. Except downy mildew infects the plant foliage, and not the roots. As the infection grows, it feeds on the plant tissue. Where noticeable blotches of dead or dying plant tissue can be seen ranging in color from simply off-color, to yellow or brown patches, to purplish patches, and even dark purple to black patches depending upon the host plant. These off-color spots are sometimes confused with nutrient deficiencies, so you’ll want to look at the underside of the leaves for the fungus if you see spotting.
Conditions That Favor Downy mildew
(1) Downy mildew prefers cool, moist conditions.
(2) Unlike powdery mildew, downy mildew requires a film of water to be able to infect the plant.
(3) Older leaves are usually affected first, and spread to the younger leaves.
(4) Spot on the top leaf surface are typically brighter than on the bottom leaf surface, and may remain yellow, turn brown or purplish.
(5) The undersides of the leaf surfaces are covered with a layer of fungus that can be white to gray, or even purplish and almost black.
 (6) Spots on the upper leaf surfaces are sometimes bounded by the veins in the leaves. (6) Spots on the upper leaf surfaces are sometimes bounded by the veins in the leaves.
(7) Downey mildew doesn’t usually infect the fruit itself, but fruit like melons can easily become covered with the fungus.
Controlling Downy mildew
(1) Use resistant varieties if possible.
(2) Keep relative humidity below 85%, and don’t allow standing water on the leaves. Reduce any splashing water on the foliage, and/or overhead irrigation or misting to reduce the chances of infection.
 (3) Promote good air circulation to help prevent damp foliage. (3) Promote good air circulation to help prevent damp foliage.
(4) Avoid spacing plants to closely together to help promote good air circulation between plants.
(5) In some cases using blue polyethylene sheets to filter light has seemed to be able to reduce spore production/infection, though may reduce yields.
(6) In some cases it may be necessary to use a fungicide. Consult with your local nursery on what they recommend. There are even some common organic fungicides like NEEM oil you can use.
Useful Links
Powdery Mildew
Powdery mildew
POWDERY MILDEW Fact sheet
Powdery mildew (University of Rhode Island)
Powdery Mildews (Colorado State University Extension)
Downy Mildew
Downy Mildew – Plasmopara viticola
Downy Mildew (University of Connecticut)
EXPECT AND PREPARE FOR DOWNY MILDEW IN BASIL
Mildew Diseases of Cucurbits
In part 1, we looked at location, creating a layout, and lighting aspects of building your indoor grow room. In part 2, we’ll take a look at the environmental controls for your grow room. The term “environmental controls” sounds expensive, and scares a lot of people. But it doesn’t need to be. There are a variety of expensive computer programs, systems, sensors, relays etc. for controlling the environment of a indoor grow room, and that’s typically what people think of when thinking of the term “environmental controls.” But controlling the environment of your grow room, can be done much cheaper and easier, as well as in many different ways.
Heating and Cooling
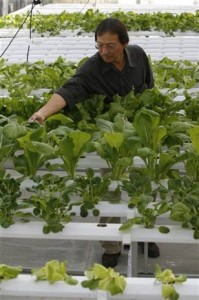
Heating and/or cooling you grow room is important for good plant growth. It’s not only important to have good lighting. But photosynthesis is a major factor in plant growth, and for good photosynthesis to be able to take place within the plant tissue/leaves, temperature is an important factor that affects the process of photosynthesis. Thus temperature dramatically affects whether you get quick healthy plant growth or not. Typically plants are grouped into one of two groups, “winter corps” or “summer crops.” Winter crops like lettuce, and winter squash do better in cooler environments than summer crops do.
The easiest way to keep track of your grow room temperature is with a weather station. Sound expensive? Their not, although there are many types of weather stations, but even the most basic ones record both high and low temperatures, as well as show humidity. The more expensive ones have other features like wind speeds, a rain gauge, lightning detectors, but expensive features aren’t useful  in your indoor grow room anyway. For $40 at Wal-mart, I got a weather station that has a wireless remote sensor, that shows temp and humidity in both locations, as well as records the highest, and lowest daily temperatures. It even has a barometer (though not really useful in a grow room). The remote sensor works up to 100 feet away, and can be placed in the grow room. in your indoor grow room anyway. For $40 at Wal-mart, I got a weather station that has a wireless remote sensor, that shows temp and humidity in both locations, as well as records the highest, and lowest daily temperatures. It even has a barometer (though not really useful in a grow room). The remote sensor works up to 100 feet away, and can be placed in the grow room.
The weather station base can be placed anywhere in your house (within 100 feet of the remote sensor), and you can view the conditions in your grow room at a glance without even going in the grow room. The temp and humidity can also be read right on the remote sensor that’s in the grow room. You can even get a weather station with more than 1 remote sensor, and place them in various areas of your grow room. 
Controlling the temperature in the grow room doesn’t need a expensive computer program either. Through a little trial and error, and using a space heater, or small window AC unit, it won’t be difficult to figure out the optimum timer settings for the consistent temperature range you want. Another inexpensive, yet more advanced option is to use a typical household digital thermostat for your grow room. If coarse you’ll need some wiring knowledge, have a friend that does, or need hire a professional to set it up. But a simple digital thermostat can be programmed to turn on and off your space heater/AC unit (even fans for ventilation) at the specific temperature ranges you want, the same way it does for your house.
Relative Humidity
For plants to be able to grow, they need to be able to transpire freely during photosynthesis. Basically speaking they need to be able to breathe freely. They do this by exhaling water vapor through tiny pores called stoma in their leaves. Plant transpiration is directly  related to humidity (as well as temp). To plants humidity is pressure (vapor pressure to be exact), and the more pressure (humidity), the harder it is for the plants to breathe. It comes down to the pressure difference between the surrounding air, and what the plant is trying to exhale. The more water vapor (pressure) in the surrounding air, the harder it is for the plant to exhale it’s water vapor (like asthma for plants). related to humidity (as well as temp). To plants humidity is pressure (vapor pressure to be exact), and the more pressure (humidity), the harder it is for the plants to breathe. It comes down to the pressure difference between the surrounding air, and what the plant is trying to exhale. The more water vapor (pressure) in the surrounding air, the harder it is for the plant to exhale it’s water vapor (like asthma for plants).
The plants need to be able to exhale the water vapor (transpire), in order to be able to uptake water and nutrients through the roots. That’s because water moves through the plant by diffusion. Therefor being pumped up through the plant as it transpires. Bottom line, if they cant breathe/transpire, they wont be able to uptake water and nutrients, and thus they wont be able to grow. Most plants do fine between 55% and 75% humidity, but it’s best to find out the humidity preferences for the crop you plan to grow. Nutrient deficiency can show up in plants in high humidity, because they cant uptake the water/nutrients they need to grow. But nutrient deficiency’s can also result in low humidity as well, because water and nutrients are pumped through the plant too quickly. Where more nutrients make it to the leaves than properly to the fruit.
Humidity in your grow room is a bit harder to control accurately without humidity specific sensors. But with some regular observation, it can be predicted and adjusted. As the plants transpire the humidity will go up, and ventilation is the best cure. In some extreme cases the help of a dehumidifier may be helpful as well, and can be set on a timer when humidity levels are predicted to be high. Low humidity levels are unlikely in a grow room/greenhouse, but can be adjusted the same way with a humidifier during times of predicted low humidity.
CO2 Enrichment
Like all life on our planet, plants are a carbon based life form. Carbon makes up the bulk of the plants tissue, and without carbon the plants simply wont be able to make new plant tissue, therefor wont be able to continue to grow. But plants don’t get carbon from the roots and nutrient solution, they get it from the atmosphere. CO2 (Carbon Dioxide) is naturally in the atmosphere at about 3% on  average. This greenhouse gas is where plants get the carbon they need to grow new plant tissue. But in an enclosed grow room, or greenhouse plants can use up all the carbon in the air within hours, especially if there’s a large number of plants in it. average. This greenhouse gas is where plants get the carbon they need to grow new plant tissue. But in an enclosed grow room, or greenhouse plants can use up all the carbon in the air within hours, especially if there’s a large number of plants in it.
CO2 enrichment can be done using CO2 generators, which are basically just controlled natural gas or propane burners. Or with bottled CO2 that you can get at most welding supply houses, or places that sell equipment to make your own beer, they use it for carbonation. But either way CO2 enrichment systems need CO2 sensors and regulators to work efficiently. The investment in equipment can be beneficial, however can be pricey. But fortunately if you provide enough ventilation that brings in fresh (CO2 enriched) air into your grow room, CO2 enrichment equipment isn’t really necessary. Providing good ventilation with plenty of fresh air, is the key to low cost grow room CO2 enrichment, along with many other grow room issues.
Useful Links
Indoor Gardening with CO2/Carbon Dioxide for hydroponics
Environmental Control Systems
DIY Homemade Hydroponics – Climate Control (video)
Plant Growth Factors: Photosynthesis, Respiration, and Transpiration
Indoor Oasis
Growing indoors has become very popular in resent years. Not just for commercial farms, but for backyard growers as well. The benefit of being able to grow what you want year round is a very appealing to many people, and growing indoors offers the grower the ability to completely control the plants environment. Being able to control the plants environment offers the ability to increase the quality of the crop, as well as the ability to produce maximum yields and bumper crops. The weather conditions outside can be unpredictable at times, and just about impossible to control. Especially in places that get snow most of the winter, and/or are very hot during the summer months if growing outside. Inside grow rooms (even greenhouses) offer the ability to provide the plants with the perfect growing conditions year round, as well as the ability to harvest multiple crops throughout same year.
Although building your own indoor garden can seem complicated and expensive. With recent advances in technology over the past decade, and the prices of equipment being more affordable because of competing manufactures, as well as more and more extensive research developing better nutrient formulas, growing crops inside has become much more economical these days. For the particularly savvy deal hunter, even better deals on hydroponics equipment can sometimes be found at places like eBay and/or Amazon, though you’ll want to make sure the seller is reputable before you buy. And with the rising prices of produce at the grocery stores, more and more people are turning to growing their own food, and trying to make the most out of the space they have.
Getting Started
When deciding on a space for an indoor garden, there are some important considerations to keep in mind. You’ll need easy access to pluming, including a good water source for mixing your nutrient solution with. A sink and drain for draining used nutrients, as well 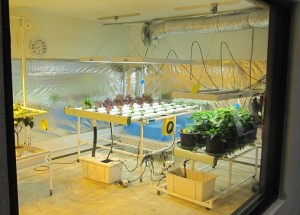 as washing and cleaning things. Good ventilation is also very important, plants need fresh air to breath, pollinate, as well as controlling high humidity that can cause diseases. Ventilation is also important controlling heat buildup in the grow area. Of coarse you’ll also need access to electricity for running pumps, lights, fans climate controls etc.. It’s also important to determine how many lights you’ll need, as well as the wattage you’ll be needing to ensure you’ll have enough power, and wont be blowing fuses. Especially if the fans, pumps, heaters etc. will be on the same circuit. as washing and cleaning things. Good ventilation is also very important, plants need fresh air to breath, pollinate, as well as controlling high humidity that can cause diseases. Ventilation is also important controlling heat buildup in the grow area. Of coarse you’ll also need access to electricity for running pumps, lights, fans climate controls etc.. It’s also important to determine how many lights you’ll need, as well as the wattage you’ll be needing to ensure you’ll have enough power, and wont be blowing fuses. Especially if the fans, pumps, heaters etc. will be on the same circuit.
Once you’ve decided on a space for your grow room, the best thing to do is make a floor plan of your grow space. Draw out where everything is going to need to go, double check the layout, and see if you can improve anything and haven’t forgotten anything. Make sure to draw your floor plan to scale for accuracy, you can make the grow space the most economical and productive when everything is put down accurately on paper first (draw twice, build once). Next calculate the size of your grow room in both square feet as well as cubic feet. This will be important information needed to help determine the actual ventilation, amount of lighting, heating and cooling needed, and even co2 enrichment if needed and/or desired. 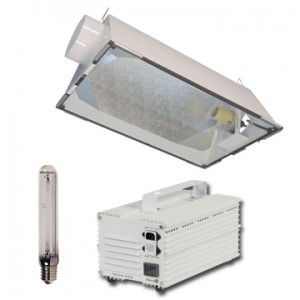
Lighting your Grow Room
Lighting your grow room can be done with either natural or artificial lighting. Depending on where your grow room is located, you may be able to take advantage of natural sunlight. Either completely, or at least in part with light coming in from windows, clear Plexiglas walls typically made for greenhouses, or by using skylights/sun tubes. If you still need to artificial lighting, there’s a wide variety of options (bulbs, wattage’s, spectrum’s, ballasts, reflectors, fixtures etc.) available. Artificial lighting is to wide a subject to be completely covered in this article, but here is some general information on artificial lighting for plants. Just be weary of retailers that want to sell you anything, lighting is the most expensive cost, and you don’t want to be buying it twice.
Metal Halide (MH), and High Pressure Sodium (HPS), both are also referred to as High Intensity Discharge (HID) lighting, and are the most commonly used for growing plants indoors. Metal Halide is generally used for vegetative growth of plants, and has more of the blue spectrum of light. High Pressure Sodium is generally used for flowering growth, and has more of the red and/or orange spectrum’s of light. High Intensity Discharge lights also generate more heat than the other lighting options. This means that they need to be placed far enough away from the plants so they wont burn the foliage. They also need to be well ventilated so they don’t heat up the grow room to much.
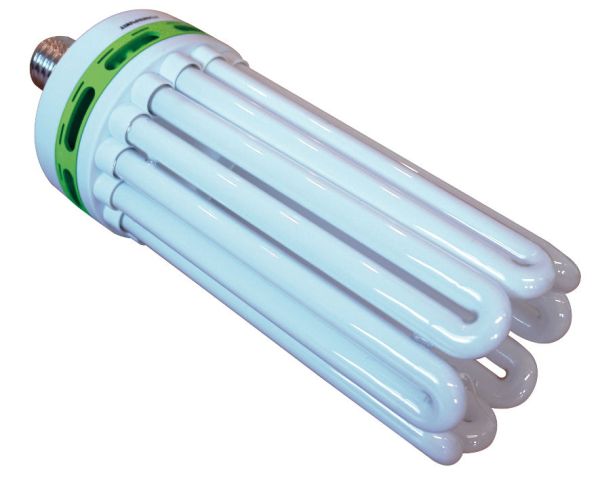
There is also Fluorescent lighting (T12, T8 and T5) and/or Compact fluorescent lights (CFL). These lights typically are best used for plants that have low light requirements like lettuce, and/or starter seedlings. Though with enough of them, and strategically placed, fluorescent lighting has been known to grow large plants. The main difference between the regular fluorescent and compact  fluorescent is the ballast. CFL’s have the ballast built right into the bulb. Regular fluorescence’s have the fluorescent is the ballast. CFL’s have the ballast built right into the bulb. Regular fluorescence’s have the 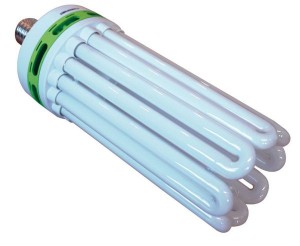 ballast in the light fixture. They also produce much less heat than HID lighting, and also need to be placed close to the plants because the amount of usable light significantly drops off the farther away from the foliage they are. ballast in the light fixture. They also produce much less heat than HID lighting, and also need to be placed close to the plants because the amount of usable light significantly drops off the farther away from the foliage they are.
Regular fluorescent light tubes come in T12, T8 and T5 bulbs. The lower the “T” number the thinner the tube is, although the higher the light output the plants need is. But there progressively more expensive as well. Fluorescent lights come in blue and red spectrum’s as well, the color is measured on a temperature scale referred to as Kelvin (K). Bulbs marked 5000-6500K, are in the bluest range. Bulbs marked 2700-3000K are in the reddest range, and bulbs marked 3500-4100K are in the middle.
 Lastly, there’s LED lighting. LED lights produce the least amount of heat, but also need to be placed closer to the plants to be effective. There’s a large number of LED light manufactures on the market, but unfortunately there’s often a lot of difference in quality between one manufacture to another. Often LED’s are often sold with the claims that they will replace a particular wattage MH or HPS bulb, but this is rarely if ever true. Be aware of inexpensive LED lights, good ones are not cheep. Though cheaper ones may be fine for seedlings. Good LED lighting will produce good plants, but like fluorescent lighting need to be placed close to the plants foliage to be effective. Increasing the need for multiple LED light panels/UFO’s the larger the plants are/get. Even for good LED light fixtures, they should be no more than 1 foot to 18 inches away from the foliage max. So even though LED’s use less electricity, the overall cost for good LED’s is generally higher than HID. Lastly, there’s LED lighting. LED lights produce the least amount of heat, but also need to be placed closer to the plants to be effective. There’s a large number of LED light manufactures on the market, but unfortunately there’s often a lot of difference in quality between one manufacture to another. Often LED’s are often sold with the claims that they will replace a particular wattage MH or HPS bulb, but this is rarely if ever true. Be aware of inexpensive LED lights, good ones are not cheep. Though cheaper ones may be fine for seedlings. Good LED lighting will produce good plants, but like fluorescent lighting need to be placed close to the plants foliage to be effective. Increasing the need for multiple LED light panels/UFO’s the larger the plants are/get. Even for good LED light fixtures, they should be no more than 1 foot to 18 inches away from the foliage max. So even though LED’s use less electricity, the overall cost for good LED’s is generally higher than HID.
Building your own Indoor Grow Room part 2
It’s easy to think of the nutrient solution as just a bunch of nutrients floating around in some water, and for the most part that’s just what it is. Although, there’s more going on than just that. The nutrient solution is made up of many mineral elements, most of which have either a positive or negative charge. Some of these mineral elements are more attracted to each other than others. This can cause them to bond with each other, and become tied up in the nutrient solution. Thus not available to the plants, that’s known as precipitates. Precipitates can even be visible in some cases, and look like a fine white powdery like substance that floats in the water, or settles at the bottom of the reservoir.
When the mineral elements precipitate, they become insoluble in water, and they need to be water soluble before they can be used by the plants (thus, “tied up” in the nutrient solution). Hydroponic nutrients are made up of both Macro-elements (nutrients that the plants need in large quantities), and Micro-elements (nutrients that the plants need in small quantities). These micro-elements tend to easily bond with the other elements, especially in high pH conditions, and/or when there’s a large concentration of minerals.
What is a Chelated Micro-Nutrient
The Chelating process basically forms a protective shell around the particular mineral element, as well as creates a neutral charge. This keeps them from bonding with each other, and becoming tied up in the nutrient solution. The word “chelate” is of Greek origin and refers to a crabs claw, and the tight hold their claws pinch down with. When two molecules of the same type surround a particular mineral, that’s known as a chelate. But some chelating molecule are shaped like a letter ‘C’ and surround the mineral with just one molecule. This type is called a “complex.” Some minerals like boron are limited to forming only complex bonds, because they only have one chelating molecule they can bond with. This isn’t a true chelated mineral, but it’s often represented and sold as a chelated micro-nutrient.
Types of Chelates
The Chelating molecules need a type of glue to glue them in place to the specific mineral element they want. There’s a few bonding agents that can be used for this, each has a different affect for the plants. The least desirable would be sodium. For anyone who has poured table salt (sodium) on their grass lawn as a kid, knows that sodium is toxic to plants. Along with the mineral elements, the plants will absorb it, and a sodium buildup in the plant tissue could be extremely damaging to the plants.
EDTA
One of the most common forms of chelates is Ethylene Diamine Tetraacetic Acid (EDTA). Ethylene Diamine Tetraacetic Acid is a large synthetic molecule, and it bonds very tightly to mineral elements. But once the elements enters the plant, this very tight bond can be a negative characteristic. The EDTA wants to bond to something so strongly that even once it’s separated from the mineral element inside the plant tissue, it still wants to hold onto something, and so it may grab onto another mineral element. EDTA can help solve one mineral deficiency, but in some cases it can wind up causing another. EDTA has even been known to take calcium directly out of the cell walls of the already formed plant tissue, this causes cell damage to the plant. In cases where there has been a significant amount of cell damage from calcium loss this way, the plant is unable to maintain enough water pressure (like blood pressure in humans), and it may appear like the plants are wilting.
Amino acid Chelates
Another type of chelate is the amino acid chelates. Amino acid chelates have a somewhat less of a strong bond than EDTA chelates, but once the mineral has been absorbed by the plant and released from the amino acid, the plant can also use the left over amino acid as a source of nitrogen. They also have a smaller molecule size than EDTA chelates do. Amino acids are the building blocks for cell formation, so it doesn’t go unused by the plant. Unlike the synthetic EDTA chelates where the plant doesn’t know what to do with it when it’s left over. Because the amino acids are recognized by the plant as building blocks, the minerals can easily move within the plant tissue to where their needed because the leftover amino acids can easily be used anywhere in the plant tissue. Amino acid chelates are also often available for use in organic nutrient formulas, and come in both liquid or dry form.
Glycine Chelates
Another form of amino acid chelates is the glycine chelates. Just like regular amino acid chelates, once the glycine is separated from the mineral element inside the plant tissue, the leftover glycine (amino acid) is used by the plant tissue. The glycine amino acids have an even smaller molecule size, making them even easier to be absorbed by the plants. That makes glycine chelates particularly useful in foliar applications, because they passes through the plants leaf pores (stomata) easier than other, larger molecule chelates can.
Conclusion
Amino acid chelates are very safe for plants, for both root uptake and foliar applications, and would really need large amounts to be applied before they could become toxic to plants. However generally speaking care should be taken to avoid toxic effect using EDTA chelates, and I would always avoid using chelated minerals that use sodium as a binder. When looking for chelated minerals it’s best to look for ones that don’t use sodium, ones that the minerals are readily available to the plants, ones that doesn’t promote other deficiencies (like EDTA chelates), and ones that have an organic certification.
Useful Links
Fertilizer Management for Greenhouse Vegetables
Well only if you want healthy plants, otherwise you don’t need to worry about it. Plants can suffer from nutrient deficiencies, even with a fresh and perfectly balanced nutrient solution if the pH is out of range. Kind of like how you can freezes to death in full sunlight at the north pole, or drink all the salty seawater you want and still suffer or even die of dehydration . Even when one variable is sufficient, another variable can cause a big problem. Think of it like being really hungry, and there’s a nice big juicy hamburger just out of reach.
Improper pH ranges can also result in precipitates (calcium sulfate), a white cloudy or powdery looking substance that can float or even settle at the bottom of your reservoir. When the pH of the nutrient solution rises above 7.0, a chemical reaction can occur causing the calcium to bond with sulfate and other trace elements like iron, copper, zinc and manganese causing them to become unavailable to the roots. It can even cause problems with emitters and/or misters clogging, and buildup in the growing medium, and in extreme cases can cause plumbing blockages or restrictions (like clogged arteries). The exact pH that precipitation of the nutrients begins, depends on the exact concentrations of calcium and sulfate in the nutrient solution. But it typically can begin at 6.5, unless the particular nutrient solution is low in concentrations of calcium and/or sulfate. Generally speaking, higher nutrient concentrations are more likely to result in precipitates, than lower concentrations.
When to check the pH of your Nutrient Solution
For best results it’s a good idea to have a regular routine for checking your pH levels and adjusting when necessary. Check the pH of the water before initially adding the nutrients to help prevent precipitates while mixing them up. But unless the pH is well above 7.0, don’t bother trying to adjusting it before adding the nutrients, or you may experience wild pH swings while trying to reach the target pH. Most nutrients have pH buffers added, and will begin lowering the pH as soon a it’s added if it’s to high. If the nutrients that you are using have more than one part, add them separately, and thoroughly mix each of them before adding the next part. Same goes for any additives that you may be using. Then check the pH of the freshly mixed nutrient solution once it’s all mixed and ready to use.
You should also check the pH of any system other than a non-recovery (run to waste) system daily, because the nutrients and water the plants take up causes the pH to change, particularly when the water to plant ratio is low. In other words, the larger the amount of nutrient solution, the less fluctuation that is likely to occur, and larger plants use more water and nutrients than smaller plants. You should also check the pH anytime you add any fresh water to top off the reservoir (and/or nutrients or additives). The pH of the water supply can change daily, so even if you have checked it in the past, it can be different today.
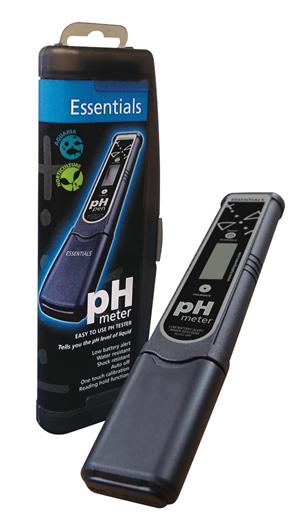
Checking and Adjusting the pH
To check pH you can use either a liquid pH indicator (drops), paper test strips, or an electronic pH meter. The electronic testing meters are the most expensive option, and require calibration (including calibration fluid), as well as regular maintenance and care or they wont give accurate results. So you will need to fallow the manufactures  instructions carefully, but even with proper care and maintenance, they may not give reliable readings. I prefer to use the liquid pH drops because they are inexpensive, as well as accrete, and cost less than the calibration liquid for the electronic meters. But mostly because they don’t require any calibration or maintenance in order to be accurate, and/or reliable. I have never used the paper test strips, but they don’t require any calibration or maintenance either, and are quite accurate as well. instructions carefully, but even with proper care and maintenance, they may not give reliable readings. I prefer to use the liquid pH drops because they are inexpensive, as well as accrete, and cost less than the calibration liquid for the electronic meters. But mostly because they don’t require any calibration or maintenance in order to be accurate, and/or reliable. I have never used the paper test strips, but they don’t require any calibration or maintenance either, and are quite accurate as well. 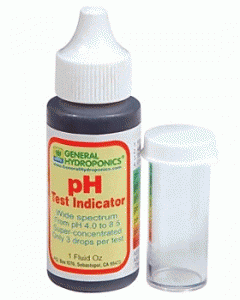
You will want to choose a target pH, for your nutrient solutions. It’s completely unnecessary to hold pH at a single point value like 5.8, in fact it’s better not to. Plants have evolved over millions of years, and can easily tolerate pH ranges, and the less pH adjusters that you add to your nutrient solutions the better. Choosing a target pH right in the middle of the range you intend, allows for pH fluctuations in either direction. A good example would be if the pH range for the plants you are growing is 5.5 to 6.5, set the target pH for 6.0, that gives room for fluctuation in either direction.
pH adjusters (pH up, and pH down)
pH adjusters come in both dry and liquid forms. But which ever you type you use, make sure to add small amounts   at a time. It’s impossible for manufactures to give exact directions on how much to add because of all the variables like size of reservoir, type of nutrients, weather the nutrients have pH buffers added, and the amount of pH change needed. When adding pH adjusters, it’s best to dilute them in water before adding it directly to the reservoir, that helps prevent precipitates from extreme pH changes before it can be mixed in. If accidentally raising the pH above 6.5, lower the pH again as quickly as possible. at a time. It’s impossible for manufactures to give exact directions on how much to add because of all the variables like size of reservoir, type of nutrients, weather the nutrients have pH buffers added, and the amount of pH change needed. When adding pH adjusters, it’s best to dilute them in water before adding it directly to the reservoir, that helps prevent precipitates from extreme pH changes before it can be mixed in. If accidentally raising the pH above 6.5, lower the pH again as quickly as possible.
Useful Links
pH Affects Plant
Understanding pH in Hydroponic
pH ranges for Hydroponic Vegetables
We all want to get the biggest yields, as well as the best tasting produce from our plants that we can. After all isn’t that why we grow them in the first place? But often we can overlook some basic things that affect our plants growth, as well as the quality of what they produce. Here are a few things to consider when trying to get the most out of your plants.
Nutrient Strength
There’s a wide array of hydroponic nutrient products on the market these days, and manufactures have even come up with complete feeding schedules for entire lines of the nutrients they sell. As growers we naturally want to give our plants the best of everything, but this can sometimes do more harm than good. Most of the time the dosing rates that manufactures give, are recommendations for the stand-alone application of their products. They simply can’t account for anything, and/or everything else you might use (additives, biological inoculates, etc.). It’s important to pay attention to the overall feeding strengths, it all contributes to the overall feeding strength of the nutrient solution, and how the plants react to it. Also the growing environment itself will affect how suitable the feeding strength for your plants will be, and subsequently how the plants will react to it.
Growers often refer to their nutrient strength in PPM (parts per million), although EC (electrical conductivity) may be a better way to measure it. EC is the base measurement that PPM is converted from, and PPM is not universal. Different manufactures in different regions use different conversion rates, that will affect what the actual PPM should be, while EC will remain the same from one region to another. In most cases it’s rare for the EC of the nutrient solution to need to be higher than 2.0.
 The best bet is to just fallow the feeding schedule of one reputable manufacturer at a time. Piecing together a custom feeding schedule using different manufactures products can be quite a hit and miss endeavor. Over-fertilized plants tend to produce poorly, and are much more likely to be affected by diseases and insects. They also don’t usually smell and taste nearly as good either. Along with keeping an eye on the overall strength of the nutrient solution, flushing the growing medium with plain water a couple of times a month will help keep nutrients from building up in it and causing problems. The best bet is to just fallow the feeding schedule of one reputable manufacturer at a time. Piecing together a custom feeding schedule using different manufactures products can be quite a hit and miss endeavor. Over-fertilized plants tend to produce poorly, and are much more likely to be affected by diseases and insects. They also don’t usually smell and taste nearly as good either. Along with keeping an eye on the overall strength of the nutrient solution, flushing the growing medium with plain water a couple of times a month will help keep nutrients from building up in it and causing problems.
Grow Room Temperature
When growing indoors it’s usually necessary to use at least some artificial hydroponic lighting, and with the technology today there are a wide variety of lighting options (bulbs, fixtures and systems, etc.) available. Most widely used are High Intensity Discharge (HID) lights, also known as Metal Halide (MH), and High Pressure Sodium (HPS). The larger wattage the bulb the more light, and generally speaking, the better plant growth will be. However these lights (as well as all the components of the lighting system) create heat.
MH and HPS lighting systems produce a lots of heat, this heat needs to be properly managed in a way to continuously maintain the optimal temperatures for your plants. Environments that are to hot and/or dry will stress the plants, and stressed plants just won’t produce well. For most indoor growing situations the 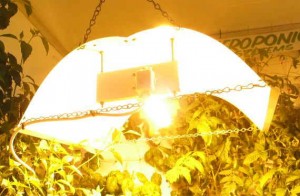 plants will produce better, and have better quality when the temperatures don’t reach above 85°F at the tops of the plant (nearest to the light, and heat source). Some of this heat can be vented from the lights using ducting with inline hydroponic exhaust fans, and/or using fans directly on the plants, or even by adjusting the height of the lights. plants will produce better, and have better quality when the temperatures don’t reach above 85°F at the tops of the plant (nearest to the light, and heat source). Some of this heat can be vented from the lights using ducting with inline hydroponic exhaust fans, and/or using fans directly on the plants, or even by adjusting the height of the lights.
For most plants (plants that don’t like high temperatures), temperatures above 90°F tend to result in poor crop quality in indoor (and outdoor) gardens. Higher temperatures cause the plants to work at higher metabolic rates. This causes all the plants biological processes to be accelerated. Just like a person that’s running, his/her body is more stressed, and will have accelerated metabolic rates than they would be if they were just walking. Plants are the same way, and wont function as well under stress. Then if one factor is lacking, like say oxygen levels to the roots, that compounds the stress level for the plants. Then if even just one important component is lacking, this could cause irreversible damage to be done. Even if it means using less light for your plants, keeping the temperatures at the optimum will reduce the plants stress level, and be beneficial to them.
 Root Zone Temperature Root Zone Temperature
Along with the plant canopy, pay attention to the temperature of the nutrient solution and root zone. The temperature of the root zone can be a unnoticed area that will greatly affect your plants. High and low temperatures in the root zone will also will stress out your plants. The optimum temperature of the nutrient solution is between 68°F and 75°F, and if the nutrient solution is in the optimal range, then your root zone will likely be in that range as well. Low temperatures in the root zone inhibit the plants from being able to get the nutrients they need to grow and be healthy. High temperatures in the root zone cause heat stress. Think of it like hiking in the desert on a hot day and being allowed to drink all the water you want, except that all you get to drink is hot water. Just imagine how refreshing that would be.
Distribute the Light Evenly
If your growing with MH and HPS lighting, use a high quality hydroponic reflector in order to maximize your lights efficacy. High quality reflectors will spread the light more evenly, and give you better light distribution. Even light distribution is important when growing inside, you don’t want one plant directly under the bulb to hog all the light, and the other plants to suffer from pour lighting. Look for reflectors that have charts that illustrate how the light is distributed, and choose a reflector that’s designed for the wattage bulbs your using. In some cases where there is a large area to cover, it may be better to use more smaller wattage bulbs that are spaced evenly around the plant canopy. If you have any concerns about weather your plants are getting the light they need, it may be worthwhile to invest in a light meter. A light meter can tell you exactly how much light the plants are getting at various points around the plant.
Get to Know your Plants
Pay attention to your plants, if your plants are not ready for increased feeding strengths or the next growing phase, you should wait until they are. Fallowing recommendations is a good start, but plants don’t know there supposed to grow according to a chart. Just because a chart says at 3 weeks you should change the nutrients from vegetative to bloom, doesn’t mean there ready for that. Environmental conditions are a big factor on how fast they actually grow,  so that’s a big factor on when there ready for changes. so that’s a big factor on when there ready for changes.
Determining when the plants are ready for the next phase of growth, as well as increased feeding strengths can take a couple of trial and errors to get right. Especially if it’s a plant variety that your not familiar with. Some plants grow much more once flowering has started, and others slow down or even stop growing after it starts to flower. So knowing when to induce flowering will be a factor on how productive they will be. If your unfamiliar with a particular plant, do some research on them and ask people who have grown them before about the in’s and out’s of growing them. Even if they are only used to growing them in soil there incite will be helpful. Typically hydroponically grown plants will develop at a faster rate than soil grown plants, but still grow the same way. Getting to know your plants is important.
Experimenting with your Plants
Sometimes when trying to be a better grower, or figure out a problem, we try to do to much at once. It’s fine to experiment with crops, but it’s not much good unless you can accurately evaluate the results. When experimenting with your plants be careful not to try more than one variable at a time, and allow sufficient time to see a change before coming to a conclusion about it. If you change a 400 watt bulb to a 600 watt bulb, and introduce a additive to the nutrient solution about the same time, you wont know how much if any change was due to each variable. If you are experimenting to find the optimal temperature for your plants and, change bulb wattage and/or lighting cycles, feeding schedules etc., again you wont know what change did what. Start with a tried and true method, and experiment one variable at a time to dial it in accurately.
 Plants need Love and Attention Too Plants need Love and Attention Too
Have you ever heard the term “made with love?” Well your plants need love and attention too, probably even more so. They cant speak, so they cant tell you when there suffering from disease, or stressed out from the environment. They cant even tell you if there being attacked by insects. They silently sit there suffering, and just try to do the best they can. However spend enough time with them and you will be able to notice the suttle signs they give when there unhappy, you will also be able to tell when there as happy as a songbird on a nice day with no cats in sight.
Most people garden because they love to do it, and/or have a passion for the particular crops they grow. We all have our good and bad days but if tending to your gardens becomes a chore, and your just in a hurry to get done tending to them, your plants will know it. If you just need more time to get other things done, you can enlist a trusted friend to tend to your plants part of the time. That would allow you to slip away for a while for other things, and the plants wont be neglected. Beer and pizza usually works on my friends.
Consider using beneficial’s
Weather you garden hydroponically or in soil consider adding beneficial microbes. These beneficial microbes add a layer of protection against pathogens and disease. They also use the growing medium as a breeding ground to reproduce and increase their numbers, much like a like a Bio-filter further protecting the roots. There are some beneficial’s specifically designed to inoculate hydroponic systems (works in soil as well), like bacillus, Pseudomonas, Trichoderma Fungi, and Mycorrhizae fungi. These are available in both liquid and dry form, and specifically formulated for hydroponics they wont clog up your hydroponics systems.
With all the different brands of nutrients on the market today, the question always comes up, witch ones to get for the best performance? But growing good, productive, healthy plants is more complicated than just simply picking a good quality brand of nutrients for the type of plants you want to grow. There are a lot of good quality nutrients on the market. But the first thing growers typically blame is the nutrients if they wind up with poor plant performance. Then they usually just decide to try another brand, and go on another quest looking for the best one. But before changing brands, there are some things to consider before blaming the nutrients for causing the poor plant performance.
First Tip
The first important factor is volume of your nutrient reservoir. That is deciding how many gallons of nutrient solution you need for each plant in the system, total in the reservoir. Larger plants use more nutrients and water than smaller plants do. So use your plants as a guide as to how much nutrient solution is needed to properly supply them with what they need. For instance for large plants like tomatoes you should estimate at least 2.5 gallons of nutrient solution per plant in the system. For medium size plants like peppers or basil estimate at least 1.5 gallons of nutrient solution per plant in the system. Then for smaller plants like strawberries or lettuce estimate at least 1/2 gallon of nutrient solution per plant in the system. Then multiply that by how many plants you plan to grow in order to give you a minimum reservoir size.
This is important because larger volumes of nutrient solution will have smaller fluctuations in their nutrient concentrations as the plants use them up. Basically this helps keep the nutrient solution evenly balanced as the plants deplete the nutrients from it. Also in warm/hot weather the plants transpire (use) more water than they do in cool weather. As the plants use up more of the water from the reservoir than usual, this concentrates the nutrients (EC levels) that are left in the solution. With smaller water volumes there is a much better chance of nutrient levels soaring to toxic levels/concentrations. Even when regularly topping off with fresh water to the original volume in smaller reservoirs, there is a lot of fluctuation of the nutrient concentrations that wont do your plants any good. cool weather. As the plants use up more of the water from the reservoir than usual, this concentrates the nutrients (EC levels) that are left in the solution. With smaller water volumes there is a much better chance of nutrient levels soaring to toxic levels/concentrations. Even when regularly topping off with fresh water to the original volume in smaller reservoirs, there is a lot of fluctuation of the nutrient concentrations that wont do your plants any good.
Second Tip
There are a lot of variables that can affect the amount of nutrients the manufacture recommends to use (dosage). Of coarse some trial and error here can be helpful to you in the long run, but you should start with what the manufacturer recommends. After all, they know their nutrients best. Some of the things that can affect the dosage that the nutrient manufacturer recommends to use are plants size (seedlings, small plants, heavy growth etc.), the plants growth phase (like vegetative growth or flowering/fruiting growth), type of growing medium (clay pellets, Coco cor, Perlite, Vermiculite etc.).
Even the type of system like recirculating or non-recirculating systems can make a difference. Most manufactures assume that your plants are going to be grown in favorable conditions, so they don’t always post directions for weather extremes for those people that grow outdoors. But like I mentioned earlier, the plants will take up more water in hot environments, and going a little under the recommendations (dosage) for hot conditions is generally recommended.
Third Tip
 When mixing your nutrients and/or additives, add all the water (at least 3/4 of it) to the reservoir first. Two and three part nutrients are separated for a reason. If you pre mix them in concentrated form or even small amounts of water first, some of the elements in the solution that were separated now have a chance to bond, and a white precipitate (calcium sulphate) may even be seen forming in the solution. By thoroughly mixing each concentrated part of the nutrient (and/or additives) one at a time into the larger volume of water will keep them diluted enough so they wont have a chance to bond together. If they do, they will become un-usable to the plants. When mixing your nutrients and/or additives, add all the water (at least 3/4 of it) to the reservoir first. Two and three part nutrients are separated for a reason. If you pre mix them in concentrated form or even small amounts of water first, some of the elements in the solution that were separated now have a chance to bond, and a white precipitate (calcium sulphate) may even be seen forming in the solution. By thoroughly mixing each concentrated part of the nutrient (and/or additives) one at a time into the larger volume of water will keep them diluted enough so they wont have a chance to bond together. If they do, they will become un-usable to the plants.
Forth tip
Keep your nutrients mixed up. For most systems this wont be much of a problem, using a air bubbler in the reservoir will easily keep the water moving. Also most systems that recirculate the nutrient solution should also keep the water mixed up enough. This keeps the mineral elements from settling and concentrating at the bottom. This also prevents areas/pockets of high or low pH levels, where the mineral elements then become unusable outside of the plants pH range.
Fifth Tip
Check your pH often. Plants are only able to uptake the nutrients in the solution if the pH is in the right range. After mixing your nutrients immediately check the pH, and adjust it if necessary. Then recheck it until it’s right. After that checking it daily would be recommended. Letting the pH go out of range will deprive your plants of nutrients, and allowing pH to rise above 6.5 can often cause the white precipitate to be seen in nutrient reservoirs also.
Conclusion
It’s not just having good nutrients that maters, it’s also how you use them that makes the most difference in their performance. By taking the time to regularly fallow a few basic guidelines, as well as checking the manufactures instructions, then fallowing their instructions correctly. You will be able to get the most out of any nutrients you choose to use. Growing good hydroponic plants requires a little more work than just pouring some water on a mound of dirt, but well worth the effort.
The search continues for the person or persons responsible for poisoning 7 million tomato seedlings, and nearly 16,000 tomato plants near Queensland, Australia. The 16,000 tomato plants were fruiting and about to be harvested when the poisoner struck, destroying 40 tonnes of produce. A numbers of capsicums, watermelons and eggplants were also killed as well. The saboteur poured an herbicide into the farms water supply. Two neighboring hydroponic farms were directly affected by the poisoning, Donnelly Farming (growers of hydroponic tomatoes), and Supa Seedlings (a large seedling grower). The poisoning of the water supply caused both farms to loose their entire crops. Even though only two farms were directly poisoned, the effects reach much farther, hurting about 30 of the areas 40 district’s farmers who had pre-ordered plants for planting and had them all wiped out. Many of the local growers rely on these seedlings for their plants.
The Queensland area is the largest producer of fresh tomato’s in Australia, and supply’s major city markets like Sydney, Brisbane and Melbourne, along with many smaller markets. The region grows 80% of the Australia’s September tomatoes. And with such a large percentage of the nations fresh tomatoes coming the Queensland region, the sabotage is likely to have nationwide consequences, resulting in spiking supermarket prices. In 2005, Queensland produced nearly 86,000 tonnes of tomatoes worth about $90.6 million dollars.
 But the cost to the region goes far beyond just the cost of the plants and rising tomato prices. Many farms that were expecting to be growing plants had to lay off workers, as well as company’s that expected to be picking, packaging, processing and even shipping the produce to markets were all heavily affected by the poisoning. The estimated cost to the region could climb to as much as $50 million dollars in reduced spending. But the cost to the region goes far beyond just the cost of the plants and rising tomato prices. Many farms that were expecting to be growing plants had to lay off workers, as well as company’s that expected to be picking, packaging, processing and even shipping the produce to markets were all heavily affected by the poisoning. The estimated cost to the region could climb to as much as $50 million dollars in reduced spending.
The Queensland’s Health department says that tomatoes from both of the property’s have been tested, and have been found safe for consumption. The tomato’s had no residue of herbicide that could be detected. They also said that they will continue to do testing for future crops. Although there are concerns about health implications because the poisoned water is also a part of their household water supplies as well.
Police are investigating the incident
The poisoning occurred in late June of 2010. Both of the affected properties use water from the same holding tank, and it’s been established that the herbicide was introduced into the water supply that both properties draw water from. Police are suspecting that the sabotage was an inside job because it had to have be done by someone with an intimate knowledge of irrigation systems. There are a lot of area farmers who have access to that creek, and a large number those farmers also draw water from the same creek as well. So it obviously had to have been done by someone that knew the area well, and how the pump systems worked. The saboteur/s snuck into the pumping station and injected a large amount of herbicide into a pipe system when the pump was engaged. From there the poisoned water went into the main lines that supply both of the property’s.
 Police have little to go on, but say they are determined to find the culprit. They have assigned a team of 12 investigators to the investigation. They are also offering a $200,000 reward for information leading to the arrest and conviction of the perpetrators. It’s rumored that police are receiving numerous tips, but they aren’t saying if any of them are panning out. They don’t want to speculate but have said all along that it could be as simple as just plane vandalism to someone that has a grudge against the farm, and/or even a attempt to influence the competition or markets. Police have little to go on, but say they are determined to find the culprit. They have assigned a team of 12 investigators to the investigation. They are also offering a $200,000 reward for information leading to the arrest and conviction of the perpetrators. It’s rumored that police are receiving numerous tips, but they aren’t saying if any of them are panning out. They don’t want to speculate but have said all along that it could be as simple as just plane vandalism to someone that has a grudge against the farm, and/or even a attempt to influence the competition or markets.
It’s also not the first time farms in this the area have been targeted, this is actually the third time crops in the region have been poisoned. In 2002, another Queensland Seedlings Nursery, just about a 10-minute drive east of where this year’s attack took place, was also targeted. That time resulted in about $6 million dollars worth of losses in seedlings. And in July 2006, as much as $1 million dollars worth of crops were destroyed when a poison was put into the water tank of an aerial spraying contractor. Naturally with so much financial damage, and with so much pressure to find the culprit, there’s naturally a lot of anger, as well as finger pointing, gossip and rumors. Things have even gone so far for one man that has had his neighboring farm raided by police, that he has felt the need to hire a public relations firm to speak out in behalf of his innocence after receiving threats.
What’s the world coming to where anybody would want to devastate so many lives. I just cant imagen what’s going through their mind, or how they could even live with themselves after doing such a thing. The scary thing is how such a simple act of putting something in the water supply can cause so much damage, and put so many lives at risk. Not to mention how easy it is to do and go unnoticed. I guess we can all learn something from it though. There are people out their that have no conscience, and sadly that’s the reality. And with all the other things there is to worry about, we have that to worry about now too. Gone are the days where we could just trust people.
|
|