A sample text widget
Etiam pulvinar consectetur dolor sed malesuada. Ut convallis
euismod dolor nec pretium. Nunc ut tristique massa.
Nam sodales mi vitae dolor ullamcorper et vulputate enim accumsan.
Morbi orci magna, tincidunt vitae molestie nec, molestie at mi. Nulla nulla lorem,
suscipit in posuere in, interdum non magna.
|
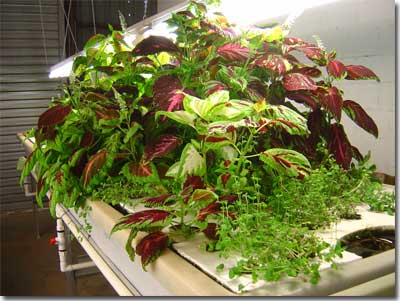
These days With the worlds population getting larger, and more and more city’s growing in size, this leaves less and less land to grow food with. As the farms that grow this produce become smaller and farther away from these city’s, this poses a big problem in getting enough fresh produce to these places in order to feed the people who live there. Not to mention the increasingly diminishing quality and nutrition of the produce being grown. As farmers are needing to turn to more chemical pesticides, hormones and genetically altered plants, in order to make every acre count. Also because the farms are so far away from the stores where they are sold, farmers are needing to pick the produce before it’s actually ripe, then use various means of artificial ripening on its way to the store. This just leads to bland, less nutritious produce.
In recent years there has been a lot of focus on being environmentally friendly and green. Previously regarded as unusable space, the landscape of the rooftops are being reclaimed for productive and sustainable purposes. Their is a huge trend in turning to urban rooftop gardens for sustainable living, could this be the future of urban farming? Well I cant tell the future, but these hydroponic rooftop gardens are sprouting up on many rooftops around the country, especially in large urban city’s. Both commercial and home gardeners alike are looking to be able make the most of the resources they have. Along with rooftops, home gardeners are even using any usable patio, balcony and deck space they can find for their gardens. Even backyards, basements and garages.
 Benefits of rooftop Gardens Benefits of rooftop Gardens
Besides taking advantage of all the unused space on the rooftops, there are some particular advantages. For one it helps cool the rooftop itself down, this uses less electricity to cool the building during summer months. The plants and greenhouse (if using one) block the direct sunlight that ultimately heats up the roof. Also if you can use solar power that’s so abundantly collected from rooftops in order to run the timers pumps and environmental control systems (if using them), you can create an even more efficient garden.
On the rooftop the plants can take full advantage of all the free direct sunlight. This reduces the cost of a hydroponic farming operation significantly. With a hydroponic farming operation (even a home garden) the largest cost is always the lighting, both in the cost of the lights and all the electricity needed to run the lights. The cost of the lights alone  generally cost more than it does to build the hydroponic systems. On the rooftop the plants will get full benefit from all the free direct sunlight, at the same time the plants help shade the roof from the sunlight. generally cost more than it does to build the hydroponic systems. On the rooftop the plants will get full benefit from all the free direct sunlight, at the same time the plants help shade the roof from the sunlight.
Also with a water collection system in place for collecting rainwater, you can take advantage of free rainwater, that would just otherwise just make it’s way down to the sewer system. This reduces the amount of water that the city water works need to process (that just costs taxpayers money). Not to mention the water company needs to charge money for water use, but by taking advantage of the free rainwater you can reduce your water bill while growing a sustainable urban garden to feed your family, that also reducing your food bill.
Long story short
 With all the benefits of being able to utilize previously unused natural resources, along with the need for replacing the diminishing farmland surrounding large city’s, its no wonder that rooftop gardens are on the rise. Hydroponic Rooftop gardens also minimizes weight while maximizing plant space and vegetable productivity. One rooftop does not have a lot of acreage, but by using the method of hydroponics you can still utilize this With all the benefits of being able to utilize previously unused natural resources, along with the need for replacing the diminishing farmland surrounding large city’s, its no wonder that rooftop gardens are on the rise. Hydroponic Rooftop gardens also minimizes weight while maximizing plant space and vegetable productivity. One rooftop does not have a lot of acreage, but by using the method of hydroponics you can still utilize this  space in an much more efficient way than any soil grown crops. There is vertically no downtime to using hydroponic systems between crops, no need to recondition soil, or rotate crops because of depleted minerals and/or soil born pests and/or diseases. space in an much more efficient way than any soil grown crops. There is vertically no downtime to using hydroponic systems between crops, no need to recondition soil, or rotate crops because of depleted minerals and/or soil born pests and/or diseases.
Once one crop is done, it only takes a matter of hours to pull the plants clean the system, refresh the nutrient solution and insert new plants that were already started by seeds many weeks earlier. In one day you go from the old crop, to a completely new crop by the end of the day. Even if you don’t have a suitable roof to be able to place your garden, when growing with the method of hydroponics, just about any space will do because you don’t need ground/soil to place the plants. A balcony is a great place to put a garden. Also you can design the system to custom fit your space, even if all you have to work with is just wall space. Like hanging a picture, you can hang a hydroponic garden.
Useful Links
8 greenhouses made using sustainable materials
Tapping the Potential of Urban Rooftops
Ecogardens
Urbangardensweb
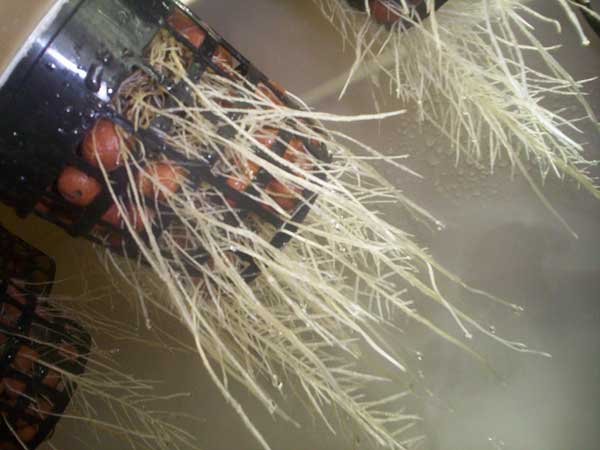
Growing Medium basically takes the place of soil in a hydroponic system. True the nutrients replace the soil in a hydroponic system, but the root system still needs to be able to support the weight of plant. A growing medium is the substrate that the roots grow into that allows the plants to be supported. When growing hydroponically, this substrate needs to be free from the mineral elements that are normally provided to the plants by the soil in soil grown plants, or it will cause nutrient problems in a hydroponic system. That’s the idea behind the growing medium.
Another purpose for growing medium, is moisture retention. This is the moisture that the growing medium can absorb when the system is flooded. When the system is drained it’s important that the medium retains some of the moisture, this way the plants can continue to drink up the water as well as the nutrients that are in the nutrient solution. How well it retains this moisture also plays a big part in your watering cycles. You don’t want to deprive the root system of the oxygen/air they need for healthy growth, but you don’t want to deprive them from moisture either.
Growing medium needs to have good drainage. Too much moisture in the root system can be a problem, well it’s actually the lack of air/oxygen to the root system (because of the excess water) that would actually be the problem, commonly referred to as over watering, and root rot. Some plants are more sensitive to excess water in the root  system than others are, this is normally referred to as wet feet. In other words some plants can tolerate wet feet more than others. So when deciding on the growing medium you plan to use, it would be a good idea to take into consideration how your plants tolerate wet feet for best results. Some plants cant tolerate dry feet much either, and depending on the growing medium that you use, it may need more frequent watering cycles. system than others are, this is normally referred to as wet feet. In other words some plants can tolerate wet feet more than others. So when deciding on the growing medium you plan to use, it would be a good idea to take into consideration how your plants tolerate wet feet for best results. Some plants cant tolerate dry feet much either, and depending on the growing medium that you use, it may need more frequent watering cycles.
Your growing medium should also be pH stable/neutral and can be checked by using a pH meter. If it’s not, you may be constantly changing the pH balance of your nutrient solution. Also being in direct contact with the plants root system, a unstable growing medium will most likely have a negative affect in the way the plants are able to absorb the nutrients in the nutrient solution. Most growing mediums that are sold specifically for hydroponics are going to be pH neutral/stable, you will just want to look into that aspect when using other materials.
Some of the most commonly used Growing Mediums
Grow Rock (Hydrocorn)
Grow rocks are a Lightweight Expanded Clay Aggregate (L.E.C.A.). This clay aggregate is formed into small pebble shaped rocks. This is made from a type of clay which is super-fired to create a porous medium. It’s also heavy enough to provide support for your plants’ root systems. Grow rocks are a non-degradable, sterile growing medium that will hold moisture. Hydrocorn is also recyclable, it can be cleaned, serialized and then reused. Although on large scale growing setup, cleaning and sterilizing a lot of Hydrocorn can be time consuming and tedious. Grow rock is often the growing medium of choice for novices and professionals alike because it’s easy to use, and reusable.
Rockwool
This is a sterile, porous, and non degradable medium. It’s primarily composed of a granite or limestone, which is then melted down and spun like cotton candy. The Rockwool is then compressed and formed into blocks, sheets, cubes, slabs, or flocking. Rockwool absorbs moisture without holding nutrients, and even when it is completely saturated it still generally retains around 20% air for the roots.
Perlite
 Perlite is primarily composed of minerals that are subjected to intense heat, then they expand and become very absorbent. This material is lightweight and can float to the top of the water when used all by itself in some situations, like in a flood and drain system. But it’s very porous and is used in a wide variety of hydroponic systems because of its ability to hold moisture and nutrients as well as air. It’s also easy to use and inexpensive. It works best in drip systems, especially when it’s added to other growing mediums. It adds moisture retention, and can then still support the plants weight. Perlite is primarily composed of minerals that are subjected to intense heat, then they expand and become very absorbent. This material is lightweight and can float to the top of the water when used all by itself in some situations, like in a flood and drain system. But it’s very porous and is used in a wide variety of hydroponic systems because of its ability to hold moisture and nutrients as well as air. It’s also easy to use and inexpensive. It works best in drip systems, especially when it’s added to other growing mediums. It adds moisture retention, and can then still support the plants weight.
Coco Fiber and Coco Chips
Coconut fiber is the first “organic” medium to offer high performance in hydroponic systems. Coco fiber has the  consistency of potting soil, and coco Chips have a larger particle size (much like wood chips for your BBQ/smoker). Coconut chips are made from the same material (coconut husks), but are in chunks so they don’t fall through the openings in the growing baskets the way coco fiber can. It also does not become as compacted, allowing better aeration to the root system. Coconut fiber/chips hold more oxygen than rockwool and is pH neutral. It usually comes as a compressed brick, then when it’s soaked in water, it expands to about 6 times its compressed size. Many growers find that a 50/50 mix of coconut fiber/chips and L.E.C.A is the perfect organic medium, but the coco fiber/chips are not reusable like the grow rocks. So they can be difficult to separate when it comes time to clean the grow rocks. consistency of potting soil, and coco Chips have a larger particle size (much like wood chips for your BBQ/smoker). Coconut chips are made from the same material (coconut husks), but are in chunks so they don’t fall through the openings in the growing baskets the way coco fiber can. It also does not become as compacted, allowing better aeration to the root system. Coconut fiber/chips hold more oxygen than rockwool and is pH neutral. It usually comes as a compressed brick, then when it’s soaked in water, it expands to about 6 times its compressed size. Many growers find that a 50/50 mix of coconut fiber/chips and L.E.C.A is the perfect organic medium, but the coco fiber/chips are not reusable like the grow rocks. So they can be difficult to separate when it comes time to clean the grow rocks.
Vermiculite
Vermiculite is Similar to perlite, except it has a relatively high cation exchange capacity (meaning it can hold nutrients for later use). And like perlite, vermiculite is very lightweight and has a tendency to float. So like perlitte it may not be the best choice to use in EBB and Flow (Flood and Drain) system, unless it’s mixed with other growing mediums. And like perlite, it’s quite suitable for drip systems.
Nutrient deficiency or toxicity symptoms often differ among species and varieties of plants. A nutrient deficiency occurs when the nutrient is not in sufficient enough quantities to meet the needs of the growing plant. Nutrient toxicity occurs when a plants nutrients are in excess and decreases the plants growth or quality. Nutrition in Hydroponics is a building block philosophy. Once you have low concentrations of one element, the rest react differently to other elements, and this can start a chain of lockout.
Chlorosis is the yellowing of plant tissue due to limitations on chlorophyll synthesis, and can be caused by many things. This yellowing can be generalized over the entire plant, localized over entire leaves or isolated between some leaf veins. Nutrient deficiencies may not be as apparent and with striking symptoms such as chlorosis on the plant, especially when a mild deficiency is occurring. However, significant reductions in crop yields can occur with such deficiencies, especially if it leads to blossom end rot and/or blossom drop. But some deficiencies and toxicities can only be detected with plant tissue analysis, however, experience with growing a specific plant species or variety can greatly help in distinguishing poor crop performance and possible nutrient deficiency symptoms from normal plant growth.
 Essential Tomato plant nutrient deficiencies and toxicities Essential Tomato plant nutrient deficiencies and toxicities
Boron deficiency, Blackened areas at tip of stem, which is stunted. Abnormally bushy looking plants. Terminal shoots curl, yellow and die. Fruit of severely affected plants may darken and die in patchy patterns. Toxicity, yellowing of leaf tips, leading to browning of the leaves.
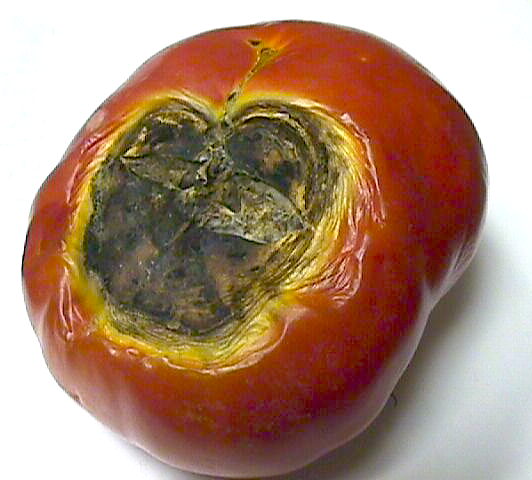
Calcium deficiency,Thick woody stems, slow growth, yellow upper leaves (not yellow lower leaves seen in N, P or K deficiency), weak, flabby plants. Blossom end rot of fruit. Cure: Correct Ca/Mg balance. Fluctuations seem to bring on blossom end rot. Toxicity, no visual symptoms because it can appear as a plethora of other deficiencies.
Copper deficiency, Stunted root and shoot growth, blue-green curled, flabby leaves, few or no flowers. Bordeaux mixture applied at fungicidal rates will work. Toxicity, reduced growth.
Iron deficiency, Spotted white areas on new leaves and upper parts of stem leading to spots of dead leaf tissue. New shoots may die if severely deficient. Toxicity, Is not usually a problem, but can have possible bronzing of leaves with tiny brown spots.
Manganese deficiency, Very slow growth; light green leaves with dead patches ringed in yellow. Poor fruit development and production with few flowers or fruit. Toxicity, stunted growth, older leaves have brown spots surrounded by a chlorotic circle or zone.
Nitrogen deficiency, Very slow growth of plants, followed by progressive pale green color moving from tip and young leaves back to more mature leaves. Leaves are small, thin, perhaps with purple veins. Stems eventually brown and dry off. Flower buds yellow and drop. Toxicity, dark green leaves with abundant foliage but little root growth or fruit production, flower drop, crops may fail to yield.
Phosphorus deficiency, Stunted plant growth and delay in plant development, purple tinged coloration on leaves, and small leaves that feel fibrous. Fruit set delayed. Toxicity, no recognizable symptoms, however excess phosphorus may cause micronutrient deficiencies, especially iron or zinc.
Zinc deficiency, Very long, narrow, yellowed leaves mottled with dead spots, and interveinal of yellowing on young leaves, as well as reduced leaf size. Toxicity, excess zinc may cause iron deficiency in some plants. commonly accompanied by chlorosis
Typical tomato plant problems
 Blossom end rot, See Calcium deficiency above. End of fruit, away from stem gets soft and mushy. Generally caused by a inadequate water availability to the root system, calcium mobilization problems. Blossom end rot, See Calcium deficiency above. End of fruit, away from stem gets soft and mushy. Generally caused by a inadequate water availability to the root system, calcium mobilization problems.
Blossom drop, Usually caused by inadequate water availability, and drying winds, but may be caused by sudden cold spells, heavy rains, N overdose, or heavy infections by bacteria or fungi.
Fruit crack, Surface cracks in fruits near stem end caused by rapid growth during periods of good moisture and high temperatures. Cracks can radiate around stem or encircle “shoulders” of tomato. May vary in depth. No cure, but even moisture availability to the root system will help prevent periods of slow, and then rapid growth. Pick fruits with rapidly developing cracks early (not fully reddened) to prevent Early Blight and other fruit rots.
Leaf roll, Rolling begins on lower leaves and proceeds upwards until most leaves are affected. Plants may lose leaves, particularly on staked plants. Seems to be caused by heavy pruning or deep, close cultivation.
Sunscalding, Occurs when green tomatoes are exposed to sun, most commonly in hot, dry weather on plants with leaf spot diseases or other defoliation.
Curly top (western yellow blight), Caused by the same virus as curly top of sugar beets. Seems to be carried by beet leafhopper. Main symptoms are curling and twisting of leaves of affected plants. Prevention is planting at times that may avoid high leafhopper populations, or excluding insects with row covers.
Useful Links
Color Pictures of Mineral Deficiencies in Tomatoes
Plant Nutrition
Emerging Virus Diseases of Greenhouse Vegetable Crops
Symptoms of Deficiencies and Toxicities by Element
Nutrient Functions and Deficiency Symptoms (25 page pdf.)
AeroGarden’s are becoming more and more popular, and some people swear by them. But are they worth the money? That’s really up to your personal preference. It’s a good way to learn the principals of what makes hydroponic systems work. It’s also a self contained everything you need in a box system. Although the AeroGarden is just basically a small aeroponic, flood and drain, or water culture type hydroponic system (depending on the model), that has an adjustable height florescent light. They usually start at about $100. That sounds like a good deal for a self contained hydroponic system, but is it really a good deal?
That really depends on how you look at it. Many people love them for growing small herb gardens, and for starting plants for other systems (inside or outside). But there not really functional for growing larger plants, so it really depends on what you want to grow. Their to small to grow anything of any real size, larger than herbs. The tallest AeroGarden’s give you about 3 feet maximum for the total plant height, and is only about 18 inches wide. Those run about $170. The problem with florescent lighting for tall plants is that only the top leaves will get the benefit of the grow lights. The bottom leaves wont receive enough light to grow well if at all. Simply because they are too far from the light source, also the upper leaves can block the light from getting to the lower leaves.
What makes an AeroGarden work?
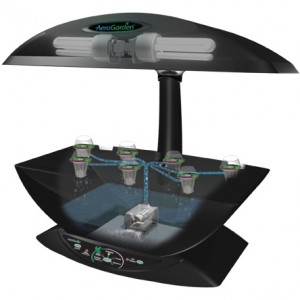 Like I mentioned before, it’s basically nothing more than a self contained aeroponic, flood and drain or water culture system depending on the model. But a small hydroponic system is easy to build yourself (even a large one). It probably wont look as neat, but will function just the same. In the AeroGarden hydroponic and aeroponic home gardens, the plant roots are suspended in the air above a reservoir of nutrient rich water. A pump delivers the nutrient solution via channels directly across the plant roots, and then drips back into the reservoir. Like I mentioned before, it’s basically nothing more than a self contained aeroponic, flood and drain or water culture system depending on the model. But a small hydroponic system is easy to build yourself (even a large one). It probably wont look as neat, but will function just the same. In the AeroGarden hydroponic and aeroponic home gardens, the plant roots are suspended in the air above a reservoir of nutrient rich water. A pump delivers the nutrient solution via channels directly across the plant roots, and then drips back into the reservoir.
The basic principal of hydroponic systems remain the same in any case, the roots get wet regularly with the nutrient solution. If grown indoors, it will need a light source like with the AeroGarden’s florescent grow light. You would also need a timing device for the pump that feeds the roots, as well as the on/off of light. This would involve 2 separate timers, unless you turn them on and off manually yourself.
You cant really beat the stylish looks of the AeroGarden, but if you feel comfortable building things, you can easily build your own garden if you understand how the six different (Drip Systems, Ebb-Flow, NFT, Water Culture, Aeroponics and Wick System) types of hydroponic systems work. You can also customize the system to accommodate the size, and number of plants you were planing to grow when you build your own systems. The downside is that you will need to piece the system together yourself. First you would need to decide what type of  system would be best for the plants you were planning, how it will be watered, and overall size of the full grown plant etc.. system would be best for the plants you were planning, how it will be watered, and overall size of the full grown plant etc..
Then you would need to decide if you were going to grow in natural lighting or if you wanted to build your own florescent lighting system. You could easily find a hood at a local hardware store, then outfit it with as many compact florescent grow lights (CFL’s) as you needed. Or you could find an inexpensive florescent tube fixture, and just replace the florescent tube with a high output florescent tube. Though again, florescent grow lighting may not work well for larger plants, say over about 2 feet. So if your planing to grow larger plants, you may want to steep up the lighting, or simply grow them in natural sunlight.
 Bottom Line Bottom Line
It really comes down to what it is you wanted to grow, if you feel comfortable building your own hydroponic system or not, and if the overall stylish looks of the AeroGarden are an important factor to you. Also the AeroGarden system monitors itself to create the ideal growing conditions for small plants, and it even alerts you when it’s time to add more water and nutrients. It does come with a florescent light, so even a low-light spaces is suitable.
For those who would like to just get started right away, without needing to research what makes a hydroponic system work, and/or don’t really want to need to piece things together to build there own system, the AeroGarden is a good way to get your feet wet. The AeroGarden is also a good choice for those who just want to grow some fresh herbs on their counter-top for cooking with. The ease of use factor is also a big plus for new hydroponic gardeners, and you really cant beat the stylish good looks of the AeroGarden systems. So it really comes down to your personal preferences.
Useful link
AeroGarden Reviews: What you NEED TO KNOW!
We all know that all life on planet earth is carbon based, that includes plants. The building blocks of all plants is carbon, as well as the bulk of what a they are made of. Carbon dioxide (CO2) is present at a concentration of approximately 350 ppm in the atmosphere. However, this is an average and the actual concentration in a given location can vary. Climatic changes can cause a 4 to 8 percent variation in CO2 concentration daily or seasonally due to increases or decreases in solar radiation, temperature, humidity and the passage of storm fronts.
What most people don’t realize is that do not receive their carbon from the root system like most of their nutrients. They actually get their carbon through the leaves and from the atmosphere. The atmosphere is about 3% carbon, so growing outside is not a problem. But carbon can be depleted from the air in the same way nutrients are depleted in the nutrient solution. Plants can deplete the CO2 in a closed greenhouse without adequate fresh air in a matter of hours, significantly reducing growth rates, especially with a large number of plants.
Light and temperature will also influence a plants respiration rate and in turn it’s CO2 intake. Exactly how much the light and temperature influences respiration has been reported to be anywhere from no effect at all, to four times more for every 10 degrees rise in temperature. Carbon intake depends on efficient photosynthesis, adequate respiration, and the proper balance between the two. But if the atmosphere surrounding the plants is lacking carbon, the plants wont be able to utilize it to their full potential. Plants enjoying elevated levels of CO2 can be expected to increase fertilizer and water consumption requirements.
Applying CO2
There are a couple of ways to add CO2 to the atmosphere, and although there are studies on its application in open areas like field crops, that’s quit impractical. Any breeze will just blow all your extra CO2 away. It’s much more practical to use it in enclosed areas like in a greenhouse, especially because a lot of plants in a small area will use up all the CO2 up fast. In a closed greenhouse in winter, or early in the morning before the vents open, plants can use up  enough carbon dioxide to slow photosynthesis and reduce growth, so replacing it then is quite beneficial. enough carbon dioxide to slow photosynthesis and reduce growth, so replacing it then is quite beneficial.
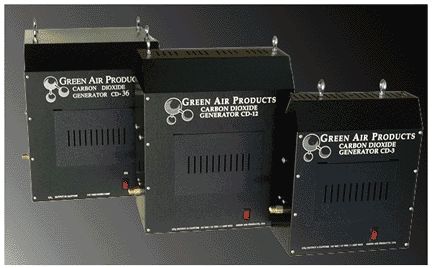
Specially designed CO2 generators are natural gas or propane burners hooked up to sensors. Large commercial growers often use the flue gases from a hot water boilers burning natural gas as a source of CO2. Commercially available CO2 generators offer the most economical, practical and consistent method of enriching indoor gardens. Especially when using them for large greenhouses, and with atmospheric control systems in conjunction with your CO2 generators. This ensures the most effective use of the fuel for applying the right amount of CO2, only when it’s needed.

You can also use bottled CO2 which can be obtained from most welding supply houses. It’s even used as carbonation for beverages, so stores that sell equipment to make your own beer may carry it, or at least may be able to let you know where to get it locally. It is important that the CO2 be free of contaminate gases, as some plants like tomatoes are extremely sensitive to many gases, especially ethylene.
Bottled CO2 is a less expensive form of CO2 application to start with. It involves the purchasing of the bottle, filling it with CO2, and adding line to run the CO2 out of. You can poke a few holes in the line, and place it in front of a fan to circulate the CO2 into the atmosphere, and manually turning the CO2 on and off. You can also use an atmospheric control system which would be much more efficient (as well as expensive).
Atmospheric control systems
Atmospheric control systems vary in price and functions. But they are essential in automating the proper CO2 levels of your greenhouse. They can also automate temperature, humidity, lighting, pumps, fans, etc. Control systems for CO2 will have a CO2 sensor, this detects the level of CO2 in the atmosphere in order turn it on and off, and enrich and  maintain optimum CO2 levels. Some will even have photo sensor, this allows it to shut off the CO2 outlet during periods of darkness when the plants are not using the CO2. maintain optimum CO2 levels. Some will even have photo sensor, this allows it to shut off the CO2 outlet during periods of darkness when the plants are not using the CO2.
Plants use all of the CO2 around their leaves within a few minutes leaving the air around them CO2 deficient, so air circulation is important. As CO2 is a critical component of growth, plants in environments with inadequate CO2 levels of below 200 ppm will generally cease to grow or produce. Growers should be cautious when experimenting with CO2 levels above 2000 ppm. CO2 is heavier than oxygen and will displace the O2 required by both plants and humans to function and live. OSHA’s maximum allowable levels for human exposure is 5000 PPM. So, air circulation and ventilation is important to a profitable CO2 enrichment system.
Useful links
Supplemental Carbon Dioxide
Do-It-Yourself Carbon Dioxide Injection
CARBON USE EFFICIENCY
Effects of Atmospheric CO2 Enrichment on Vegetative Productivity
This Ebb & Flow hydroponic design can be custom built for as many plants as you wish, but it would be recommended to build smaller setups, and place them in line with each other, in case in the future you don’t want to grow a lot of plants in the same hydroponics system. That way they would be more versatile.
Parts List
- 6 empty two litter bottles (cleaned and sterilized)
- 1/2 inch PVC tubing (3/4 inch if desired)
- 7 PVC elbow connectors
- 8 PVC “T” connectors
- 1 Threaded and barbed connector (to connect PVC tubing to vinyl tubing)
- 1 Threaded (on one end) PVC connector to connect the PVC tubing, to the vinyl tubing connector
- PVC glue and Primer
- Six 3/4 to 3/4 inch PVC connectors
- Six 1/2 inch to 3/4 inch adapter (if using 1/2 inch tubing)
- Epoxy glue (for gluing plastics)
- 1 Water pump
- 1/2 inch black vinyl tubing (or blue tubing from a hydroponics store)
- Minim 10 gallon storage tote for reservoir (15-20 recommended)
- Air pump (optional)
- Air line (optional)
- Air stones (optional)
- Black spray paint
- White spray paint
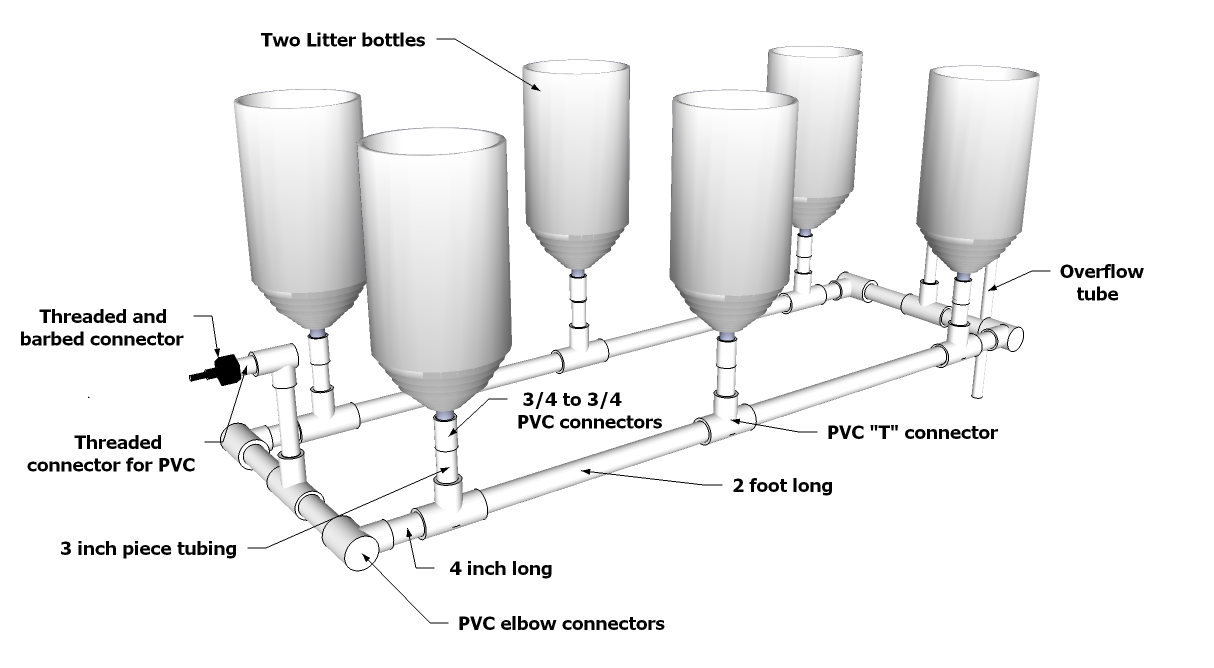
Two litter bottles for the growing chambers
 First cut the bottoms off of 6 two litter bottles. Then either drill or use a hot poker to make a lot of holes in the bottoms of the two litter bottles that you cut off. Flip the bottoms upside down then insert them all the way down into the tops of the bottles. No need to glue them, they will stay in place and make it easier to take out and clean for reuse. This is just to keep the growing medium from going down into the PVC tubing. First cut the bottoms off of 6 two litter bottles. Then either drill or use a hot poker to make a lot of holes in the bottoms of the two litter bottles that you cut off. Flip the bottoms upside down then insert them all the way down into the tops of the bottles. No need to glue them, they will stay in place and make it easier to take out and clean for reuse. This is just to keep the growing medium from going down into the PVC tubing.
Grind off just enough of the threads on the two litter bottles so they will fit into the 3/4 inch to 3/4 inch PVC connectors. Then glue the connectors to the bottles using the epoxy glue (for plastics). After the epoxy has dried wadded up a paper towel and place it into the other end of the connector so paint wont get in the throat of the bottles. Set the bottles cut side down, and paint and paint the outside of the bottles black (note: painting black will block light and keeps algae growth down). Once the black paint has dried, paint them again using white paint (note: white paint reflects light and helps to keep the temp of the nutrient solution, and root zone down).
Building the base of the system
The base of the system can be built with either 1/2 inch or 3/4 inch (or even 1 inch) PVC tubing, just make sure you have the right connectors for the size tubing you are using, and if using 3/4 inch tubing you can omit the “1/2 inch to  3/4 inch adaptor.” Now cut four 2 foot, four 1 foot, and four 4 inch pieces of tubing. We will cut the tubing for the fill and drain lines, and bottle connections later. 3/4 inch adaptor.” Now cut four 2 foot, four 1 foot, and four 4 inch pieces of tubing. We will cut the tubing for the fill and drain lines, and bottle connections later.
Now dry fit the tubing with the “T” and elbow connectors together (as in the image), don’t glue them yet. Now cut 8, 3 inch pieces of tubing. Place one in the “T” for each of the 6 bottle. Then one in the “T” for the water inlet, then place an elbow connector facing the direction you need the inlet to come from. Now place the last 3 inch piece in that elbow. Now place all 6 bottles in place and align all the tubing so everything is straight, and the bottles are straight up. Now take a marker and draw one line across all the connections, this way when you glue them together you can simply and quickly line up the marks before it sets.
 Now glue all the connections together, except the bottles themselves. That way you will be able to remove them for cleaning or any maintenance. Now connect and glue the threaded PVC connector for the inlet, and thread on the barbed PVC connector to connect PVC tubing to vinyl tubing. The inlet side is now complete. Now measure a piece of tubing so that it will come up to about 2 inches below the top of the upside down bottles, this will be the height of the water level in the system. Place this tubing in the overflow side, don’t glue any of the pieces in the overflow side so you can easily adjust the water height later if needed. Now place an elbow on it in the direction of the reservoir and measure and cut what you need to get the overflow the drain back into the reservoir. Now glue all the connections together, except the bottles themselves. That way you will be able to remove them for cleaning or any maintenance. Now connect and glue the threaded PVC connector for the inlet, and thread on the barbed PVC connector to connect PVC tubing to vinyl tubing. The inlet side is now complete. Now measure a piece of tubing so that it will come up to about 2 inches below the top of the upside down bottles, this will be the height of the water level in the system. Place this tubing in the overflow side, don’t glue any of the pieces in the overflow side so you can easily adjust the water height later if needed. Now place an elbow on it in the direction of the reservoir and measure and cut what you need to get the overflow the drain back into the reservoir.
The reservoir and pump
You can use almost anything for the nutrient reservoir as long as it will hold enough water and is light proof to prevent algae growth (you can paint it black, then white like the bottles if needed). I recommend at least a 10 gallon reservoir, although 15 to 20 would be better. I have used a 18 gallon storage tote that I can get at Walmart for under $4 for my reservoirs. Just place it in place then cut a hole in the lid for the overflow line, then cut a notch out of the side for the vinyl tubing and cord for the pump.
You can get a pump from any hydroponics store, or you can use a fountain and/or pond pump found at most home improvement store in the nursery department. Just make sure it has a filter. You wont need a large pump, the most important number is the head height, this is the maximum height the pump can pump up to. The pump should be able to pump at least twice as high as it will be pumping in order to get good water flow. When the pump shuts off the system will drain (syphon) back into the reservoir through the pump tubing.
Hydroponics is often associated with using artificial light to grow plants, though the term “ Hydroponics” simply means “Growing without Soil” and actually has nothing to do with any type of lighting. But a lot of people grow there hydroponic plants inside where there is no natural light, this is where the need for artificial light comes in. Not commonly thought about, but you can grow plants in soil with artificial light also. The use of artificial lighting is becoming more popular as growers become interested in shortening the time needed for their crops to reach maturity, and/or to have continuous plant production throughout the winter seasons.
The use of grow lights also allows you to control the length of the days (daylight) the plants receive if desired, this can result in faster more vigorous growth. Using artificial light also allows them cut back the length of the days, in order to trigger fruiting/flowering in some plants. The use of artificial “supplemental lighting” in greenhouses that generally use natural light is also useful during the winter months, in order to extend the daylight hours, by using them before the sun comes up, and in the evening when it begins to go down.
Deciding what artificial lights best for your plants can be complicated. It can also be very confusing as well, especially with the 100’s of thousands of grow bulbs on the market, and all the different types of lighting that are available. You even have your specific plants lighting needs to consider. Even how much heat your lighting system  produces, and venting that heat away can be a problem. Not to mention the energy costs of all of it. There are also four other variables that will further determine the overall light output and effectiveness of your lighting systems. Lamp wattage, mounting height, spacing, and the age of the bulbs (bulbs will loose some of there intensity (Lumens) as they are used and get older. The higher the wattage the higher the lamp output (Lumens), also the closer the light is to the plants the more lumens reach the foliage. produces, and venting that heat away can be a problem. Not to mention the energy costs of all of it. There are also four other variables that will further determine the overall light output and effectiveness of your lighting systems. Lamp wattage, mounting height, spacing, and the age of the bulbs (bulbs will loose some of there intensity (Lumens) as they are used and get older. The higher the wattage the higher the lamp output (Lumens), also the closer the light is to the plants the more lumens reach the foliage.
Choosing what type of artificial light to go with
When choosing an artificial light, it’s important to take into consideration the type of light that’s best for the particular plants you want to grow first. The spectrum’s of light, as well as the lights intensity (Lumens). Plants like lettuce don’t need the same light that pepper plants do. Lettuce plants generally do better in a low intensity light than they would in a high intensity light, and pepper plants like high intensity light. So it’s important to find out the lighting requirements of your plants first, or grow plants that are best suited to the lighting you already have. Here are the basic differences between types of lighting.
Metal Halide Bulbs (MH)
Metal Halide bulbs are probably the most widely used type of artificial lighting, and are recommend most by many gardeners. The reason is, it has excellent spectral distribution. Metal halide bulbs emulate bright summer sunlight and contain all the energy peaks at wavelengths of the visible spectrum. This means to plants good quality simulated sunlight and photosynthesis. Metal halide grow lights also have good lumen maintenance that translates into a long life expectancy (it’s decline in lumen output is very gradual). Metal Halide is about the best bulb technology that’s available for achieving the highest level of plant and flower growth. They allow the flexibility of multi-crop, multi-season indoor gardening.
High Pressure Sodium Bulbs (HPS)
High pressure sodium bulbs are the only bulbs that can really compare with metal halide bulbs. They have good spectral distribution, but cannot compare to halide bulbs in the blue end of the light spectrum, and metal halide bulbs cant compete with Sodium bulbs in the red end of the spectrum. Sodium bulbs are much higher in the yellow and red ends of the spectrum. This is the type of light that fruiting and flowering plants like best. But because HPS bulbs focus more on the red spectrum, some plants grown with only sodium lights can become elongated and leggy. 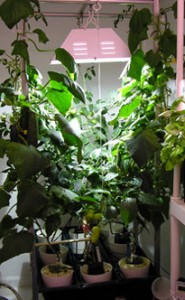 Sodium lights do on the other hand, stimulate flower and fruiting more effectively than metal halide alone. So their an important light source that’s best used in conjunction with metal halide, either in addition to, or cycled together. Sodium lights do on the other hand, stimulate flower and fruiting more effectively than metal halide alone. So their an important light source that’s best used in conjunction with metal halide, either in addition to, or cycled together.
LED Grow Lights
Plants seem respond well to LED lights similar to fluorescent’ lights. They generally result in a tight inter-nodal growth, and short stocky, strong plants. The plants do look a little different, the leaves can tend to curl down, but are usually thicker and a more healthy shade of green. Vegetative growth tends to be a little slower compared to MH and HPS lights, but seem to be healthy and progress normally. Fruiting and flowering is also slightly slower but healthy. One LED UFO will come very close to the best results you could achieve with a 400 watt HPS and it uses only 1/4 of the electricity, plus it doesn’t generate any heat. But LED’s are NOT the best choice for big plants however, that’s because they loose light intensity quickly the farther away the foliage is from the light source.
High Output Fluorescent’s
T5 high output fluorescent tubes produce very little heat which lets you position them closer to your plants in order to raise light intensity to the foliage. High output fluorescent’s are great for seedlings and cloning. T5 high output fluorescent’s put out 5000 lumens per tube and have solid state electronic ballasts that do not emit heat, noise or vibration. Although they cant compare to the light output of MH and HPS bulbs, and are not the best choice for tall plants, because they also loose light intensity quickly the farther away the foliage is.
Compact Fluorescent lights (CFL’s)
CFL’s are a lot like the high output florescent, but work best in small spaces as they do not produce much heat or use much electricity. For fruiting or flowering plants, the 2700K warm bulbs are best. For plants taller than a foot, regular fluorescent tubes can be supplemented on the sides of the plants to increase light intensity. When using CFL’s, you should remember to use the actual wattage (NOT their wattage equivalents) when calculating how many watts you need for your plants.
Generally speaking, the plants root system is the best way of absorbing nutrients for the plant. But some conditions can prevent the uptake of some nutrients. When plants are stressed and/or have suffered from root damage or loss, they can suffer from nutrient deficiency’s as well. Even environmental conditions like temperature, insufficient oxygen levels in the root zone, light and humidity all can affect nutrient uptake through the roots. Even plant pathogens can either directly, or indirectly affect nutrient uptake. But foliar fertilization is not just limited to deficiency’s, even healthy plants can benefit from foliar fertilization.
Foliar feeding enables plants to absorb nutrients directly through the leaves, so it’s a particularly useful method of nutrient application. Once the plants have absorbed the nutrients through the leaves, the minerals can then be translocated by the plant within the plants tissue. Foliar feeding has been found to be quite effective in ensuring reliable nutrient uptake and healthy plant growth. This also helps protect your crops yield, and quality because the healthier the plant, the better it can resist against disease.
Nutrient uptake by plants is a very complex process
 The stomata normally function to enable gas exchange for photosynthesis and releasing water vapor in transpiration. But the leaf can also work as an organ for absorption, and is effective in excreting water and substances that were dissolved in that water. There are many things about foliar fertilization that are not really understood yet, therefor it’s not an exact science, but quite helpful. One way to tell if a fertilizer has been effective is to squeeze juice from the leaves of plant and to test it with a refractometer. The stomata normally function to enable gas exchange for photosynthesis and releasing water vapor in transpiration. But the leaf can also work as an organ for absorption, and is effective in excreting water and substances that were dissolved in that water. There are many things about foliar fertilization that are not really understood yet, therefor it’s not an exact science, but quite helpful. One way to tell if a fertilizer has been effective is to squeeze juice from the leaves of plant and to test it with a refractometer.
If after spraying with foliar fertilizer the amount of light refracted significantly rises, then foliar application has worked. To increase effectiveness of foliar fertilizers, it’s usually recommended to use a spray enhancer to help the nutrients stick to the leaf and to penetrate the waxy sheen of most leaves. For the best results, foliar feeding should be carried out on a regular and/or weekly basis. Foliar feeding is particularly beneficial in times of high nutrient demands like during fruiting, and heavy flowering or foliage growth.
Organic gardeners sometimes use foliar feeding. Because in their effort to replenish the nutrients with organic nutrients, and keeping in line with natural and healthy, they often find themselves unable to provide trace elements to plants in sufficient quantity, especially with what’s available to them in a form that is organic. Feeding through the leaves can sometimes allow these gardeners to add some of these nutrients directly to the plant as well as the soil, for stronger healthier plants.
Applying Foliar Fertilizers
 The effectiveness of foliar feeding can be a controversial subject, and has many factors. It’s just as complex as the nutrient uptake from the root system., if not more so But complexities aside, foliar fertilization is becoming more and more commonly used as a way to enhance plant nutrition, even for the home hydroponics gardener. It would be impossible to give exact foliar feeding requirements for any plant type, as well as all the complex variables, there are a few important things to consider that will affect the rate and effectiveness of the foliar fertilizers that are applied. These will have a big effect on the way the nutrients are absorbed by the leaves and then translocated within the plant. The effectiveness of foliar feeding can be a controversial subject, and has many factors. It’s just as complex as the nutrient uptake from the root system., if not more so But complexities aside, foliar fertilization is becoming more and more commonly used as a way to enhance plant nutrition, even for the home hydroponics gardener. It would be impossible to give exact foliar feeding requirements for any plant type, as well as all the complex variables, there are a few important things to consider that will affect the rate and effectiveness of the foliar fertilizers that are applied. These will have a big effect on the way the nutrients are absorbed by the leaves and then translocated within the plant.
- The finer the mist droplets the better. A real fine mist using a hydroponic fogger will give good coverage of the surface area. The foliar fertilizer solution should then be applied as a fine mist until it begins to run off the leaves, and the entire leaf surface is wetted.
- Both the top and bottoms sides of the foliage should be sprayed. Both sides of the leaves will be able to absorb the nutrients. some more than others.
- The use of a good quality, non ionic wetting or sticking agent is important for good foliar feedings. Wetting agents are important in the aiding of the adherence of the water droplets when applied by the hydroponic mister. Especially on difficult to wet leaves, as well as assisting with the absorption of the fertilizer solution into the plant leaves. It wont be able to do much good if it just slides off.
- The time of day when the solution is applied is also important. Spraying in early morning is best while it’s light, but temperatures are still cool. Also in the evening, but the conditions allow the leaves to dry off rather than stay wet for an extended length of time. That can lead to fungal infections from constant moisture on leaves.
- Foliar solutions should not be applied during hot, bright conditions. If the plants are wilting or under water stress, the plants stomata are likely to be closed as a survival instinct. Trying to conserve moisture, making the application ineffective.
- Often the greatest response to foliar feeding will occur during high active growth phases of plants like fruiting, and heavy flowering or foliage growth. During these periods of exceptional active growth, leaves are likely, and are generally most effective in absorbing nutrients.
Useful links
Foliar Fertilization In Hydroponics
Foliar fertilization
Most hydroponic growers assume that the crystal clear odorless water they get from their tap is pure water, so therefor should be perfectly safe for their hydroponic systems. After all, it’s safe for people to drink why not their plants, and who has herd of water quality being an issue in soil gardens either. Often persistent problems in hydroponic systems can be traced back to the water supply.
Water is the only transportation source for the nutrients and other additives to get to the root system of the plants. So the water supply quality is an important factor to consider for plants grown hydroponically. Plants are more sensitive to certain water treatments than people are, so there are often things left in the “Safe Drinking Water” that are a problem for your hydroponic plants. Not all water is created equal, tap water, reverse osmosis (RO), distilled, rainwater, well water, lake/pond and even stream water all have their advantages and disadvantages.
Problems with Tap and City Water
The municipal city water supply standards for drinking water vary from place to place. These often have chemicals added to bring them up to drinking standards. These drinking water standards apply to making water safe for people to drink, but not necessarily safe for hydroponics. Salt (sodium chloride) may also be in the water supply. Sodium is toxic to plants and even in small amounts can accumulate in recirculating hydroponic systems, causing major growth problems.
City water often use chlorination to control bacteria levels. Fortunately chlorine will dissipate quite rapidly, and you can usually smell high levels of chlorine. This can be taken care of by placing the water in a open aerated holding tank and allowing 2 to 3 days for the chlorine to dissipate before mixing up the nutrient solution. City water may also contain herbicides, these can be very damaging to hydroponic plants. Carbon filtration will be able to remove most of these contaminates, as long as the filter is changed often enough.
Usable plant elements like Nitrate, Magnesium, Potassium, sulphur, Boron, Copper, Manganese and Zinc can all be present in most water sources. Hydroponic nutrient manufactures take this into account when manufacturing them. But these can all be present in different amounts, and/or not at all, this will effect the overall composition if the nutrient solution, and thus the plants growth. The only way to have the perfect nutrient solution is to have the water tested and a nutrient solution made specifically for your plants and water supply combined.
Problems with Pond, Lake, Stream and Rain Water
 Well water, lake water, pond and stream water, may all likely have bacteria and soil-born pathogens in them that are not good for your hydroponic plants. They can cause a variety of diseases to your plants, and can be difficult to get rid of. Chlorination as a water treatment is probably the most common form of treatment, although you will need to all the chlorine to dissipate before use. Hydrogen Peroxide is also effective as a sterilization procedure, but should be allowed to dissipate before use. Hydrogen Peroxide in larger amounts can also be damaging for plants. Although in smaller quantity’s like 1 teaspoon (5ml) per gallon of water can actually be beneficial to the plants, by adding extra dissolved oxygen into the nutrient solution. Beneficial microbes can also help in suppressing the unwanted plant pathogens, because they feed on the unwanted ones. Well water, lake water, pond and stream water, may all likely have bacteria and soil-born pathogens in them that are not good for your hydroponic plants. They can cause a variety of diseases to your plants, and can be difficult to get rid of. Chlorination as a water treatment is probably the most common form of treatment, although you will need to all the chlorine to dissipate before use. Hydrogen Peroxide is also effective as a sterilization procedure, but should be allowed to dissipate before use. Hydrogen Peroxide in larger amounts can also be damaging for plants. Although in smaller quantity’s like 1 teaspoon (5ml) per gallon of water can actually be beneficial to the plants, by adding extra dissolved oxygen into the nutrient solution. Beneficial microbes can also help in suppressing the unwanted plant pathogens, because they feed on the unwanted ones.
Rain water (depending on how and where it’s collected and stored) may contain contaminants also. Areas with high pollution regularly produce acid rain, this is a result of the raindrops collecting and holding onto the pollution on it’s way from the clouds to the ground. Rainwater collected from a galvanized iron roof and/or rain gutters may contain high levels of zinc. Water stored in new cement tanks may have minerals in it that have leached into it from the cement. Rainwater should be tested to check for possible problems.
Reverse Osmosis (RO), Distilled and Water Softener Water
A lot of water sources are considered hard water. Hard water can cause multiple problems, besides the added minerals. High levels of iron, calcium, lime scale and other elements when they make contact with solid objects like pumps, tubing, heating elements and drip emitters, it will begin to scale up. This causes many problems with things clogging, stop working, it can even cause pH problems.
Hard water can be cleaned using water softeners that use a ionizing resin that back flushes through salt. Although this process adds a small amount of sodium (salt) to the water which is toxic to plants, and as it builds up can be a  big problem. Smaller computerized water conditioning units that are designed to prevent scaling for home use, would be better in the long run. Reverse Osmosis (RO) systems will be able to take out the contaminants without adding sodium to the water, however most RO systems designed for the home only produce a gallon or two per hour. Though there are RO systems that can provide 100-200, and even 700 gallons per day. Depending on the RO system, filter changes, RO systems may be able to provide a almost distilled water quality. big problem. Smaller computerized water conditioning units that are designed to prevent scaling for home use, would be better in the long run. Reverse Osmosis (RO) systems will be able to take out the contaminants without adding sodium to the water, however most RO systems designed for the home only produce a gallon or two per hour. Though there are RO systems that can provide 100-200, and even 700 gallons per day. Depending on the RO system, filter changes, RO systems may be able to provide a almost distilled water quality.
Distilled is truly pure water and free from any bacteria and pathogens, but it’s also free of all trace elements that pre-manufactured nutrient solutions have expected to be in the water, so they have compensated for that. Clean pure water will give your hydroponic plants the best start in being healthy from the beginning, and even when using a better quality water source when problems have been noticed can results in significant improvements in the plants health, and growth.
Most new people to hydroponics (newbies) tend to get over whelmed by it all. Is hydroponics complicated? It can be if you try to take on to much at the very start. In fact, it can be quite simple. If you have ever grown plants in soil you can grow plants using hydroponic systems. True it’s not quite as simple as just pouring water on them, and away the grow. Though you certainly don’t need a collage degree, or need to be a chemist either. What makes it so easy?
There are really just a few things you need to consider when just starting out. Plant nutrition (nutrients/fertilizers), lighting, pH level, type of system, temp (both the top, and root zone), humidity and whether your plants are compatible with your conditions. Plants are quite tolerant of most varying conditions. So will your plants die if one changes a little? No, not at all. Sure they will do better under the perfect conditions, but the change would need to be quite severe for the plants to die. Everyone wants the prefect plant, but just like with soil grown plants there are varying conditions that will affect how well the plants will do, but the plants will adjust as best as they can.
The type of system doesn’t matter too much, most plants will do fine in all of them. Although you should design your hydroponic systems with your plants in mind. Taking into consideration where it will be placed, how big the plants will get and easy maintenance. The air temp should be taken into consideration, finding out what type of climate they like and try to mimic that. If growing outside, pick plants that grow well for your season. Most plants will do well in a large range of humidity conditions, but high humidity and not enough airflow around the plants could result in the plant getting diseases.
Nutrients/Fertilizers
In any type of hydroponic system, all the micro and macro (simple way of saying major and miner) nutrients the plants need for growth must be supplied through a hydroponic nutrient solution. This is the fundamental principal of hydroponics (growing without soil), because with soil grown plants they would get these nutrients directly from the soil. Carbon, hydrogen and oxygen are absorbed from the air and water. The macro nutrients are those needed in relatively large amounts, they include, nitrogen (N), phosphorus (P), potassium (K), calcium (Ca), magnesium (Mg), and sulfur (S). Micronutrients (or trace elements) include, iron (Fe), manganese (Mn), boron (B), molybdenum (Mo), zinc (Zn), copper (Cu), and chlorine (Cl). These are used in very small amounts by plants, that’s why their referred to as “micronutrients.”
What makes all this easy, is that all the elements needed for successful hydroponic growing are available pre-mixed from, and from many different hydroponic supply companies. So in other words, you simply don’t need to worry about all of that chemistry. New hydroponic gardeners should simply use these commercially available mixes, rather than trying to prepare and figure out their own nutrient solutions. These pre-mixed formulas come in three general forms, Grow formula, Bloom formula and Continuously flowering/fruiting plant formulas.
“Grow” formulas are for the vegetative stages (foliage, not flowers), “bloom” formulas are for the flowering stage (when they begin to flower), and “continuously flowering/fruiting” formulas are for plants that do both at the same time like strawberry’s, tomato’s and peppers. Just make sure the nutrients you are using are for hydroponics, and not soil. Soil nutrients wont have all the micronutrients you need in it. Nutrient temp is often overlooked but it’s important, just get a small inexpensive fish tank thermometer and check it regularly. You want it to be between 65 and 72 degrees to mimic the root zone in there natural (soil) environment.
pH Testing Simplified
Controlling pH is simple, pH testing kits can be bought for as little as $8 in the form of pH drops. Using the drops is more advisable for the beginner, as compared to buying a pH test meter. It’s much less expensive, but also you don’t need to worry about calibrating it to get accurate results. Learning to read the color is easy, and because you don’t need to be at an exact pH like 6.8 all the time, but rather within a range like 6 to 7 the drops will do just fine.
Now that you know what the pH is at, getting it in the right range is easy using pH adjusters. pH adjusters come in two forms (liquids, and dry powders). Both come in “pH up” and “pH down.” There is a little learning curve to learning how much to add, but this is quick and easy to learn. If the pH tested to low, just add a small amount of pH up until it’s in the right range. If it tested to high, just add a little pH down until it’s in the right range. You should test the pH every couple of days, so you know it will always be in the right range. Most all plants will do good at around 6, or within a range of 5.5 to 6.5.
Lighting
 The subject of artificial light, or grow lights can get complicated, and everyone seems to have different opinions and preferences. There are a wide variety of artificial lighting options to choose from, making it even more difficult. Metal Halide (MH), High Pressure Sodium (HPS), LED Grow Lights, High Output Fluorescent, as well as Compact Fluorescent lights (CFL’s). There are also what are claimed to be all spectrum bulbs, they claim to have all the spectrum’s of the suns light in one bulb. The subject of artificial light, or grow lights can get complicated, and everyone seems to have different opinions and preferences. There are a wide variety of artificial lighting options to choose from, making it even more difficult. Metal Halide (MH), High Pressure Sodium (HPS), LED Grow Lights, High Output Fluorescent, as well as Compact Fluorescent lights (CFL’s). There are also what are claimed to be all spectrum bulbs, they claim to have all the spectrum’s of the suns light in one bulb.
But the last form of light is often forgotten about, it’s simply natural light (the sun), this is my favorite. Natural light truly has all the spectrums of the suns light, and with the right intensity. Best of all, no need for expensive lighting equipment because natural light is free to everyone. But for those who still want to use artificial light, I’ll try to break it down to simplify them.
- Metal Halide Bulbs emulate bright summer sunlight, and are probably the most commonly used. They focus on the blue end of the spectrum, but give good results and most all plants will do well with Metal Halide Bulbs. They do get hot, so they need to be well ventilated and spaced so they don’t burn the plants.
- High Pressure Sodium Bulbs are the only grow lights comparable to metal halide bulbs. They focus more on the red end of the spectrum. This is the type of light fruiting and flowering plants like best. Because of the focus on red light, some varieties of plants grown with sodium lights alone can become elongated and leggy because they need more light from the blue end of the spectrum than the sodium lights provide.
- LED Grow Lights are the newest to the market in hydroponics, thus probably more expensive. They use about 1/4 the electricity, and don’t produce a lot of heat like the Halide and Sodium Bulbs do. Vegetative growth is a little slower compared to a 400 watt HPS and fruiting and flowering is slightly slower also, but healthy and strong. LED lights come in different spectrum’s (blue, red) also. Both spectrum’s should provide the best results.
- High Output Fluorescent’s like T5’s and T8’s produce very little heat which lets you position them closer to your plants to raise the light levels. T5 high output fluorescent’s put out 5000 lumens per tube (at the bulb). The lumens levels drop quicker with fluorescent the farther away the plants are than they would with Halide or sodium lights.
- Compact Fluorescent lights (CFL’s) these do not produce much heat or use much electricity either. CFL’s have the ballast inside the bulb instead of in the light fixture, making them small and compact. These come in two spectrums 6500K and the 2700K. The 2700K warm bulb tends to work best for most plants. CFL’s don’t put out a lot of lumens (their intensity), thus you will need to use many in close quarters of each other, and for plants taller than a foot, regular fluorescent tubes can be supplemented on the plant sides because the light wont penetrate the foliage very far. CFL’s tend to work best for small plants, seedlings and for low light requiring plants like lettuce.

|
|
 Benefits of rooftop Gardens
 With all the benefits of being able to utilize previously unused natural resources, along with the need for replacing the diminishing farmland surrounding large city’s, its no wonder that rooftop gardens are on the rise. Hydroponic Rooftop gardens also minimizes weight while maximizing plant space and vegetable productivity. One rooftop does not have a lot of acreage, but by using the method of hydroponics you can still utilize this
  space in an much more efficient way than any soil grown crops. There is vertically no downtime to using hydroponic systems between crops, no need to recondition soil, or rotate crops because of depleted minerals and/or soil born pests and/or diseases.